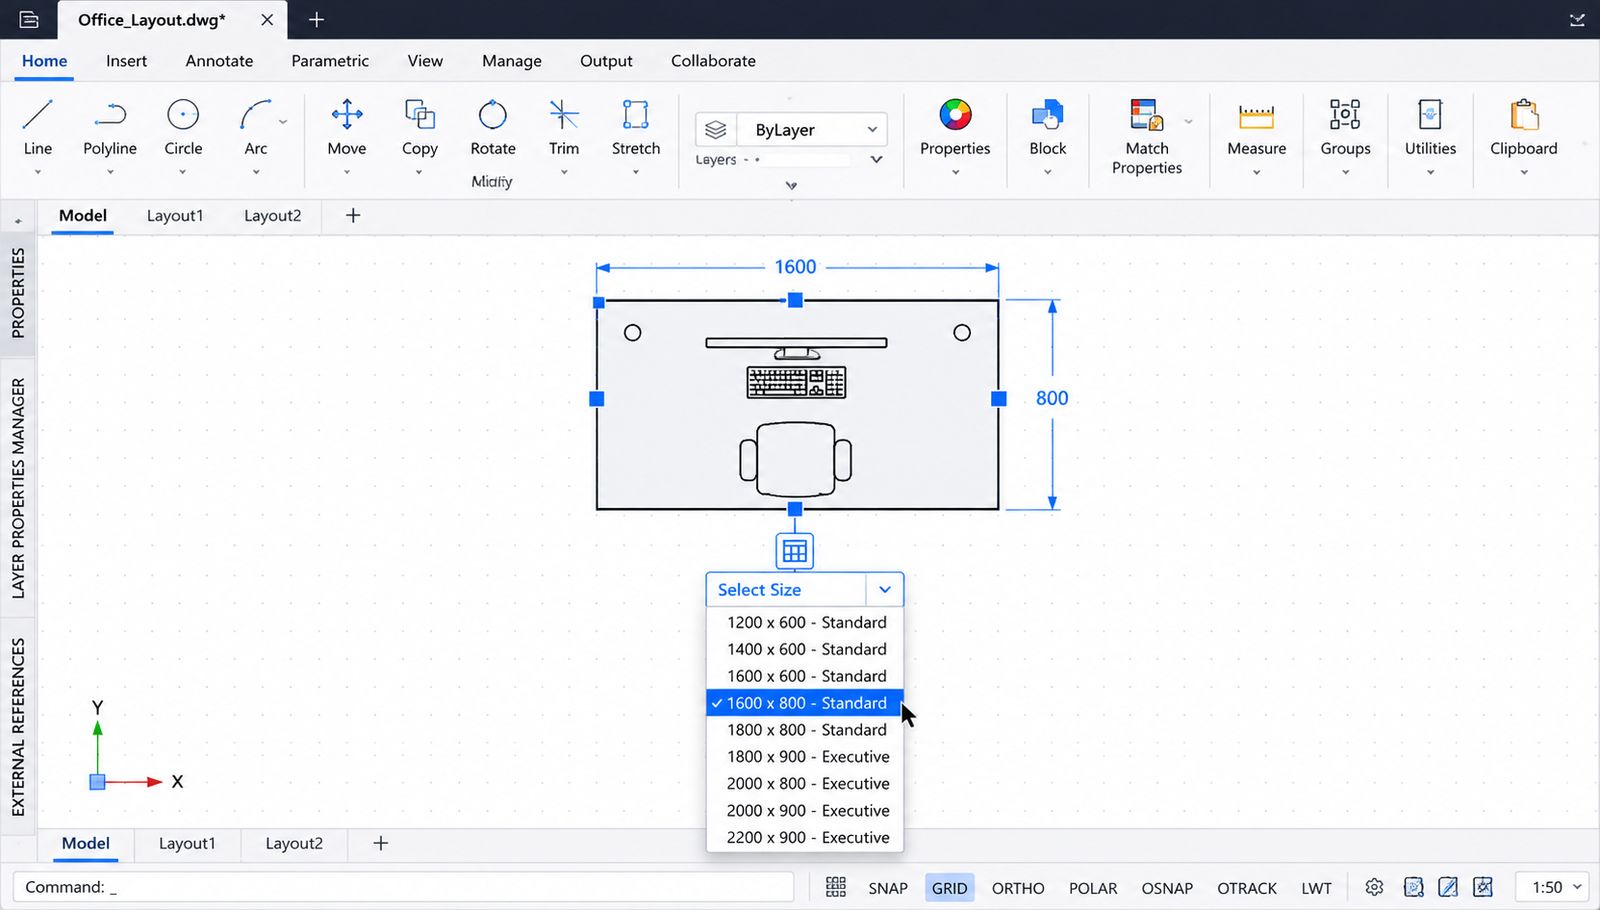
AutoCAD’s dynamic blocks are one of the most powerful productivity tools in the software, allowing a single block definition to represent dozens or even hundreds of variations through parameters and actions. But even among experienced AutoCAD users who are comfortable with stretch, scale, and visibility parameters, lookup tables remain one of the least understood and most underused features of the dynamic block system.
A lookup table takes a dynamic block to a completely different level of usability. Instead of users having to manipulate grips, type specific values, or know the exact dimensions of a component they are placing, a lookup table presents them with a simple dropdown list: select ‘M8 Bolt’, or ‘Type A Door’, or ‘600mm Wide Desk’, and the block automatically sets all associated parameters to the correct values simultaneously. One selection drives everything.
This guide explains AutoCAD dynamic block lookup tables from the ground up. It covers what they are and why they are useful, the conceptual building blocks (lookup parameters versus lookup actions), how to create a single-parameter lookup table step by step, how to build a multi-parameter lookup that drives multiple block properties from one dropdown, the Allow Reverse Lookup setting that confuses almost every user who first encounters it, how to extract lookup data for bills of materials and parts lists, and a full troubleshooting reference for every common problem.
| Quick Answer: A dynamic block lookup table in AutoCAD is a table inside a dynamic block definition that maps a named entry (e.g. ‘M10 Bolt x 50mm’) to a specific set of parameter values (e.g. Diameter = 10, Length = 50, Head Height = 6.4). When a user selects that entry from the block’s grip dropdown, AutoCAD automatically applies all associated parameter values simultaneously. It is created in the Block Editor using a Lookup Parameter and a Lookup Action. |
What Is a Dynamic Block Lookup Table and Why Use One?
In the context of AutoCAD dynamic blocks, a lookup table is a structured internal table that associates named text entries (the list items a user sees in the dropdown) with corresponding values for one or more block parameters. It is the mechanism that converts a block from something a user manipulates by dragging grips to something a user selects from a predefined list.
Think of a lookup table as the dynamic block equivalent of a product catalogue. A block representing a structural steel section might have a lookup table containing every standard section size: UC203x203x60, UC203x203x71, UC254x254x89, and so on. The user selects the section from the dropdown, and the block instantly updates to the correct flange width, depth, and web thickness , all values set simultaneously from a single selection.
The Problem Lookup Tables Solve
Without a lookup table, a dynamic block user faces one of two sub-optimal workflows. Either they drag grips and hope they snap to the correct values, or they type exact values into the Properties palette manually. Both approaches are slow and error-prone, especially when blocks represent components with manufacturer-standard dimensions that must be exact.
A lookup table eliminates both problems. It constrains the block to only valid, predefined configurations and presents those configurations in a human-readable named list. The user never needs to know the exact numeric values , they just pick the configuration they need.
Read related article on How to Sort Tables in AutoCAD
When to Use a Lookup Table vs Other Dynamic Block Features
| Situation | Best Approach | Why |
| Block has 2-3 continuous size variations that users need to set to any value | Linear/scale parameter with value sets or increment | Lookup table adds unnecessary complexity for simple continuous size changes |
| Block has a fixed catalogue of named configurations (e.g. standard hardware, furniture sizes) | Lookup table | Best: presents named options, ensures only valid configurations are used, drives multiple parameters at once |
| Block needs to show/hide different geometry based on a selection | Visibility states | Visibility states are specifically designed for geometry show/hide. Lookup tables control parameter values, not direct visibility. |
| Block has named configurations AND geometry differences (e.g. door type with different swing geometry) | Lookup table + Visibility states combined | Use lookup for dimensions, visibility states for geometry changes, link them via the lookup table |
| Block configuration depends on 3+ parameters that all change together | Lookup table with multiple property columns | Only a lookup table can drive multiple parameters simultaneously from one selection |
Lookup Parameter vs Lookup Action: Understanding the Two-Part System
The single most common source of confusion for users learning dynamic block lookup tables is not understanding the relationship between the Lookup Parameter and the Lookup Action. These are two separate objects placed in the Block Editor, and both are required. Neither works without the other. Understanding what each one does makes the entire workflow logical.
| Object | What It Is | What It Does | Visible to User? |
| Lookup Parameter | A parameter added from the Parameters tab of the Block Authoring Palette | Provides the grip (dropdown handle) that users see and interact with when the block is inserted. It holds the currently selected lookup value name (e.g. ‘M10 Bolt x 50mm’). The parameter itself has no values until connected to a Lookup Action. | Yes , the grip appears as a small arrow or diamond on the inserted block |
| Lookup Action | An action added from the Actions tab of the Block Authoring Palette | Contains the actual lookup table: the rows of data mapping named entries to parameter values. The Lookup Action reads the current value of the Lookup Parameter and sets all other block parameters to the corresponding row values in its table. | No , the action is invisible in the drawing. It is a background engine. |
The workflow is therefore always in this order: (1) Set up the block parameters that will be controlled by the lookup table (length, width, visibility state, etc.). (2) Place the Lookup Parameter in the Block Editor. (3) Place the Lookup Action and attach it to the Lookup Parameter. (4) Open the Lookup Table inside the Lookup Action and populate the rows with named entries and corresponding parameter values.
| The Most Common Mistake: Placing a Lookup Action without first setting up the parameters it will control. A Lookup Action is only useful if there are already named parameters in the block (linear parameters, visibility states, rotation parameters, etc.) whose values the action will set. If you open the Lookup Table and the ‘Add Properties’ button produces an empty list, it means no controllable parameters are available , go back and add the required parameters first. |
Prerequisites: What Your Dynamic Block Needs Before Adding a Lookup Table
Before adding a lookup table, the dynamic block must already have the parameters whose values the lookup table will control. Here is what must be in place before entering the Block Editor to add lookup functionality:
- At least one controlling parameter: A Linear parameter (for size), Rotation parameter (for angle), Visibility parameter (for geometry variants), or any other named parameter that can hold a value. The lookup table will set the values of these parameters.
- Parameters must be named: Each parameter should have a clear, descriptive name (e.g. ‘Width’, ‘Height’, ‘Leg Style’) so you can identify it when adding columns to the lookup table.
- For multi-parameter lookups: All parameters you want the lookup to control must be present in the block before adding the Lookup Action. You cannot add parameters to the lookup table that do not yet exist in the block.
- The block should be tested without the lookup: Verify that the parameters and their associated actions (Stretch, Scale, Visibility) work correctly by testing the block with grip manipulation before adding the lookup layer on top.
Step-by-Step: Creating a Single-Parameter Lookup Table
This walkthrough creates a lookup table for a bolt block that already has a Linear parameter named ‘Length’ controlling the bolt body geometry via a Stretch action. The lookup table will let users select bolt lengths from a named list (M8x20, M8x25, M8x30, M8x40) rather than dragging a grip.
Step 1: Open the Block Editor
- Double-click the inserted block to open it, or type BEDIT and press Enter, then select the block definition from the list.
- The Block Editor opens. The Block Authoring Palettes panel should be visible on the left. If not, go to Block Editor tab > Manage panel > Authoring Palettes to show it.
Step 2: Place the Lookup Parameter
- In the Block Authoring Palettes, click the Parameters tab.
- Scroll down to find Lookup in the parameter list and click it.
- AutoCAD prompts: Specify parameter location:. Click a location on the block where the grip (dropdown handle) will appear when the block is inserted. A good position is just to the side of the block, away from functional grips.
- AutoCAD prompts for the number of grips: accept the default of 1 and press Enter.
- A Lookup grip appears at the specified location, labelled ‘Lookup’ by default. In the Properties palette (Ctrl + 1), rename the parameter to something descriptive, such as ‘Bolt Size’ or ‘Select Size’. This name appears as the label next to the grip when the block is in use.
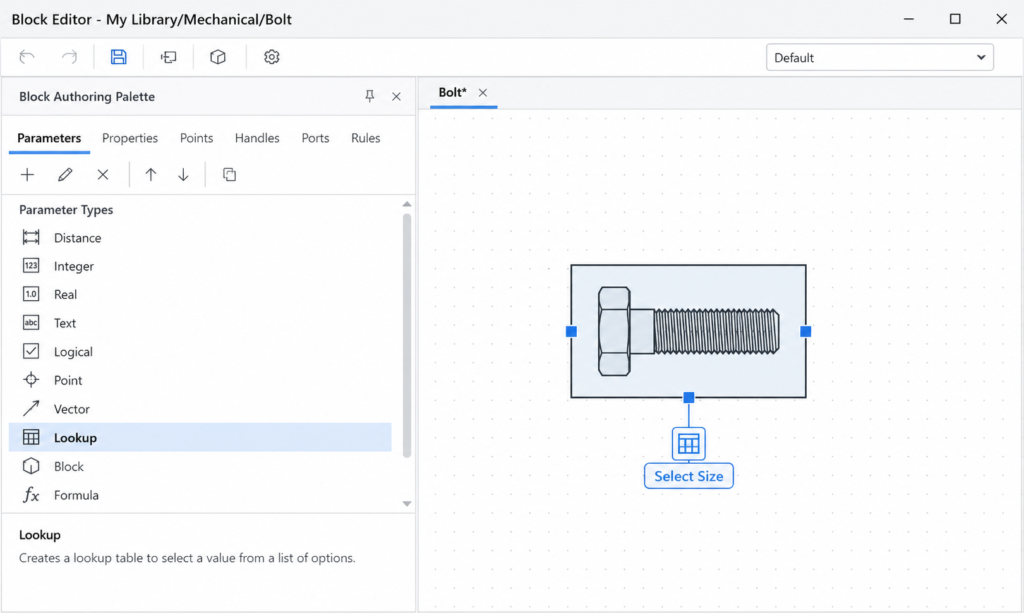
Step 3: Place the Lookup Action
- In the Block Authoring Palettes, click the Actions tab.
- Click Lookup in the action list.
- AutoCAD prompts: Select parameter:. Click the Lookup Parameter you placed in Step 2 (the grip labelled ‘Bolt Size’).
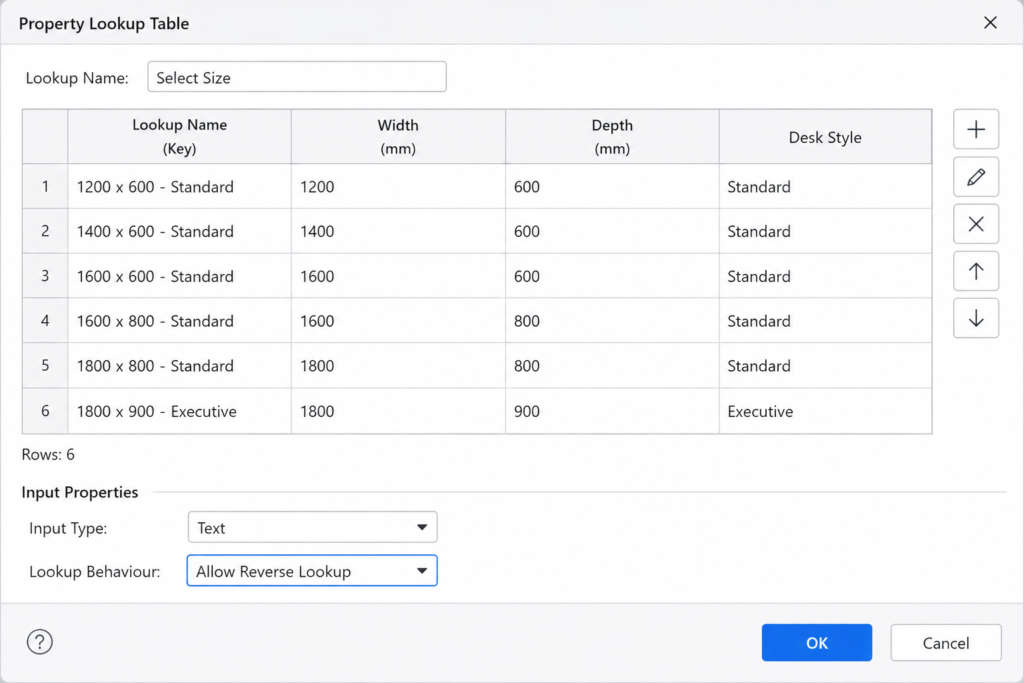
- The Property Lookup Table dialogue opens automatically. This is the actual lookup table where you define the rows of data.
Step 4: Build the Lookup Table
- In the Property Lookup Table dialogue, click Add Properties.
- A list of the block’s controllable parameters appears. Select ‘Length’ (the parameter you want to control). Click OK. A ‘Length’ column appears in the table.
- The table now has two columns: Lookup Name (the dropdown text the user will see) and Length (the parameter value AutoCAD will set).
- Click in the first empty row of the Lookup Name column and type the first entry name (e.g. ‘M8 x 20mm’). Press Tab to move to the Length column and type the corresponding value: 20.
- Press Enter or click the next row. Continue adding rows for each size:
| Lookup Name (User Sees) | Length (Parameter Value) |
| M8 x 20mm | 20 |
| M8 x 25mm | 25 |
| M8 x 30mm | 30 |
| M8 x 40mm | 40 |
| M8 x 50mm | 50 |
- In the Lookup name column at the bottom of the table (the last row with a dropdown), set the Input Properties setting to Allow Reverse Lookup. This setting is critical , see the next section for a full explanation.
- Click OK to close the Property Lookup Table dialogue.
- Go to Block Editor tab > Close panel > Save Block and then Close Block Editor.
Step 5: Test the Lookup Table
- Insert or select the block in the drawing.
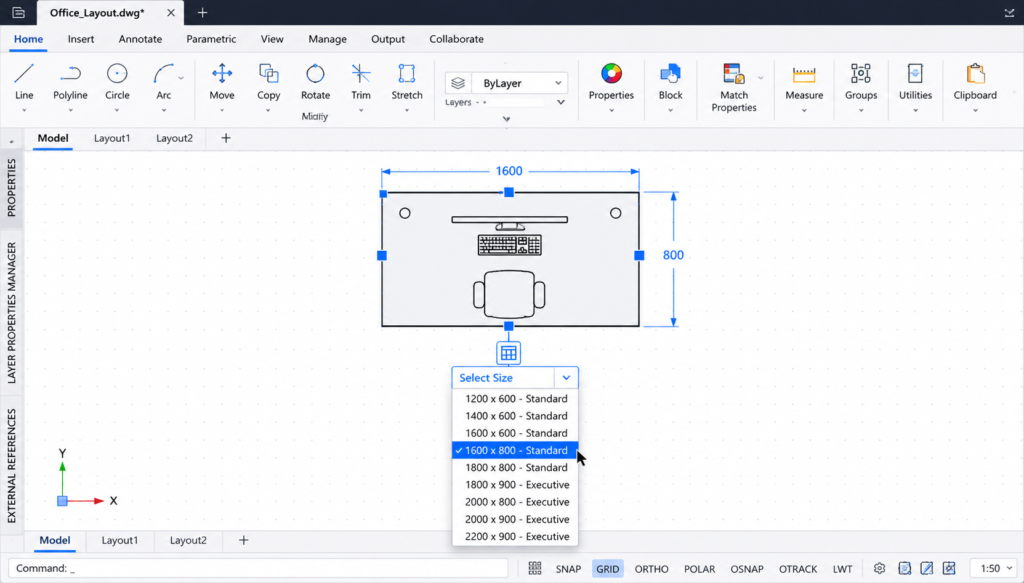
- Click the Lookup grip (the dropdown handle you placed). A dropdown list appears with the names you entered: M8 x 20mm, M8 x 25mm, M8 x 30mm, etc.
- Select any entry. The block’s Length parameter updates to the corresponding value and the block geometry stretches to match.
| Verification Step: After testing, open the Properties palette (Ctrl + 1) with the block selected. The palette should show the Lookup Parameter name and its current value. Check that the Length parameter value matches the number you entered in the lookup table for the selected entry. If it does not match, revisit the Lookup Action and verify the correct parameter column is mapped to the correct value. |
More guide on How to Use DXF Files in AutoCAD
Step-by-Step: Creating a Multi-Parameter Lookup Table
The real power of AutoCAD dynamic block lookup tables becomes apparent when driving multiple parameters simultaneously from a single dropdown selection. This worked example creates a lookup table for a desk block with three parameters: Width (linear), Depth (linear), and Style (visibility state for standard vs L-shaped desk geometry).
Block Setup Before Adding the Lookup
This block already has:
- Linear Parameter ‘Width’ , controlling the desk width with a Stretch action
- Linear Parameter ‘Depth’ , controlling the desk depth with a Stretch action
- Visibility Parameter ‘Desk Style’ , with two visibility states: ‘Standard’ (rectangular desk) and ‘L-Shape’ (L-shaped desk geometry)
Adding the Multi-Parameter Lookup
- Open the Block Editor (BEDIT) for the desk block.
- Add a Lookup Parameter from the Parameters tab, placed at a convenient grip location. Name it ‘Select Desk’ in the Properties palette.
- Add a Lookup Action from the Actions tab, clicking the Lookup Parameter you just placed.
- The Property Lookup Table dialogue opens. Click Add Properties.
- Select Width, Depth, and Desk Style from the parameter list. All three are now columns in the table.
- Fill in the table with all required desk configurations:
| Lookup Name | Width | Depth | Desk Style |
| 600 x 600 Standard | 600 | 600 | Standard |
| 800 x 600 Standard | 800 | 600 | Standard |
| 1000 x 600 Standard | 1000 | 600 | Standard |
| 1200 x 600 Standard | 1200 | 600 | Standard |
| 1200 x 800 Standard | 1200 | 800 | Standard |
| 1400 x 800 Standard | 1400 | 800 | Standard |
| 1200 x 1200 L-Shape | 1200 | 1200 | L-Shape |
| 1400 x 1400 L-Shape | 1400 | 1400 | L-Shape |
| 1600 x 1600 L-Shape | 1600 | 1600 | L-Shape |
- Set the Input Properties for the last table row to Allow Reverse Lookup.
- Click OK, save the block, and close the Block Editor.
- Test the block: clicking the ‘Select Desk’ grip should show a dropdown of all nine configurations. Selecting ‘1200 x 1200 L-Shape’ should simultaneously set Width to 1200, Depth to 1200, and switch the visibility state to L-Shape geometry.
| Multi-Parameter Power: Notice that one selection from the dropdown drove three separate parameters at the same time. Without a lookup table, a user would need to set Width, Depth, and Desk Style separately , three operations instead of one. As the number of parameters and configurations grows, the time savings from a lookup table multiply significantly. |
Allow Reverse Lookup vs Read Only: The Most Misunderstood Setting
The Input Properties setting at the bottom of the lookup table (the dropdown in the final row of the table) is one of the most confusing aspects of dynamic block lookup tables. Almost every user who first builds a lookup table wonders why it is not working , and the answer is almost always this setting.
| Setting | What It Does | Visible in Dropdown? | When to Use It |
| Allow Reverse Lookup | Allows the lookup table to work in both directions: the user can select from the dropdown (lookup name → parameter values) AND AutoCAD can determine the current lookup name by reading the current parameter values. The dropdown list of named entries IS visible to the user. | YES , user sees the named entries and can select from them | Almost always. This is the standard setting for any lookup table where users need to select from a dropdown list. If the lookup dropdown appears empty or shows no entries, this setting is almost certainly missing. |
| Read Only | The lookup table only works in one direction: parameter values → lookup name. The current lookup name updates to reflect parameter values set by other means (grip manipulation), but the user CANNOT select from the dropdown , it is read-only. Named entries are NOT visible for selection. | NO , no selectable entries in the dropdown | Only in rare specialist cases where the lookup name is used purely as a display label that tracks parameter values without allowing user selection. Not appropriate for standard dropdown-selection workflows. |
| The Single Most Common Lookup Table Problem: You build a lookup table, close the Block Editor, insert the block, click the grip, and the dropdown appears but shows no entries , or shows ‘Custom’ and nothing else. The cause is almost always Input Properties set to ‘Read Only’ instead of ‘Allow Reverse Lookup’. Open the Block Editor, double-click the Lookup Action, open the Property Lookup Table, and change the Input Properties dropdown at the bottom of the table from Read Only to Allow Reverse Lookup. Save and test. This fixes the problem in virtually every case. |
The Custom Entry: Why It Appears and What It Means
When you insert a dynamic block with a lookup table and click the Lookup grip, you may see ‘Custom’ as an entry in the dropdown list, sometimes with a checkmark beside it. This confuses almost every user who encounters it for the first time.
What ‘Custom’ Means
‘Custom’ is AutoCAD’s way of telling you that the block’s current parameter values do not match any named entry in the lookup table. It appears as a checkmarked entry when the block is in a state that falls outside the defined catalogue of configurations.
This most commonly happens in three situations: when the block has just been inserted before any lookup selection has been made (the block is in its default state which may not match any lookup entry); when a user has manually set parameter values by dragging grips or typing in the Properties palette to a value not listed in the lookup table; or when the block has been copied from a version with different parameter defaults.
Should You Worry About ‘Custom’?
Not necessarily. ‘Custom’ is informational , it tells the user the block is currently in a non-catalogued state. To remove ‘Custom’ from the dropdown entirely: ensure that the block’s default parameter values (set in the Block Editor) match one of the entries in the lookup table. If the default Width is 800 and the lookup table has an ‘800 x 600 Standard’ entry with Width = 800, the block will start in that named state and ‘Custom’ will not appear.
Real-World Use Cases for Dynamic Block Lookup Tables
The following examples represent the most common and valuable applications of dynamic block lookup tables across engineering, architecture, and design disciplines.
| Industry | Block Example | Lookup Table Entries | Parameters Controlled |
| Mechanical Engineering | Standard bolt or fastener block | M6x20, M6x25, M8x20, M8x25, M8x30, M10x30, M10x40… | Shaft diameter, length, head height, thread length , all from one selection |
| Mechanical Engineering | Structural steel section block | UC203x203x46, UC203x203x60, UC254x254x73, UB254x102x25… | Section depth, flange width, web thickness, mass/metre label visibility |
| Architecture | Door block | Single 762, Single 838, Single 914, Double 1524, Double 1676… | Door width, door height, single/double visibility state, swing direction |
| Architecture | Window block | 600 Fixed, 900 Casement, 1200 Casement, 1800 Fixed… | Opening width, frame depth, fixed/casement visibility state |
| Electrical Engineering | Electrical cabinet / switchboard block | 200H x 400W, 400H x 400W, 600H x 600W, 800H x 600W… | Overall height, overall width, number of circuit rows visibility |
| Interior Design / FF&E | Office chair block | Task Chair, Executive Chair, Meeting Chair, Bar Stool… | Seat height, back height, armrest visibility, star base/bar base visibility |
| Civil Engineering | Manhole block | 450 Dia, 600 Dia, 900 Dia, 1200 Dia, 1500 Dia… | Chamber diameter, cover diameter, cover type visibility |
| Manufacturing / Workshop | Standard channel section | 25x25x3, 40x40x5, 50x50x6, 75x50x6… | Width, height, wall thickness , all simultaneously from standard size list |
Extracting Lookup Table Data for Bills of Materials and Parts Lists
One of the most powerful and least-known capabilities of dynamic block lookup tables is that the lookup name value , the text that appears in the dropdown , can be extracted from the drawing as part of a Data Extraction, exactly like a block attribute. This allows a drawing containing multiple dynamic block instances to automatically generate a parts list, bill of materials, or schedule showing the lookup name for each block.
How Lookup Data Appears in Data Extraction
When you run DATAEXTRACTION on a drawing containing dynamic blocks with lookup tables, the lookup parameter name and its current value (the selected lookup name) appear in the property list on Page 3 of the wizard (Select Properties). Select the lookup parameter property to include it in the extraction, and the generated table will show the selected lookup entry for each block instance.
Step-by-Step: Extracting Lookup Table Data
- Ensure all dynamic blocks in the drawing have their lookup selections set correctly.
- Type DATAEXTRACTION and press Enter.
- On Page 2 (Define Data Source), select Drawings/Sheet Set and check that the current drawing is included.
- On Page 3 (Select Objects), select the block definition you want to extract data from. Tick Display all object types if the block does not appear in the initial list.
- On Page 3 (Select Properties), scroll through the property list to find the Lookup Parameter name (e.g. ‘Bolt Size’, ‘Select Desk’). Tick it along with any other block properties or attributes you want in the extraction.
- Continue through the wizard, set up the output table format, and insert the extracted table. The resulting table shows each block instance with its selected lookup name.
| Practical Application: A structural engineer places 47 instances of a steel section dynamic block throughout a drawing, selecting different section sizes from the lookup dropdown for each. Running DATAEXTRACTION generates a full steel schedule automatically , showing section designation, quantity, and total length for each section size. Updating any block’s selection and refreshing the Data Extraction table updates the schedule instantly. |
Editing and Updating an Existing Lookup Table
Adding new entries, changing values, or removing rows from an existing lookup table is straightforward. All changes happen inside the Block Editor.
- Type BEDIT and select the block definition to edit.
- In the Block Editor, locate the Lookup Action (it appears as a yellow lightning bolt action icon near the Lookup grip). Double-click the Lookup Action icon.
- The Property Lookup Table dialogue opens showing the existing table.
- To add a new row: click in an empty row at the bottom of the table and type the new Lookup Name and parameter values.
- To edit an existing value: click the cell and type the new value.
- To delete a row: select the row and press Delete.
- To add a new parameter column: click Add Properties, select the new parameter from the list, and fill in values for each row.
- Click OK to close the dialogue. Save the block and close the Block Editor.
- All instances of the block in the drawing update immediately to reflect the revised lookup table.
Lookup Tables vs Visibility States: Choosing the Right Approach
Both lookup tables and visibility states allow users to switch between named configurations of a dynamic block from a dropdown. Understanding the distinction between them prevents the common mistake of using one when the other would be more appropriate.
| Feature | Lookup Table | Visibility States |
| Primary purpose | Control numeric parameter values (dimensions, angles) and optionally visibility states from one dropdown | Show or hide specific geometry (objects) within the block based on the selected state |
| User interaction | Lookup Parameter grip , presents a dropdown of named entries | Visibility Parameter grip , presents a dropdown of named states |
| What changes on selection | Parameter values (Width, Height, Angle, etc.) and optionally Visibility state | Which objects are visible/hidden within the block |
| Can control dimensions? | Yes , primary purpose | No , dimensions must be changed separately or via a lookup table linked to the visibility state |
| Can show/hide geometry? | Yes , if a Visibility Parameter is included as a column in the lookup table | Yes , primary purpose |
| Best for | Catalogue-based selection of standard sizes; anything where exact numeric values must be enforced | Blocks with fundamentally different geometric forms (e.g. different valve types, door swings, electrical symbols) |
| Can be used together? | Yes , include a Visibility parameter as one column in the lookup table to drive both dimensions and geometry simultaneously | Yes , use alongside a lookup table for complete control over both geometry and dimensions |
Dynamic Block Lookup Table Troubleshooting
| Problem | Root Cause | Fix |
| Lookup dropdown appears but shows no named entries (empty list) | Input Properties is set to ‘Read Only’ instead of ‘Allow Reverse Lookup’ | Open BEDIT, double-click the Lookup Action, open the Property Lookup Table, change the Input Properties dropdown at the bottom from Read Only to Allow Reverse Lookup. Save and test. |
| Lookup dropdown only shows ‘Custom’ and nothing else | Same as above , Read Only setting prevents forward lookup. Alternatively, lookup table has no rows filled in. | Change to Allow Reverse Lookup. Also verify the table has populated rows , scroll through the Property Lookup Table to confirm entries exist. |
| ‘Add Properties’ shows an empty list when building the lookup table | No controllable parameters exist in the block yet. Lookup Action was added before the block parameters it should control. | Cancel, exit the Block Editor, and set up the required parameters (Linear, Visibility, Rotation, etc.) first. Then re-enter the Block Editor and add the Lookup Parameter and Action. |
| Selecting a lookup entry does not change the block geometry | The parameter controlled by the lookup table has no associated action (Stretch, Scale, etc.) driving the geometry | Verify that the parameters listed in the lookup table columns have associated actions. A parameter with no action holds a value but changes nothing visually. |
| Lookup grip does not appear on the inserted block | Lookup Parameter was placed inside the block but the block definition was not saved before closing the Block Editor | Re-open BEDIT, verify the Lookup Parameter is present, and use Save Block (not just Close) before closing the Block Editor. |
| All instances of the block show the same lookup selection regardless of what was chosen | Block was placed as a block reference that was then copied , all copies share the same dynamic block state if the block was not properly inserted as independent instances | Use INSERT to place each block independently, or use the Properties palette to change the lookup value on each selected instance individually. |
| Lookup table values appear correct but Data Extraction shows wrong or missing lookup names | Data Extraction property filter does not include the Lookup Parameter property, or the lookup name is being extracted as a block attribute rather than a dynamic property | Re-run DATAEXTRACTION. On Page 3 (Select Properties), scroll carefully to find the Lookup Parameter name in the property list and tick it specifically. |
| Lookup entry names are correct but the block geometry looks wrong after selection | Parameter values in the lookup table rows do not match the values expected by the block’s actions, or the parameter was renamed after the lookup table was set up | Open BEDIT, double-click the Lookup Action, verify each row’s parameter values are correct. Check that parameter names in the table match the current parameter names in the block. |
Frequently Asked Questions (FAQ)
What is a dynamic block lookup table in AutoCAD?
A dynamic block lookup table in AutoCAD is an internal data table within a dynamic block definition that maps named text entries to specific parameter values. When a user selects an entry from the block’s dropdown grip (such as ‘M10 Bolt x 50mm’), the lookup table automatically sets all associated block parameters (diameter, length, head height) to the corresponding values. It is created in the Block Editor using a Lookup Parameter (which provides the dropdown grip) and a Lookup Action (which contains the table data).
How do I create a lookup table in an AutoCAD dynamic block?
To create a lookup table in an AutoCAD dynamic block: (1) Open the block in the Block Editor (BEDIT). (2) Add the parameters you want to control (Linear, Visibility, etc.) if not already present. (3) Place a Lookup Parameter from the Parameters tab of the Block Authoring Palette. (4) Place a Lookup Action from the Actions tab, clicking the Lookup Parameter. (5) In the Property Lookup Table dialogue, click Add Properties, select the parameters to control, and fill in named entries and their corresponding parameter values. (6) Set Input Properties to Allow Reverse Lookup. (7) Click OK, save the block, and close the Block Editor.
Why does my AutoCAD dynamic block lookup dropdown show no entries?
If the lookup dropdown shows no entries (or only shows ‘Custom’), the most common cause is that the Input Properties setting in the lookup table is set to ‘Read Only’ instead of ‘Allow Reverse Lookup’. To fix: open the Block Editor (BEDIT), double-click the Lookup Action icon, open the Property Lookup Table, and change the Input Properties dropdown at the bottom from Read Only to Allow Reverse Lookup. Save the block and test. This resolves the empty dropdown in the vast majority of cases.
What is the difference between Allow Reverse Lookup and Read Only in AutoCAD?
In an AutoCAD dynamic block lookup table, Allow Reverse Lookup makes the named entries visible in the dropdown list so the user can select them. The block reads the selection and sets parameter values accordingly. Read Only makes the lookup table work only in the reverse direction: it displays the lookup name that corresponds to the current parameter values (set by other means), but the user cannot select entries from the dropdown. For standard dropdown-selection workflows, always use Allow Reverse Lookup.
What does ‘Custom’ mean in an AutoCAD dynamic block lookup dropdown?
‘Custom’ appears in a dynamic block lookup dropdown when the block’s current parameter values do not match any named entry in the lookup table. It means the block is in a non-catalogued state , either its default values do not correspond to any lookup entry, or a user has manually set parameter values outside the predefined options. To prevent ‘Custom’ appearing on insertion, ensure the block’s default parameter values in the Block Editor match one of the rows in the lookup table.
Can a dynamic block lookup table control multiple parameters at once?
Yes. An AutoCAD dynamic block lookup table can control multiple parameters simultaneously from a single dropdown selection. In the Property Lookup Table dialogue, click Add Properties and select all the parameters you want the lookup to control. Each selected parameter becomes a column in the table. You then fill in values for each parameter in each row , one selection from the dropdown sets all column values at once. This is one of the most powerful features of the lookup table system.
How do I extract lookup table data from dynamic blocks for a parts list?
To extract lookup table data for a parts list: run the DATAEXTRACTION command and work through the wizard. On Page 3 (Select Properties), select the block definition and scroll through the property list to find the Lookup Parameter name (the descriptive name you gave the lookup parameter, e.g. ‘Bolt Size’ or ‘Select Desk’). Tick this property along with any block attributes and other properties needed for the parts list. Complete the wizard and insert the table. The table will show the selected lookup entry for each block instance in the drawing.
Conclusion
Dynamic block lookup tables are one of the most productivity-transforming features in AutoCAD’s block system. They take the power of dynamic blocks , already a significant step up from standard static blocks, and add a layer of usability and reliability that makes them suitable for professional production environments where accuracy and consistency are non-negotiable.
Once you understand that the system has two parts (a Lookup Parameter for the grip, a Lookup Action for the data), that Allow Reverse Lookup is almost always the correct setting, and that any number of parameters can be driven simultaneously from a single dropdown, the rest of the workflow falls into place logically.
The real returns come when lookup tables are combined with Data Extraction: a drawing full of properly configured dynamic blocks with lookup tables becomes a living document where the geometry and the parts list stay in perfect sync, updating automatically as design decisions change. That is the end state that makes the investment in building lookup table-equipped blocks worthwhile.
Continue building your AutoCAD expertise: read How to Sort Tables in AutoCAD for working with the data you extract, or return to the complete AutoCAD Tutorials for Beginners and Professionals guide.