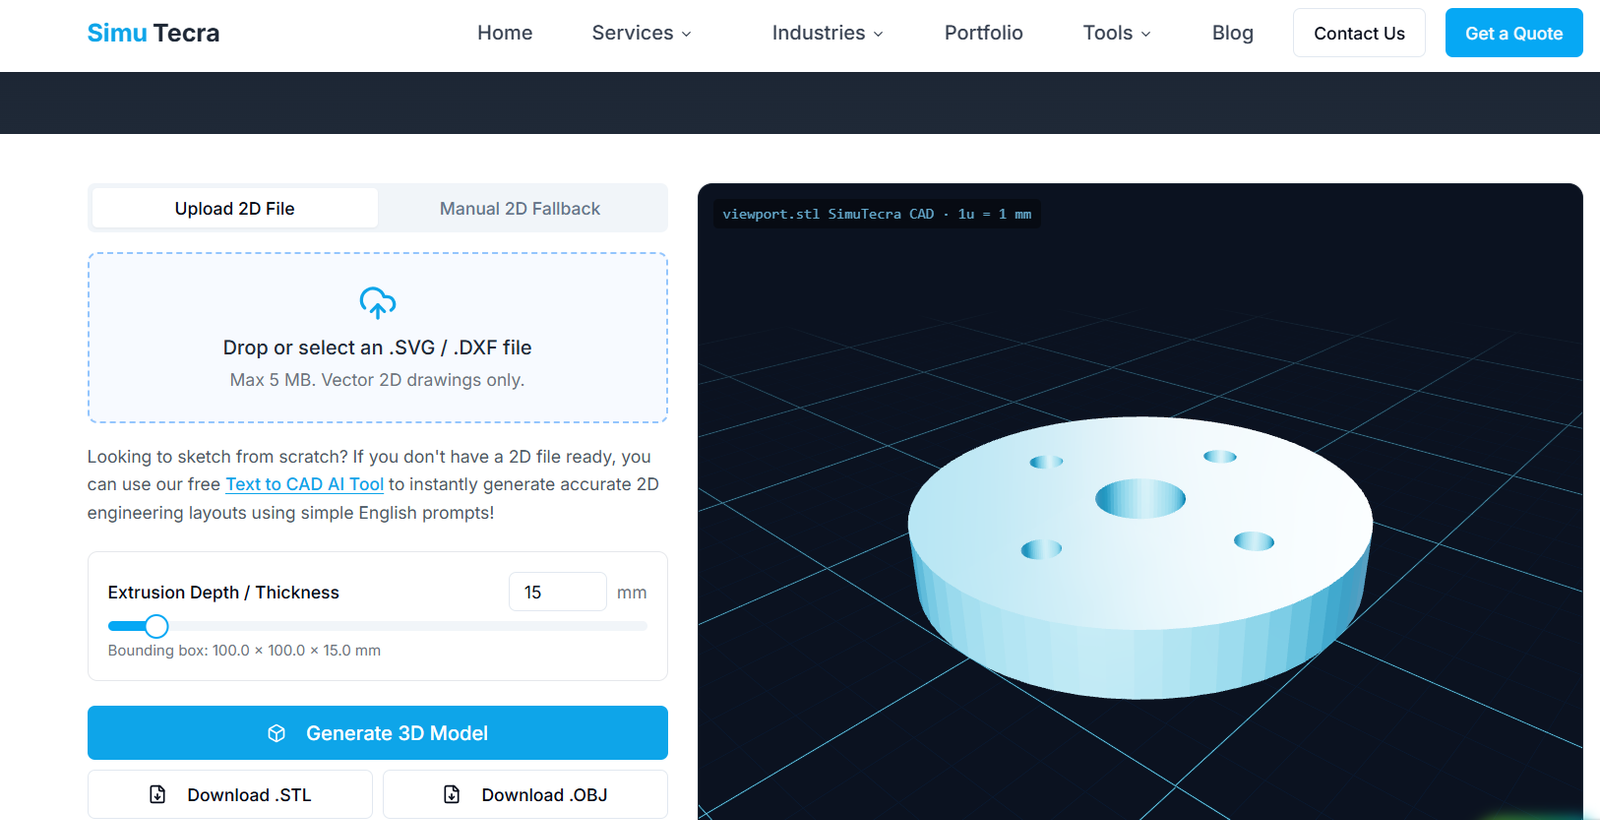
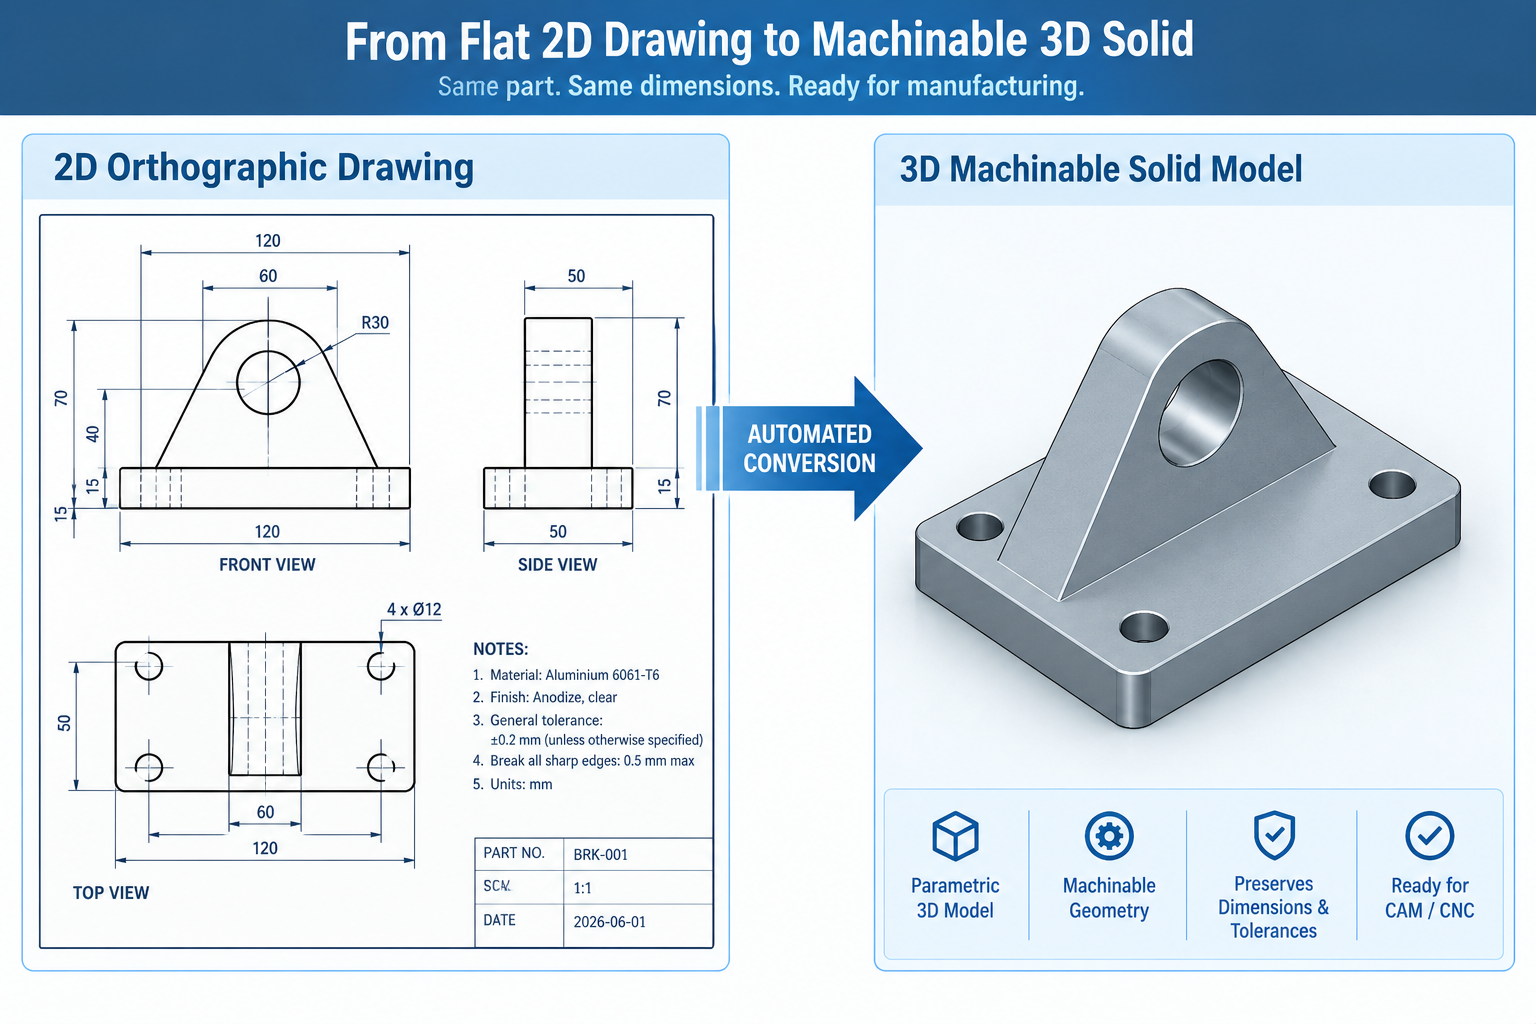
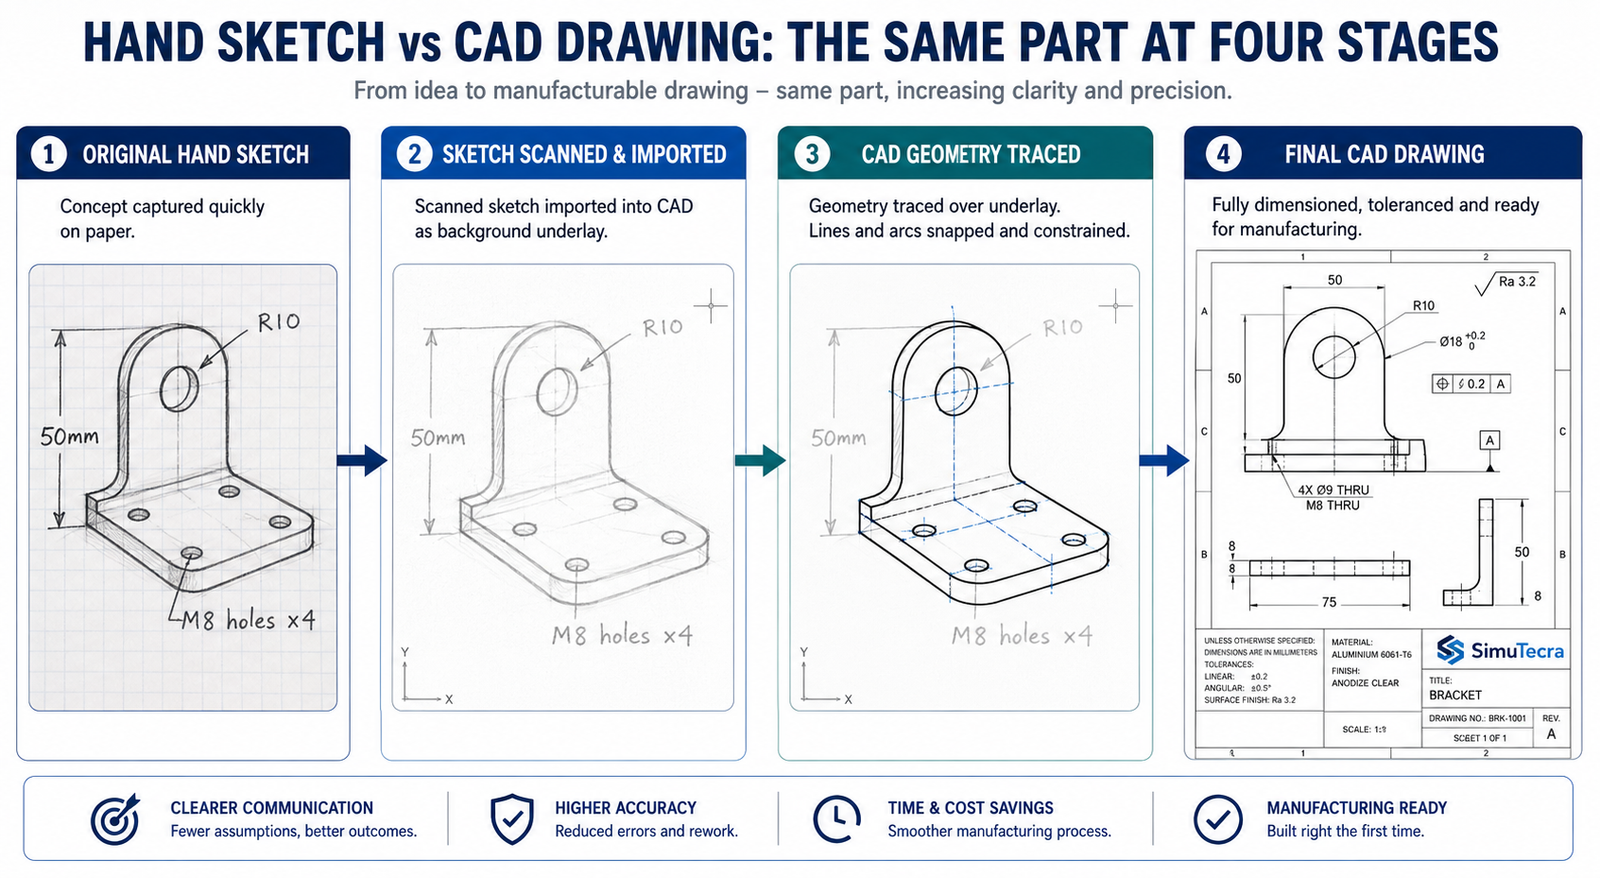
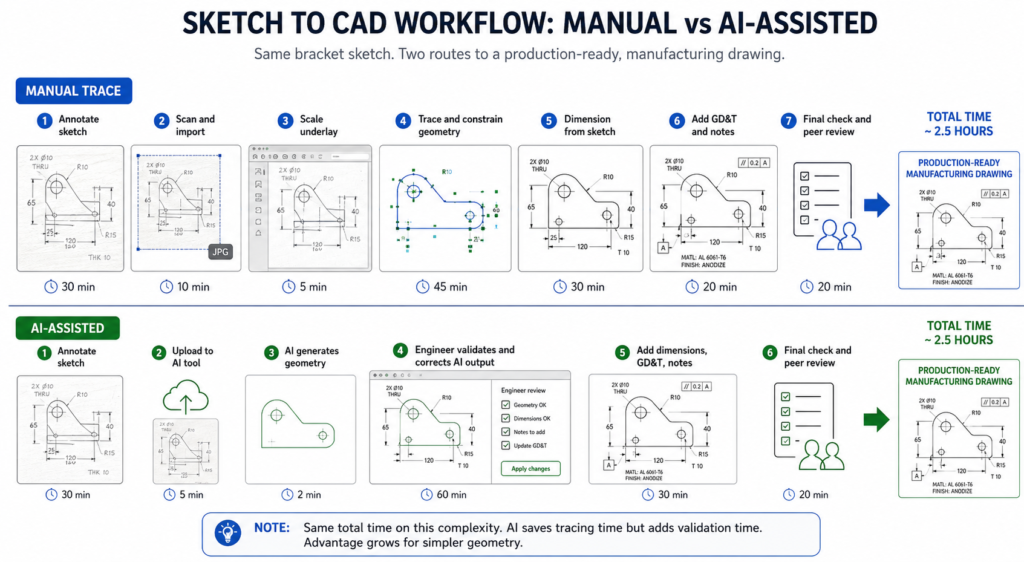
If you’re still manually rebuilding 3D models from old 2D drawings, you’re spending hours on work that modern tools can now do in minutes. Automating 2D to 3D CAD conversion for CNC machining means using software, rather than a person at a keyboard, to turn a flat drawing into a solid model a CAM program can actually machine from.
QUICK ANSWER Yes, you can automate 2D to 3D CAD conversion using one of four methods: native CAD conversion wizards, dedicated conversion software, AI-based reconstruction, or custom API scripting. For CNC machining specifically, the output needs to be a true parametric STEP solid, not just a visual mesh, and it should always be checked for dimensional accuracy before it goes to CAM.
This guide covers all four automation methods side by side, which file format actually works for CNC, how accurate automated conversion really is, and a step-by-step process to get from a flat drawing to a CNC-ready 3D model without wasting a machining run on a bad file.
What Does It Mean to Automate 2D to 3D CAD Conversion?
Automating 2D to 3D CAD conversion means letting software interpret a 2D drawing’s lines, arcs, and dimensions, and reconstruct it as a three-dimensional solid, without an engineer manually redrawing every feature by hand.
This matters specifically for CNC machining because CAM software doesn’t cut from a 2D drawing. It needs a 3D solid model to calculate toolpaths, cutter clearances, and machining operations. If your only source is an old drawing, a scanned PDF, or a customer sketch, automated conversion is what bridges that gap without a full manual rebuild.
4 Ways to Automate 2D to 3D CAD Conversion
There isn’t one single tool that does this for everyone. The right method depends on your drawing volume, your budget, and how much accuracy you need. Here are the four real approaches used in production today.
Automation Method
How It Works
Best For
Main Limitation
Native CAD conversion tools
Built-in wizards inside SolidWorks, Autodesk Inventor, Fusion 360, and Siemens NX that read a 2D DXF/DWG sketch and extrude, revolve, or auto-sequence it into a solid model
Teams already standardized on one CAD platform who need a fast, in-house way to rebuild simple to moderately complex parts
Struggles with parts that have implied features (fillets, complex holes) not explicitly drawn on every view
Dedicated CAD conversion software
Standalone tools such as Scan2CAD or Aspose.CAD that specialize in reading raster images, PDFs, or scanned drawings and outputting clean, editable vector or solid geometry, often with batch and API automation
Digitizing large archives of legacy paper drawings or scanned PDFs at scale, especially for spare-parts and MRO workflows
Output is typically a clean 2D vector file or basic solid, still needs review before it’s treated as production CAD
AI and deep-learning reconstruction
Machine learning models trained to recognize geometric features across multiple 2D views (or even photos) and infer a 3D shape, an active and fast-moving research area as well as a growing commercial category
Fast first-pass geometry when the original CAD file is lost but a drawing, PDF, or photo still exists, and speed matters more than final precision
Output is usually a mesh or an unverified solid: no GD&T, no material data, and dimensions that must be checked before machining
Scripting and API-driven automation
Custom scripts built on CAD APIs (NX Open, SolidWorks macros, Fusion 360’s Python API) that batch-process large sets of similar 2D drawings into 3D models using a repeatable, rule-based logic
Manufacturers with high volumes of similar, well-standardized drawings, such as a family of brackets or fasteners, where the same rules apply every time
Requires upfront engineering investment to build and maintain the script; not cost-effective for one-off or highly varied parts
Feature Recognition vs. AI Mesh Generation: Know the Difference
This is the distinction most articles on this topic skip, and it’s the one that actually matters most. Feature recognition (used by native CAD tools and dedicated conversion software) analyzes geometric intent, holes, pockets, fillets, and rebuilds them as true, editable, dimensioned solid features.
AI mesh generation (used by many newer AI tools) predicts an approximate 3D shape from limited 2D input. The result often looks convincing on screen, but it’s typically a mesh with no feature history, no tolerances, and no guarantee the dimensions match the original drawing exactly. Recent peer-reviewed research on deep-learning-based reconstruction confirms this gap is a structural limitation of current methods, not just a rough edge that will disappear with the next software update (more on that in the accuracy section below).
Which File Format Actually Works for CNC Machining?
Automation only helps if the output file is something your CAM software can actually use. Here’s how the common formats stack up.
File Format
Geometry Type
Good for CNC Machining?
Why
STEP (.step/.stp)
True parametric/B-rep solid
Yes , the standard choice
Preserves exact solid geometry that CAM software can read directly for toolpath generation
DXF/DWG
2D vector lines and arcs
Only for 2D profile cutting
Fine for laser, waterjet, or simple 2D milling; not a 3D solid on its own
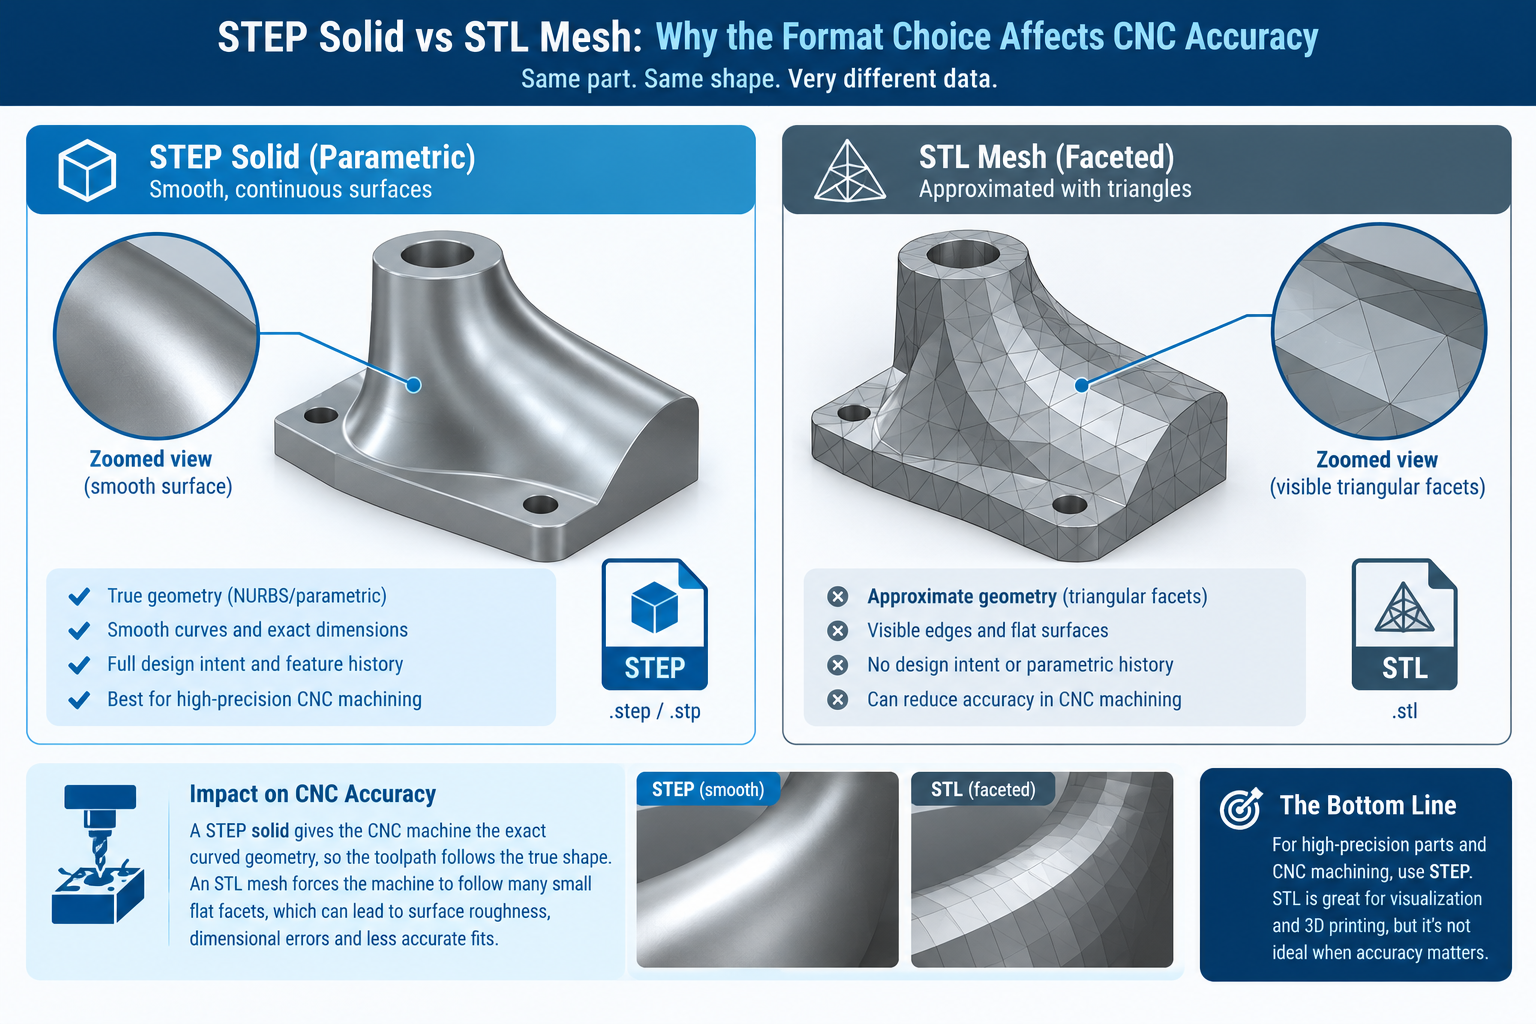
STL
Triangulated mesh (approximation)
Not recommended for milling
Approximates curved surfaces with flat facets, which can introduce dimensional error on tight-tolerance features
IGES (.igs)
Surface/solid model
Usable, but aging
Still supported by most CAM systems, though STEP has largely replaced it as the preferred neutral format
If a conversion tool only offers STL output, treat it as a visualization step, not a finished CNC-ready file. For milled or turned parts, always push for a STEP solid before it goes anywhere near a CAM program.
Step-by-Step: From 2D Drawing to CNC-Ready 3D Model
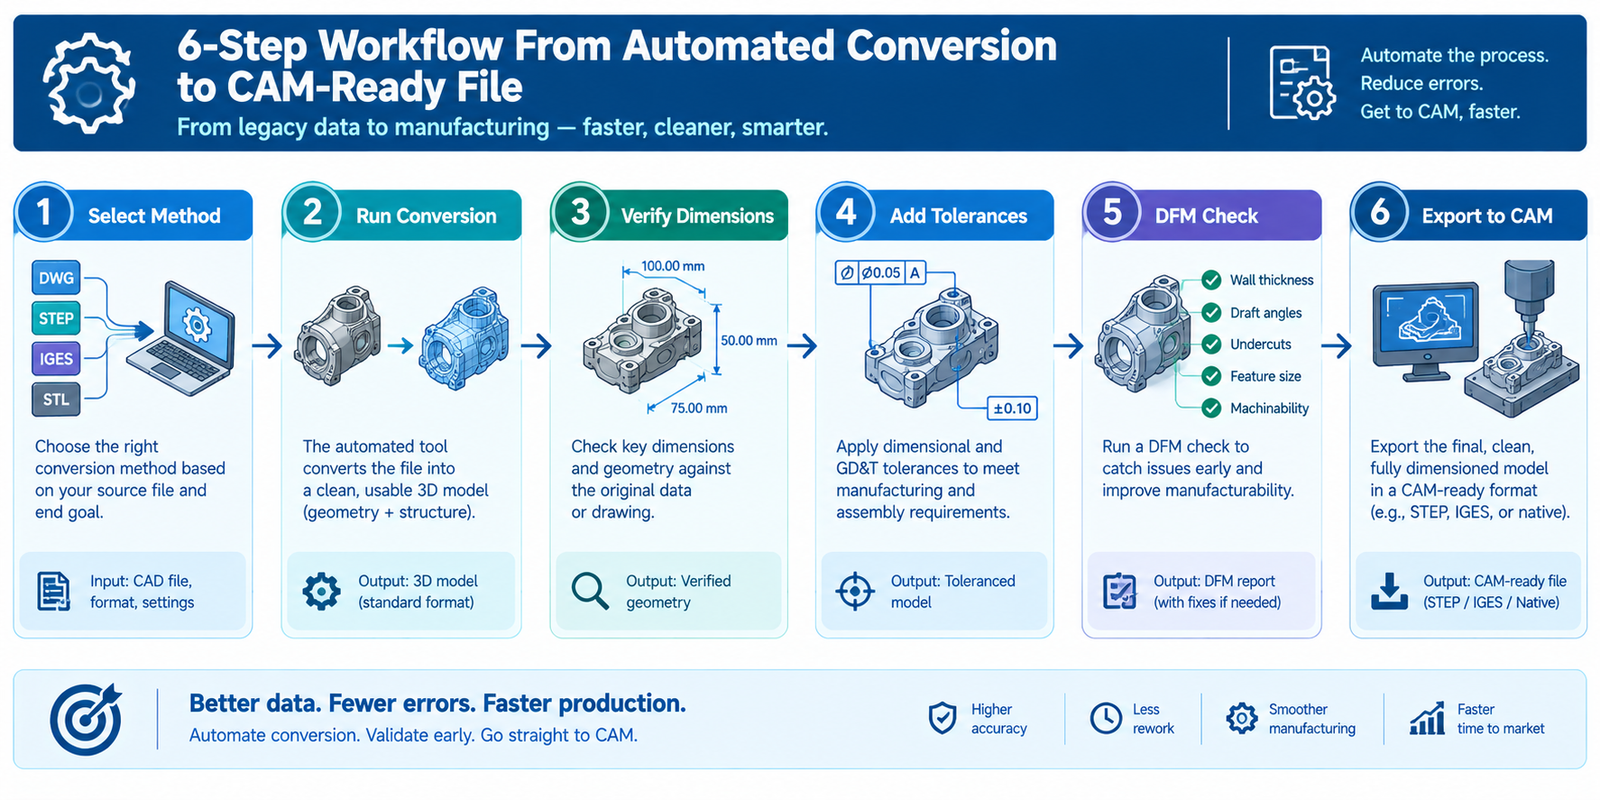
Choose the right automation method: match the method to your situation using the table above, don’t default to whatever tool you already own if it’s the wrong fit for the job.
Run the automated conversion: feed in the cleanest source file available, native DXF/DWG beats a scanned PDF, and a scanned PDF beats a blurry photo.
Verify every critical dimension: cross-check the converted model’s key dimensions against the original drawing before trusting it, especially on mating features and hole positions.
Add tolerances and GD&T: automated conversion rarely carries tolerance information forward, so this has to be added manually to define acceptable variation for the machinist.
Run a design-for-manufacturability (DFM) check: confirm the geometry is actually machinable, watch for internal corners, deep pockets, and wall thicknesses your specific CNC setup can’t reliably hold.
Export to STEP and import into CAM: generate toolpaths only once the solid model has passed the checks above, not directly from the raw conversion output.
How Accurate Is Automated 2D-to-3D Conversion, Really?
Accuracy depends entirely on the method and the source drawing quality. Native feature-recognition tools working from a complete, well-dimensioned DXF file can rebuild simple to moderately complex parts with very high fidelity, because they’re following explicit geometric rules, not guessing.
AI-based reconstruction is a different story. It’s genuinely useful for getting a fast first-pass shape when the original CAD file is gone and only a drawing or photo survives, but current research is clear that the output should be treated as a reference model, not production-ready CNC data, until an engineer verifies it. A 2026 peer-reviewed study on deep-learning-based 2D-to-3D conversion found that combining automated feature recognition with structured verification meaningfully reduced dimensional errors compared to AI inference alone, reinforcing that human review is still the difference between a usable model and a expensive machining mistake.
Common Mistakes to Avoid
Sending an STL straight to CAM: meshes approximate curves with flat facets, which can create real dimensional error on toleranced features.
Trusting AI-generated geometry without verification: a visually convincing model is not the same as a dimensionally accurate one.
Skipping GD&T entirely: without tolerance information, a machinist has no way to know what deviation is actually acceptable.
Using one tool for every job: a batch-scripting solution built for a family of brackets won’t serve you well for a single, highly custom part, and vice versa.
Assuming automation removes the need for review: automation speeds up the first draft; it doesn’t replace an engineer’s final check.
Frequently Asked Questions
Q: Can AI convert a 2D drawing into a CNC-ready 3D model?
AI can generate a 3D shape from a 2D drawing quickly, but the output is usually a mesh that needs dimensional verification before it’s safe to machine from. Treat it as a fast first draft, not a finished CNC file.
Q: What is the best file format for CAD to CNC conversion?
STEP is the best format for CNC milling and turning because it preserves true, editable solid geometry. STL is fine for 3D printing but can introduce dimensional error on machined parts.
Q: How accurate is automated 2D-to-3D CAD conversion?
Rule-based feature recognition from a clean, complete drawing is typically very accurate. AI-based reconstruction is faster but less reliable and should always be verified against the original dimensions before use.
Q: What software automatically converts 2D CAD drawings to 3D models?
Simutecra 2D CAD to 3D CAD, SolidWorks, Autodesk Inventor, and Fusion 360 include built-in conversion tools, while Scan2CAD and similar dedicated software specialize in converting scanned or legacy 2D drawings at scale.
Q: Do I still need an engineer to review an automatically converted 3D model?
Yes. Automation speeds up the initial rebuild, but dimension verification, tolerance assignment, and a manufacturability check still require engineering review before the file goes to CAM.
Conclusion
Automating 2D to 3D CAD conversion for CNC machining can save real time, but only if you match the method to the job and never skip verification. Use native or dedicated feature-recognition tools when accuracy matters most, reach for AI reconstruction when speed matters more than precision and the file can be reviewed afterward, and always export a true STEP solid, with tolerances added, before it reaches your CAM software.
An engineer running FEA on a bracket that will carry a cyclic load has a stress concentration at a fillet radius. The linear analysis runs in three minutes and the peak stress reads 180 MPa. The material yield strength is 250 MPa. The result looks reasonable. The bracket goes into service and fails at the fillet in fatigue after six months.
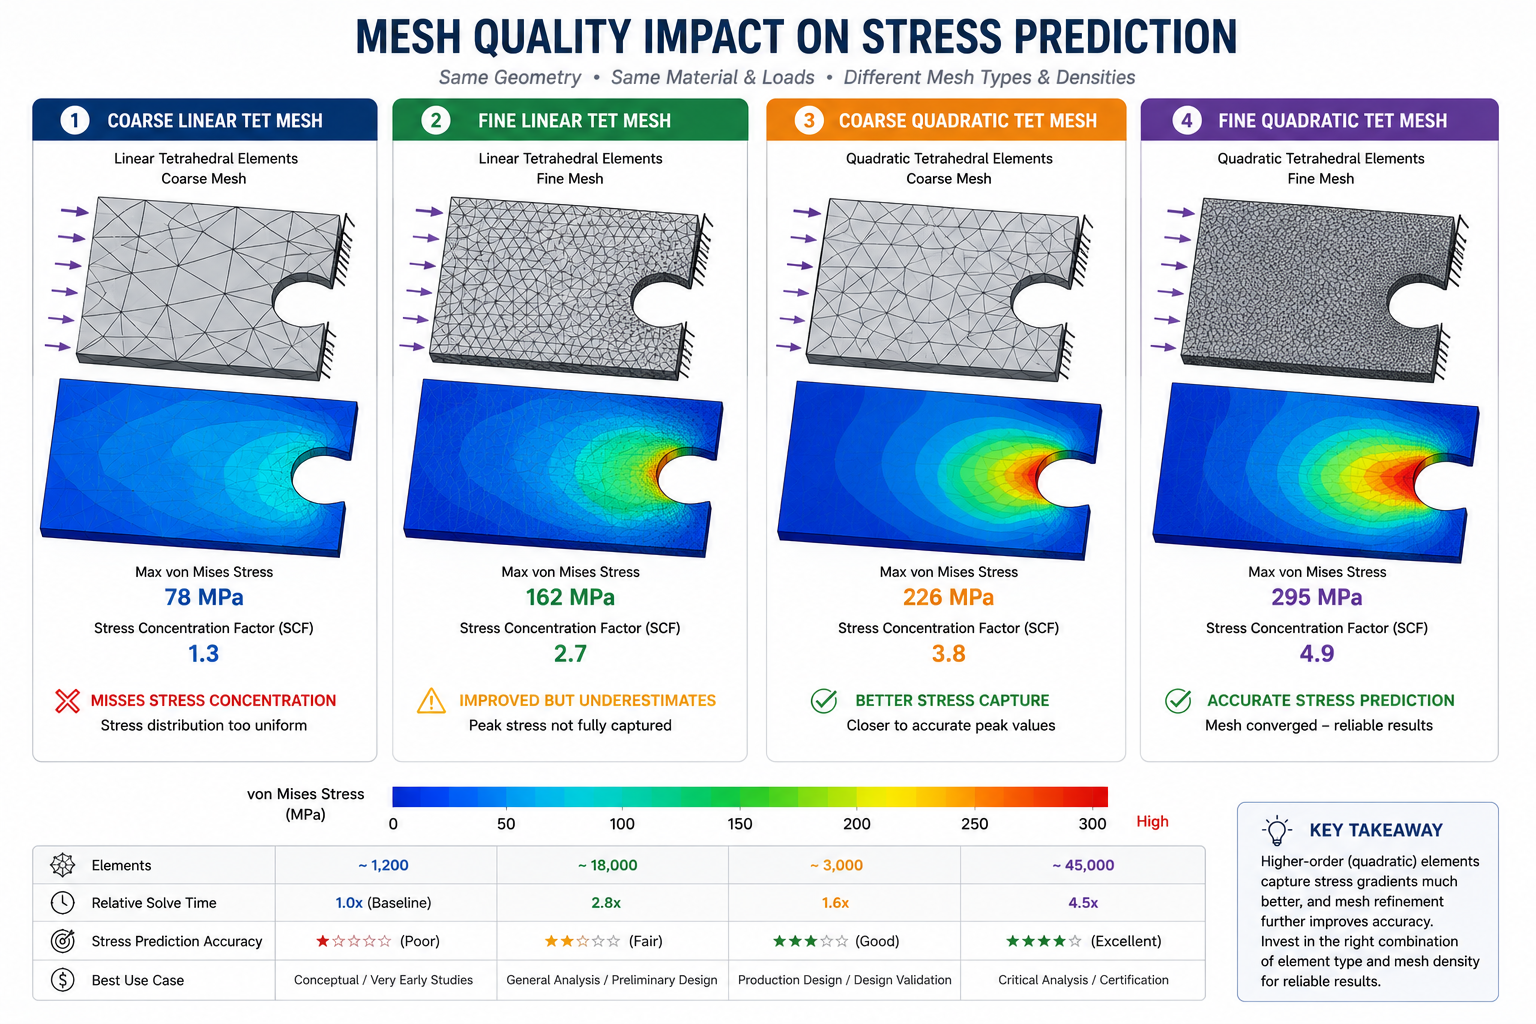
A post-mortem examination finds a stress concentration factor of 3.2 at the fillet. The true peak stress was approximately 576 MPa, well above yield, producing plastic strain accumulation and fatigue damage with every cycle. The FEA result of 180 MPa was not a modeling error in the traditional sense. The boundary conditions were correct, the material was correctly specified, the load was accurately applied. The error was in the mesh: coarse linear tetrahedral elements at the fillet, unable to capture the steep stress gradient, averaging out the peak and reporting a smooth, conservative-looking 180 MPa where the true peak was more than three times higher.
This scenario, or close variants of it, represents one of the most common categories of consequential FEA error in practice. It is preventable with mesh quality knowledge, and that knowledge is what this article provides. It covers what mesh quality metrics mean at a mathematical level, what numerical phenomena cause mesh quality to degrade results, how to select element types correctly, how to perform mesh convergence studies that verify your results are mesh-independent, and how to handle the specific problem of stress singularities that confuse the convergence picture for sharp geometric features.
Why Mesh Quality Matters: The Mathematical Foundation
Finite element analysis works by dividing a continuous structure into discrete elements, approximating the displacement field within each element using shape functions (also called interpolation functions or basis functions), and assembling the element equations into a global system of equations that is solved for the nodal displacements. Stresses and strains are then computed from these displacement solutions using the element’s strain-displacement and stress-strain relationships.
The accuracy of this approximation depends fundamentally on how well the element’s shape functions can represent the true displacement field within that element. Shape functions are polynomial functions defined in a natural (idealized) coordinate system for a perfect element shape. When the element’s physical shape deviates from the ideal, the mapping between the natural coordinate system and the physical coordinate system introduces additional terms in the strain-displacement relationship that the ideal shape function formulation did not account for. These additional terms are the source of mesh-quality-induced error.
The Jacobian Matrix: Where Shape Quality Becomes Mathematical
The Jacobian matrix is the key mathematical link between an element’s physical shape and the accuracy of its numerical integration. It is the matrix of partial derivatives of the physical coordinates (x, y, z) with respect to the natural coordinates (xi, eta, zeta) of the idealized element. For a perfectly shaped element (square quad, equilateral triangle, regular tetrahedron, cube), the Jacobian matrix is constant throughout the element and its determinant, the Jacobian determinant, is constant and positive.
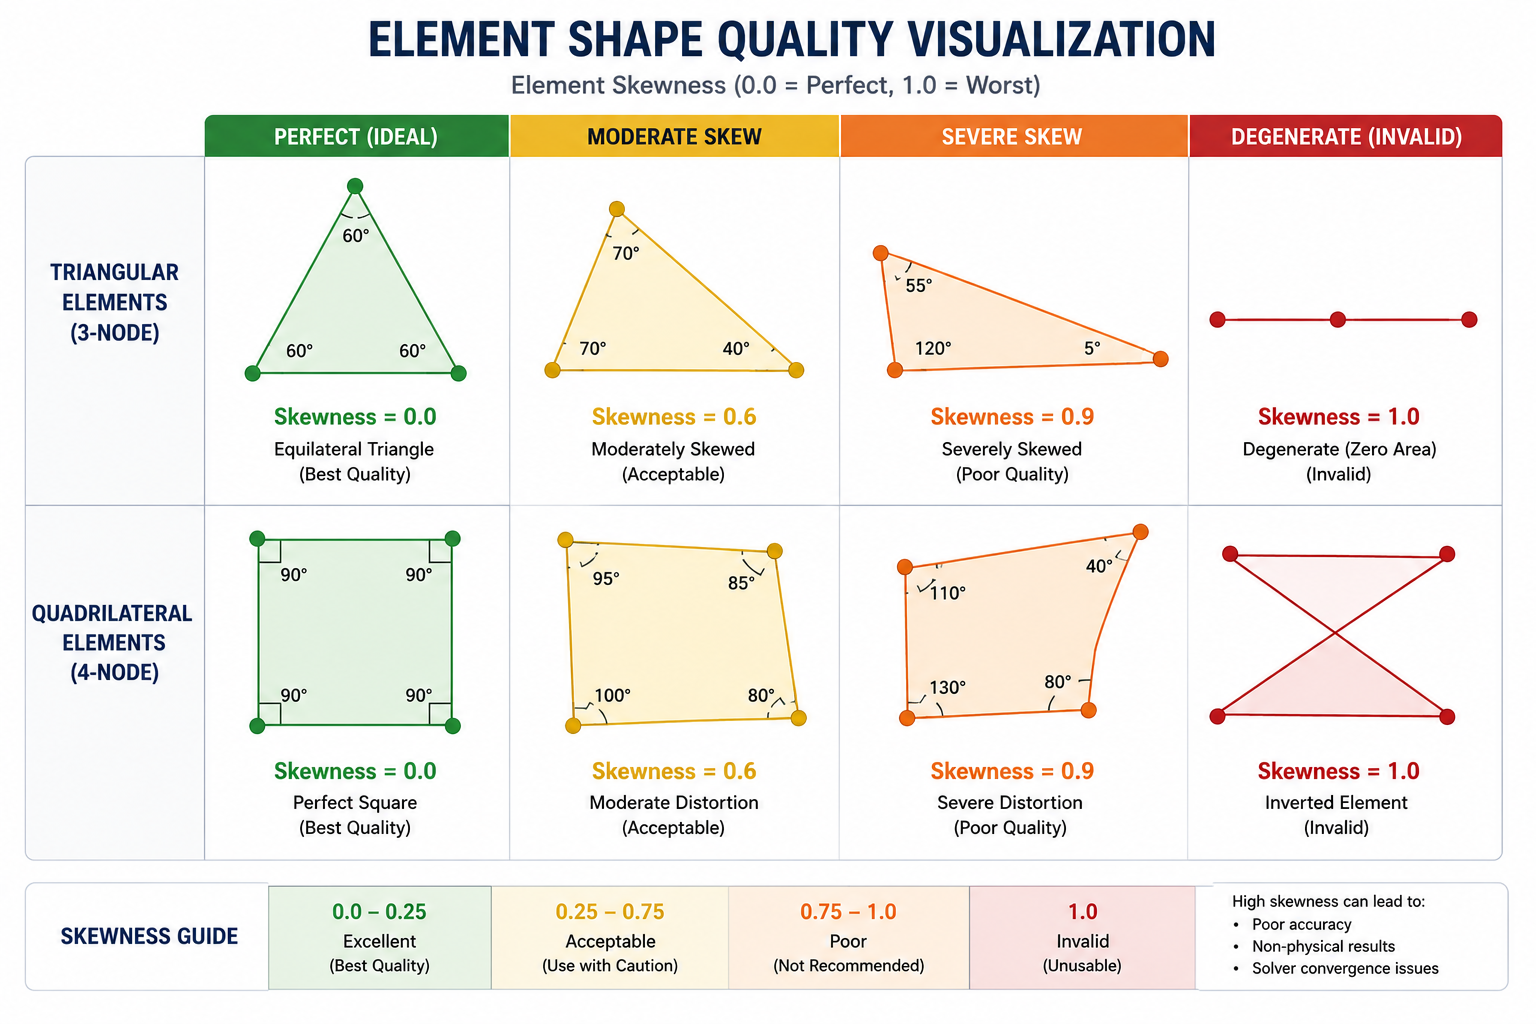
When an element is distorted (stretched, skewed, or warped), the Jacobian matrix varies across the element. If the distortion is severe enough, the Jacobian determinant can approach zero or even become negative at integration points within the element. A negative Jacobian indicates an inverted element: the element’s physical shape has been distorted so severely that the natural-to-physical mapping is no longer one-to-one. An inverted element will cause the FEA solver to either crash outright or produce completely incorrect results at that element’s location.
Between the ideal (Jacobian = 1.0 everywhere) and the inverted (Jacobian < 0.0) cases lies a spectrum of degraded accuracy. Jacobian values below 0.6 at any integration point indicate that the element shape distortion is significant enough that the shape function approximation is meaningfully compromised. Most professional FEA solvers (Ansys, Abaqus, Nastran, MSC Marc) flag elements below this threshold as potentially problematic and will warn the analyst. Some solvers allow the analyst to set the minimum acceptable Jacobian below which the analysis will be aborted.
Strain-Displacement Error: Why Aspect Ratio Matters
The aspect ratio of an element (the ratio of its longest edge to its shortest edge) directly affects the accuracy of the strain-displacement relationship within the element. In a well-shaped element with an aspect ratio near 1.0, the shape functions accurately interpolate both displacements and their spatial derivatives (strains) throughout the element volume. In a high-aspect-ratio element (an elongated or stretched element), the shape functions accurately capture displacement variation along the long axis but poorly capture variation along the short axis.
For structural FEA, this directional error in strain capture becomes critical in bending-dominated behavior. A beam element in bending has steep strain gradients across its thickness (the short dimension) and shallow gradients along its length (the long dimension). An elongated element aligned along the beam’s length will poorly capture the through-thickness strain gradient, underestimating the bending stiffness and the peak bending stress. This is why element aspect ratios above 5:1 in bending-dominated regions are considered problematic, while ratios up to 20:1 or even higher may be acceptable in membrane-dominated regions where the strain variation is aligned with the long element axis.
Mesh Quality Metrics: Thresholds, Meanings, and Measurement
Every major FEA solver provides mesh quality checking tools that compute and display quality metrics for every element in the model. Understanding what each metric measures, what the acceptable ranges are, and how violations of each metric affect the results is essential for interpreting these quality reports and deciding which elements need to be improved.
Metric
What It Measures
Ideal Value
Warning Threshold
Failure Threshold
Effect of Violation
Aspect Ratio
Ratio of longest to shortest element edge
1.0 (equilateral)
5:1 (hex/tet general)
10:1+ or 20:1 (bending-dominated)
Stiffness overestimation in bending; numerical ill-conditioning at high ratios
Jacobian (Normalized)
How well element shape maps from natural to physical coordinates
1.0 (perfect shape)
0.6 minimum (most solvers)
<0.0 (inverted element – always fix)
<0.6: shape function errors; <0.0: solver crash or completely wrong results
Skewness
Angular deviation of element from ideal shape
0.0 (no skew)
0.85 for FLUENT; 0.90 for structural
0.95+ (always fix)
Interpolation error in stress/strain; poor convergence in high-gradient regions
Severe interpolation errors; locking or excessive flexibility
Element Size Ratio (growth rate)
Transition rate between fine and coarse mesh regions
1.0-1.2 between adjacent elements
2.0 max in stress gradient regions
5.0+ (abrupt transition)
Stress discontinuity at mesh transitions; missed peak stress
Orthogonal Quality (Fluent CFD)
Element face orientation relative to flow direction
1.0 (best)
0.1 minimum
<0.01 (critical)
Diffusion errors in CFD; incorrect boundary layer resolution
How to Use This Table in Practice
The thresholds in this table are general guidelines, not absolute rules. The appropriate threshold depends on the analysis type, the solver being used, and the location of the element in the model. An element in a low-gradient region (far from stress concentrations, in a region dominated by uniform loading) can tolerate worse quality metrics than an element at a stress concentration or in a region with steep gradients.
The most important rule: zero inverted elements (negative Jacobian) in any final analysis mesh. This is the one mesh quality violation that is unambiguous: an inverted element always produces incorrect results and should always be corrected before running the analysis. All other quality metrics involve a judgment call based on the acceptable error level for the specific application, but negative Jacobian elements have no acceptable level.
Element Type Selection: The Decision That Precedes Mesh Quality
Before mesh quality metrics become relevant, the engineer must choose the element type for the analysis. This decision, made before the first element is created, determines the theoretical accuracy ceiling that even a perfect mesh can achieve. A mesh of perfectly shaped elements of the wrong type will produce results that are less accurate than a good mesh of the right type, regardless of how well the quality metrics score.
Element Type
DOF per Node
Captures Bending?
Accuracy vs Cost
Best Use Case
Avoid For
Linear Tet (C3D4/TET4)
3
No (constant stress)
Very poor accuracy for its cost
Never use alone for stress analysis
Any stress analysis – always use quadratic tet instead
Thick cross-sections, high shear-to-bending ratio applications
The Linear Tetrahedral Element: Why You Should Almost Never Use It
The linear tetrahedral element (C3D4 in Abaqus, TET4 in general) is the most commonly misused element in FEA practice. It is easy to generate automatically from CAD geometry using any commercial meshing tool, it creates meshes quickly, and it produces a solver file that runs without errors. For all of these reasons, it is the default element in many automatic meshing workflows, and for all of these reasons, it is a poor choice for structural stress analysis.
The linear tet element has only four nodes, each at a corner of the tetrahedron, and a constant stress field throughout the element volume. The displacement varies linearly from node to node, and because stress is the derivative of displacement, a linearly varying displacement produces a constant (zero-order) stress within each element. This means that a stress gradient across a region requires many elements to approximate, and the predicted peak stress is always an average over the element rather than a true point value. At a stress concentration, a linear tet mesh systematically underestimates the peak stress because the constant stress element cannot capture the steep gradient.
The quadratic tetrahedral element (C3D10 in Abaqus, TET10 in general) adds six mid-side nodes to the four corners, giving ten nodes total and a quadratic displacement field within the element. Because the displacement is quadratic, the stress (its derivative) is linear, meaning the stress can vary from corner to corner within a single element. This fundamentally different capability means that a quadratic tet mesh with the same element density captures stress gradients and stress concentrations dramatically better than a linear tet mesh. For complex organic geometry where hex meshing is impractical, the quadratic tet is the correct choice.
The Hourglassing Problem in Reduced-Integration Elements
Reduced-integration hexahedral elements (C3D8R in Abaqus, SOLID185 in Ansys) use one integration point at the element center rather than the full 2x2x2 = 8 integration point scheme of full-integration elements. This halves the computational cost of the element stiffness calculation, making them efficient for large models. However, reduced integration introduces a specific failure mode called hourglassing or zero-energy modes: deformation modes of the element that produce no strain energy at the single central integration point and therefore produce no restoring stiffness.
Hourglassing appears in the solution as a characteristic zig-zag displacement pattern visible in the deformed mesh, where alternating elements displace in opposite directions with very large magnitudes. The solution diverges from physical reality while the solver reports convergence (because the energy residual is still small, just distributed in a physically meaningless deformation pattern). Modern solvers include hourglass control algorithms that add artificial stiffness to resist the zero-energy modes, but these algorithms involve a user-defined scale factor that can either under-control (allowing hourglassing to corrupt results) or over-control (adding artificial stiffness that affects the real structural response).
The safest approach: use reduced-integration elements only when hourglass control is well-calibrated for the specific analysis type (dynamic explicit analyses where hourglassing is well understood and controlled, forming simulations where the software vendor has verified the hourglass control parameters), or switch to full-integration elements where hourglassing is not possible. For static stress analysis of structures where the mesh is not excessively distorted, full-integration elements are generally preferred despite their higher computational cost.
Mesh Convergence Studies: The Only Way to Know Your Results Are Reliable
The most important mesh quality verification tool available to every FEA analyst is the mesh convergence study: a systematic process of refining the mesh and comparing results across refinement levels to determine whether the results have converged to a mesh-independent value. A result that changes significantly as the mesh is refined is not reliable, because the level of refinement determines the answer rather than the physics. A result that stabilizes as the mesh is refined demonstrates that the mesh is fine enough to capture the relevant physics and that further refinement would not change the result meaningfully.
The Convergence Study Protocol
Identify the quantity of interest (QoI): Before meshing, identify the specific result that must be accurate: peak von Mises stress, maximum deflection, natural frequency, reaction force, temperature at a specific location. Mesh convergence is always with respect to a specific QoI, because different quantities converge at different rates with mesh refinement.
Create an initial coarse mesh: Generate the first mesh at a deliberately coarse element size. This is not the mesh you will use for the final analysis; it is the starting point for the convergence study.
Extract and record the QoI: Run the analysis on the coarse mesh and record the QoI value, the element count, and the total solve time.
Refine globally or locally: Reduce the element size by a factor of 2 (halving the mesh size in each dimension multiplies the element count by roughly 8 for 3D solid meshes). This is the h-refinement approach. Alternatively, increase the element polynomial order (p-refinement) while keeping the mesh coarse.
Repeat and plot convergence: Run the refined mesh, record the QoI, and plot QoI versus element count (or element size). Continue refining until the change in QoI between successive refinements is below a specified convergence criterion.
Apply Richardson extrapolation: Using two or more refinement levels, apply Richardson extrapolation to estimate the exact solution value and the discretization error. This provides a quantitative uncertainty estimate for the result rather than a qualitative judgment about whether the curve looks flat.
Mesh Convergence Convergence Criterion and Richardson Extrapolation CONVERGENCE CRITERION: Change in QoI from mesh N to mesh N+1 < 5% (engineering acceptable) Change in QoI from mesh N to mesh N+1 < 2% (high confidence) Change in QoI from mesh N to mesh N+1 < 1% (precision required)
RICHARDSON EXTRAPOLATION (2-level): Given: QoI_1 at mesh size h1, QoI_2 at mesh size h2 = h1/2 Estimated exact value: QoI_exact = QoI_2 + (QoI_2 - QoI_1) / (2^p - 1) where p = convergence order (p=2 for linear elements, p=3+ for quadratic)
Recommendation: Level 4 is adequate for engineering decisions. Level 5 adds 8x more elements for 0.9% additional accuracy.
h-Refinement vs p-Refinement vs hp-Refinement
Three mathematically distinct strategies exist for improving mesh accuracy: h-refinement reduces the element size (more, smaller elements of the same type), p-refinement increases the polynomial order of the element shape functions (same mesh, higher-order elements), and hp-refinement applies both simultaneously in a coordinated manner.
For smooth problems without singularities, p-refinement converges much faster than h-refinement: doubling the polynomial order of the elements reduces the error by a factor of 2^p, whereas halving the element size reduces the error by a factor of 2^p (where p is the order of the current elements). For a linear element mesh (p=1), halving the element size reduces the error by a factor of 4. For a quadratic element mesh (p=2), raising to cubic (p=3) may reduce the error by a factor of 8 for the same computational investment.
For problems with stress singularities (sharp corners, crack tips, contact edges), neither h-refinement nor p-refinement converges the local stress to a finite value, because the true solution has an unbounded stress gradient at the singularity. These cases require either singularity enrichment elements (special elements with the correct singular displacement field built into the shape functions, used in fracture mechanics), or deliberate exclusion of the singularity point from the convergence study, reporting the stress at a location removed from the singularity rather than at the singular point itself.
Stress Singularities: Where Mesh Convergence Studies Mislead
One of the most important and most frequently misunderstood aspects of FEA mesh quality is the stress singularity: a location in the model where the mathematical solution for the stress field approaches infinity, even though the real physical stress is finite. Stress singularities occur at sharp internal corners (re-entrant corners), at point loads or point constraints, and at crack tips in fracture mechanics problems. Every engineer using FEA must understand why singularities occur and how to handle them correctly.
Why Sharp Corners Produce Infinite Stress in FEA
Classical elasticity theory, which FEA implements numerically, predicts unbounded stress at sharp geometric re-entrant corners. This prediction is mathematically correct within the theory, but it does not represent a physical impossibility: in reality, every sharp corner has a finite radius (even if very small), every real material has a finite yield strength that prevents unbounded stress accumulation, and in fatigue design the relevant quantity is not the point stress at the corner but the stress in the process zone around it.
In an FEA model with a sharp internal corner, as the mesh is refined toward the corner, the peak stress continues to increase without bound. A convergence study at the corner node will show stresses that grow with every mesh refinement level and never converge to a stable value. An engineer who does not recognize this pattern may interpret the lack of convergence as a signal that the mesh needs further refinement, when in fact the correct response is to change the modeling strategy: add a fillet radius to the model geometry, or extract the stress at a location removed from the singularity using a Saint-Venant distance criterion.
The Saint-Venant Principle for Practical Stress Extraction
Saint-Venant’s principle states that the stress distribution at a cross-section far enough from a localized load or constraint is essentially independent of the exact distribution of that load. In FEA practice, this principle is applied to singularities: the stress at a distance from the singular point equal to the largest characteristic dimension of the stress perturbation is mesh-independent and physically meaningful, even though the stress at the singular point itself is not.
For a re-entrant corner in a plate under tension, the stress approximately one fillet-radius distance away from the corner is mesh-converged and corresponds to the local stress that governs fatigue initiation in the real structure. This is the quantity to extract and report, not the stress at the corner node itself. Most FEA guidelines for fatigue assessment of welded structures, pressure vessels, and aerospace structures define hot spot stress or structural stress methodologies that explicitly extract stress at defined distances from the geometric discontinuity for exactly this reason.
Adaptive Meshing: Automating the Convergence Process
Adaptive mesh refinement (AMR) is an FEA capability that automates the convergence study by computing an error estimate at each element, identifying elements where the error estimate exceeds a target threshold, and automatically refining those elements before solving again. The process iterates until all elements meet the error target. The result is a mesh that is fine where the physics demand it and coarse where coarse elements are adequate, without the engineer having to manually identify and refine high-error regions.
Error Estimators: How the Software Knows Where to Refine
Adaptive meshing requires an error estimator: a mathematical measure of how much error is present in each element’s solution. The most common type is the stress discontinuity error estimator, based on the observation that in an exact FEA solution, the stresses should be continuous across element boundaries. In a mesh of finite elements, the stresses are computed independently in each element and are generally discontinuous at the element boundaries. The magnitude of this stress discontinuity at each element boundary is proportional to the error in the adjacent elements.
The Zienkiewicz-Zhu (ZZ) error estimator is the most widely implemented in commercial FEA software. It computes a smoothed, continuous stress field by averaging the element stress values at each node, then computes the difference between the smoothed field and the element-level field at each integration point. The norm of this difference is the element error indicator. Elements with high error indicators are refined in the next adaptive cycle. The ZZ estimator is available in Ansys (as the Energy Norm Error tool), in Abaqus (as the error indicators for mesh-to-mesh solution mapping), and in Nastran (as the mesh sensitivity study tools).
When Adaptive Meshing is and Is Not Appropriate
Adaptive meshing is most effective for smooth problems without singularities: structural analysis of continuous components with smooth geometry under smoothly varying loads. In these cases, the error estimator correctly identifies regions of high error, the mesh refinement reduces that error efficiently, and the process converges to a well-distributed mesh with predictable accuracy.
Adaptive meshing is less effective for problems with singularities because the error estimator correctly identifies the singularity as a high-error region and will attempt to refine it indefinitely. Most adaptive meshing implementations include maximum refinement limits to prevent infinite refinement at singularities, but the result is typically a very fine mesh concentrated at the singularity that does not improve the physically meaningful stress result because the true solution at the singularity is unbounded. For these problems, the engineer must either remove the singularity by geometric modification (adding a fillet) or apply the Saint-Venant extraction strategy manually.
Platform-Specific Mesh Quality Guidance
Each major FEA platform has its own implementation of mesh quality checking, quality metric naming conventions, and default threshold settings. Knowing the specific tools in your platform and how to interpret their outputs prevents the confusion that arises when metric names or thresholds differ between platforms.
Ansys Mechanical
Ansys Mechanical provides mesh quality metrics under Mesh > Mesh Quality. The primary metrics available include: Element Quality (a composite metric from 0 to 1, target > 0.5 for most elements), Aspect Ratio (target < 5 for most analyses), Jacobian Ratio (target > 0.6 at all integration points, > 0 required), Warping Factor (target < 0.4 for shell elements), Maximum Corner Angle (target < 170 degrees), and Skewness (target < 0.9 for structural, < 0.85 for thermal/CFD).
The Ansys mesh quality report displays histograms of each metric and allows the engineer to visually identify elements below threshold. The Named Selections feature allows poor-quality elements to be selected, inspected, and manually remeshed using local mesh controls (sphere of influence, edge sizing, face sizing) without remeshing the entire model.
Abaqus/CAE
Abaqus uses the Verify Mesh tool (Mesh menu > Verify) to check element quality. Abaqus reports: warnings for elements where the Jacobian at any integration point is between 0 and the user-defined warning threshold (default 0.1), errors for elements with negative Jacobian, and analysis checks for elements where the aspect ratio exceeds the warning threshold. Abaqus additionally provides error indicators as output variables (ENDENERI, ESEDEN) that can be plotted as contour maps to visualize where mesh refinement would most improve the solution accuracy.
Siemens NX Nastran
Nastran provides the DMIG (Direct Matrix Input at Grid points) and PBARL/PBEAML beam cross-section quality metrics, but mesh quality checking for solid and shell elements is primarily performed in the pre-processor (Femap, NX Meshing) before the Nastran analysis is run. The pre-processor provides element quality checks including Jacobian, aspect ratio, warpage, taper, and interior angle checks with thresholds that can be customized for the specific Nastran solver version and analysis type. Nastran CBUSH and RBE element quality is checked separately through model validation routines that verify constraint consistency.
Frequently Asked Questions
Q: What is mesh quality in FEA and why does it matter?
Mesh quality in FEA describes how well the shape, size, and distribution of the finite elements approximate the geometry and physics of the problem being analyzed. Poor mesh quality degrades accuracy because finite element shape functions are derived for ideally shaped elements. When elements are distorted (high aspect ratio, skewed, or warped), the shape function approximation introduces errors in the computed strain and stress fields. The most critical quality metric is the Jacobian: an element with a negative Jacobian (inverted element) is always incorrect and must be fixed. Elements with Jacobian below 0.6 may produce inaccurate results in high-gradient regions.
Q: What is an acceptable aspect ratio for FEA mesh elements?
For general structural analysis, aspect ratios below 5:1 are acceptable for most element types. In bending-dominated regions, ratios above 5:1 can cause underestimation of bending stiffness and peak stress because the short-axis strain gradient is poorly captured. In membrane-dominated regions where the strain variation aligns with the long element axis, ratios up to 20:1 may be acceptable. For shell elements in the bending direction (through-thickness), at least 4 elements are typically required to capture the stress gradient accurately, which implies aspect ratios should be kept below 5:1 in the critical direction even if the overall element aspect ratio is higher.
Q: Should I use tetrahedral or hexahedral elements for structural FEA?
Quadratic tetrahedral elements (10-node tet) are generally the better choice for complex organic geometry because they can be generated automatically from CAD geometry and provide good accuracy with a reasonable element count. Linear tetrahedral elements (4-node tet) should almost never be used for structural stress analysis because their constant stress field systematically underestimates stress concentrations. Hexahedral (brick) elements provide the best accuracy per degree of freedom but require structured or semi-structured meshing that is time-consuming for complex geometry. The practical recommendation: use quadratic tet for complex geometry, use hex where geometry allows structured meshing and maximum accuracy is required.
Q: What is a mesh convergence study and how do I perform one?
A mesh convergence study is a systematic process of refining the mesh and tracking the change in a specific result quantity (peak stress, maximum deflection, natural frequency) across refinement levels. When the result changes by less than a specified percentage (typically 5% for engineering decisions, 2% for high-confidence analysis) between successive refinements, the mesh is considered converged. The process involves creating 3 to 5 mesh refinement levels with progressively smaller elements, running the analysis at each level, plotting the result versus element count, and checking whether the curve has plateaued. Richardson extrapolation can be applied to estimate the exact value and quantify the remaining discretization error.
Q: What is a stress singularity in FEA and how do I handle it?
A stress singularity is a location in the FEA model where the mathematical stress solution is unbounded (approaches infinity), even though the real physical stress is finite. Singularities occur at sharp re-entrant corners, at point loads, at point constraints, and at crack tips. In an FEA model with a singularity, the predicted stress at the singular point increases without bound as the mesh is refined, and a convergence study at that location will never converge.
The correct handling depends on the context: add a physical fillet radius to represent the real geometry, extract the stress at a distance from the singularity using Saint-Venant’s principle, or use specialized fracture mechanics elements at crack tips. Never report the stress value at a singular point as a meaningful result.
Q: What is hourglassing in FEA and how do I prevent it?
Hourglassing (also called zero-energy modes or kinematic modes) is a numerical instability that occurs in reduced-integration elements (elements using fewer integration points than the full integration scheme). The reduced integration point scheme fails to detect certain deformation modes (the hourglass modes) because these modes produce no strain at the single central integration point. The solution exhibits a characteristic checkerboard pattern of displacements with large magnitudes that is entirely non-physical. Modern solvers include hourglass control that adds artificial stiffness to resist hourglass modes. To prevent hourglassing: use full-integration elements in static stress analysis, use at least two or three elements through any thin-walled section, and review the deformed mesh carefully for checkerboard patterns after any analysis using reduced-integration elements.
Conclusion:
Every quality metric, threshold, and guideline in this article is a tool for engineering judgment, not a substitute for it. The mesh quality checker that reports all elements above 0.6 Jacobian and below 5:1 aspect ratio has done its job, but it cannot tell you whether those elements are in the right places, whether the mesh is fine enough near the features that govern the structural response, or whether the convergence study has been correctly interpreted for a problem with stress singularities.
The engineering judgment is: identifying the critical regions before meshing (where are the stress concentrations, the load introduction points, the contact interfaces?), choosing element types appropriate for the dominant structural behavior, performing a convergence study with respect to the quantity that actually matters for the engineering decision, and correctly distinguishing converging results from singularity behavior. These judgments are what the quality metrics support and inform, but they are not substituted by the metrics.
An FEA result supported by a mesh convergence study that demonstrates less than 5 percent change between the final two refinement levels, with no inverted elements, no Jacobian values below 0.6 in high-gradient regions, and element type selection appropriate for the dominant structural behavior, is a result that can be defended in an engineering review and relied upon for a design decision. That is the standard the discipline demands and the standard this article has provided the tools to meet.
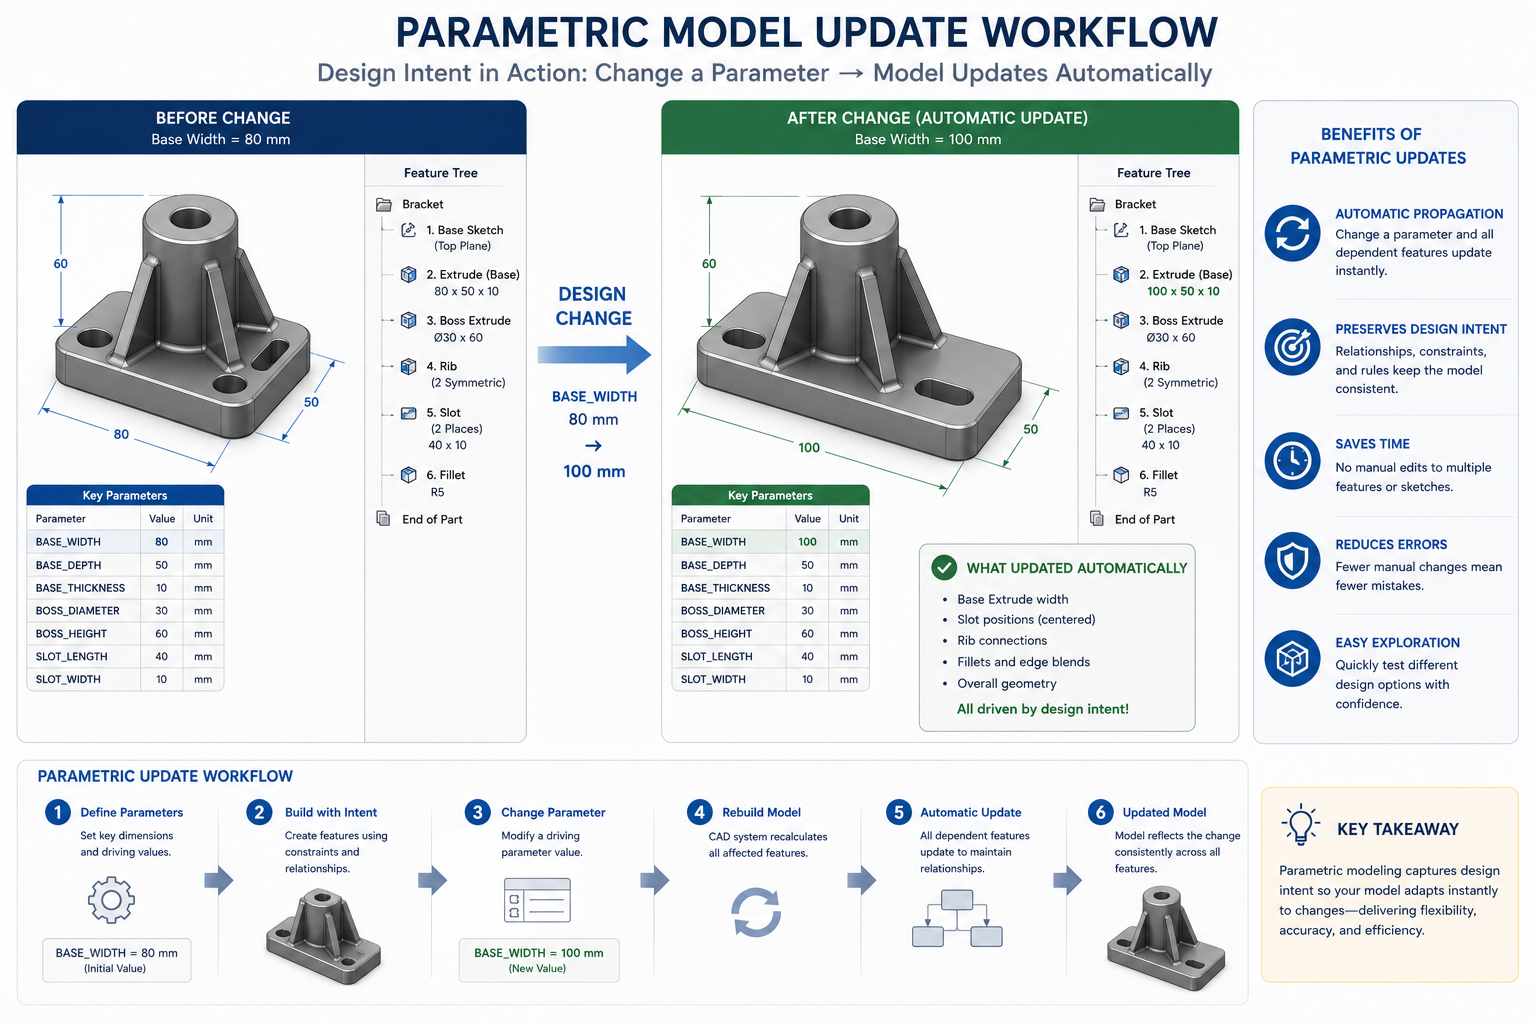
If you have ever opened a CAD model that someone else built, only to find that changing one dimension broke five other features, you already know what poor design intent costs. Hours of debugging. Redone features. Frustrated colleagues. And in worst cases, a complete rebuild.
It is one of the most common and expensive problems in engineering teams today. According to research by the National Institute of Standards and Technology (NIST)1, poor communication of design intent contributes to significant errors and rework in manufacturing. Yet most CAD training courses barely cover the topic, focusing instead on which buttons to click rather than why and how to model intelligently.
This guide will change that. Whether you are a mechanical engineer working in SolidWorks, a product designer in CATIA, or a manufacturing engineer using Fusion 360, the principles of design intent in CAD apply everywhere. You will learn exactly what design intent is, why it matters more than most engineers realize, and how to apply it in practical, actionable ways that slash rework from your workflow.
By the end of this article, you will have a clear framework for building CAD models that actually behave the way you intend them to, not just today, but through every revision, engineering change order, and design iteration to come.
1. What Is Design Intent in CAD?
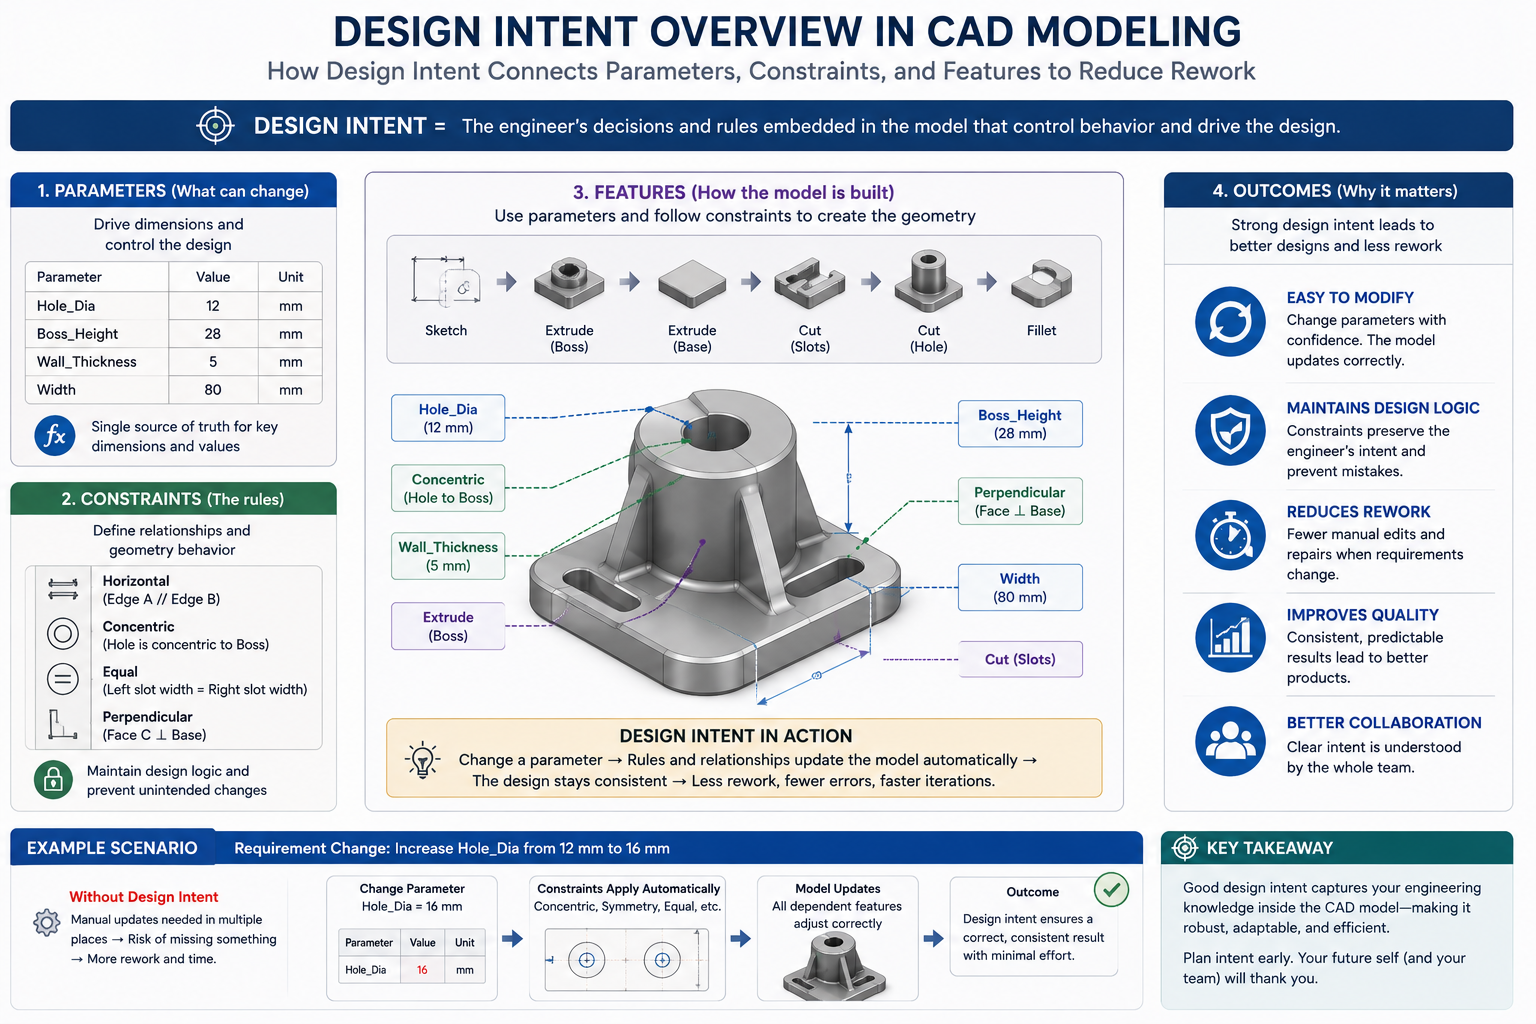
Design intent refers to the purpose, logic, and reasoning behind how a CAD model is constructed. It is not just about what the model looks like. It is about why the features exist in the order they do, how dimensions relate to each other, and how the model should behave when changes are made.
A classic definition used in the industry comes from PTC: design intent is a method in computer-aided design that defines relationships between objects so that a change to one propagates automatically to others. But in practice, it goes far beyond automated updates.
Think of design intent as the intelligence you build into a model. When a colleague opens your file six months from now and adjusts the flange width, does the bolt circle update automatically? Does the clearance hole stay in the right position? Does the drawing update correctly? If yes, your model has strong design intent. If not, expect rework.
Design intent encompasses:
How you constrain sketches (fully defined, driven by reference geometry, or floating)
The order of features in your feature tree (parent-child relationships)
How dimensions are driven (hardcoded numbers vs. named parameters and equations)
How parts relate to each other in assemblies (mates, references, skeleton models)
How well the modeling logic is documented so others can understand and modify it
In short, design intent is the difference between a model that works once and a model that keeps working as your design evolves.
2. Why CAD Rework Happens (And What It Actually Costs)
Before we talk about how to fix the problem, it helps to understand exactly where it comes from. CAD rework is rarely caused by one single mistake. It usually results from a series of small modeling decisions that seemed fine at the time but compound into major problems later.
The Most Common Root Causes of CAD Rework
Dimensions hardcoded as static numbers with no relationship to other features
Sketches that are under-constrained or over-constrained
Feature trees built in illogical order, creating unpredictable parent-child dependencies
Parts modeled in isolation without considering how they fit into an assembly
No naming conventions for features, dimensions, or parameters
Geometry copied from other models without transferring the underlying logic
Late-stage design changes that cascade through hundreds of downstream features
Multiple engineers working on a model with no shared understanding of how it was built
The Real Cost of Poor Design Intent
Industry studies consistently show that rework accounts for a significant portion of total engineering time. A common estimate in product development literature is that 20 to 40 percent of engineering hours are spent correcting or redoing prior work. In CAD modeling specifically, rework tied to poor model structure can be even higher because one upstream error can invalidate an entire feature tree.
Beyond time, there are downstream costs to consider. Designs sent to manufacturing with unresolved errors lead to scrap material, tool changes, and production delays. In regulated industries such as aerospace or medical devices, design errors that slip through to production can have safety implications and regulatory consequences.
The good news is that the majority of these costs are preventable, and design intent is the primary preventive tool available to every engineer who works in CAD.
3. The Connection Between Design Intent and Rework Reduction
Here is the core insight: rework happens when a model does not behave the way the engineer expected when something changes. Design intent is the practice of building those expected behaviors directly into the model from the start.
When design intent is embedded correctly, a model with strong constraints and parametric relationships can absorb design changes gracefully. Change the wall thickness of a bracket and the ribs update. Change the diameter of a shaft and the bearing fits update. Change the number of bolts in a pattern and the bolt circle redistributes automatically. None of that requires manual rework because the model already knows what you intended.
When design intent is absent or poorly applied, each change becomes a manual task. Engineers hunt through the feature tree, fix broken references, override dimensions by hand, and check every dependent feature one by one. This is the definition of preventable rework.
The relationship is direct: stronger design intent equals less rework. And it is not just about saving time. Models with clear design intent are safer to modify, easier to hand off to other engineers, and faster to update when customer requirements change.
4. Core Principles of Design Intent in CAD Modeling
There are several foundational principles that every engineer should internalize before building any model. These are not software-specific tips. They apply whether you work in SolidWorks, CATIA V5, Creo, Inventor, or any other parametric CAD platform.
Principle 1: Model for Change, Not for Now
The most important mindset shift in design intent work is this: you are not modeling the design as it currently exists. You are modeling the design as it needs to behave when it changes. Before you create a single feature, ask yourself: what is likely to change about this part? What must stay fixed? What relationships need to be preserved regardless of how dimensions shift?
Principle 2: Fully Constrain Your Sketches
An under-constrained sketch is a liability. It might look fine today, but when dimensions are updated, the geometry can drift in unexpected directions. Fully defining your sketches using dimensions, geometric relations (coincident, parallel, perpendicular, tangent), and references to fixed geometry ensures that your sketch always produces predictable results.
Principle 3: Use Parameters, Not Numbers
Wherever possible, replace hardcoded dimensions with named parameters and equations. Instead of entering “24” as a hole depth, create a parameter called “WallThickness” and drive the hole depth with an equation. Now when the wall thickness changes, the hole depth updates automatically. This is one of the highest-leverage changes you can make to your modeling workflow.
Principle 4: Respect Parent-Child Relationships
Every feature that references another feature creates a parent-child dependency. If the parent changes or is deleted, the child feature may fail. Plan your feature tree so that parent features represent the most stable aspects of your design, and child features handle the details that are more likely to change.
Principle 5: Make Your Modeling Logic Readable
A model that only you can understand is a liability to your team. Use descriptive feature names, logical grouping, and in-model annotations so that any competent engineer can open your file and understand what you built and why. This is especially critical in companies where models are maintained over long product lifecycles.
5. How to Plan Design Intent Before You Start Modeling
One of the biggest mistakes engineers make is jumping straight into modeling without a plan. Five minutes of planning before you open the CAD tool can save hours of rework later. Here is a practical planning process you can adopt today.
Step 1: Define What Drives the Design
Ask yourself: what are the critical dimensions or requirements that everything else must reference? For a mounting bracket, it might be the bolt pattern and the interface surface. For a housing, it might be the internal cavity dimensions. Identify these “anchor” elements first, because they will form the backbone of your feature tree.
Step 2: Identify What Is Likely to Change
Talk to your team, review the design brief, and think about where flexibility will be needed. If the customer might want three different sizes of the product, build that variability into your parameters from day one. If the mounting interface is likely to shift, reference it from a flexible reference plane rather than hardcoding its position.
Step 3: Sketch Your Feature Tree on Paper
Literally draw out the order of features before you model them. Decide which features will be parents, which will be children, and where you will place major reference geometry. This takes ten minutes and can prevent hours of tree reconstruction later.
Step 4: Set Up Named Parameters Before Your First Sketch
Create your key parameters (height, width, wall thickness, bolt diameter, pitch, etc.) before you draw a single line. Reference these parameters in your sketches and features from the start. This is far easier than retrofitting parameters into a model that was built with hardcoded values.
6. Parametric Modeling and Constraints: The Foundation of Design Intent
Parametric modeling is not just a CAD feature. It is the primary mechanism through which design intent gets encoded into a model. Understanding how to use it effectively is central to reducing rework.
What Makes a Model Truly Parametric?
A truly parametric model has all geometry driven by constraints and parameters, not by fixed coordinates or absolute positions. When you drag or modify a driving dimension, the model recalculates every dependent feature automatically. This is the behavior that makes rework reduction possible.
Geometric Constraints vs. Dimensional Constraints
These two types of constraints work together to define your geometry completely:
Geometric constraints define relationships between sketch entities: lines that are parallel, arcs that are tangent, points that are coincident. These are relationship-based and do not have numeric values.
Dimensional constraints define the size and position of geometry: the length of a line, the radius of an arc, the distance between two points. These take numeric values, ideally driven by named parameters.
Using both together gives you a sketch that is fully defined, predictable, and easy to update.
Equations: The Next Level of Design Intent
Most professional CAD tools allow you to write equations that link one parameter to another. For example: RibHeight = WallThickness * 1.5. Now every time the wall thickness changes, the rib height updates proportionally. This kind of relationship-driven modeling is what separates junior CAD users from senior design engineers.
You can also use equations to enforce design rules, such as minimum wall thickness for manufacturing, or to calculate derived values like volume, mass, or center of gravity. These smart equations embed real engineering knowledge directly into the model.
The Danger of Over-Constraining
It is possible to add too many constraints. An over-constrained sketch will refuse to update correctly because the constraints conflict with each other. Always aim for fully constrained but not over-constrained. Most modern CAD tools will warn you when a sketch is over-constrained, so pay attention to those warnings.
7. Feature Tree Planning: Order Matters More Than You Think
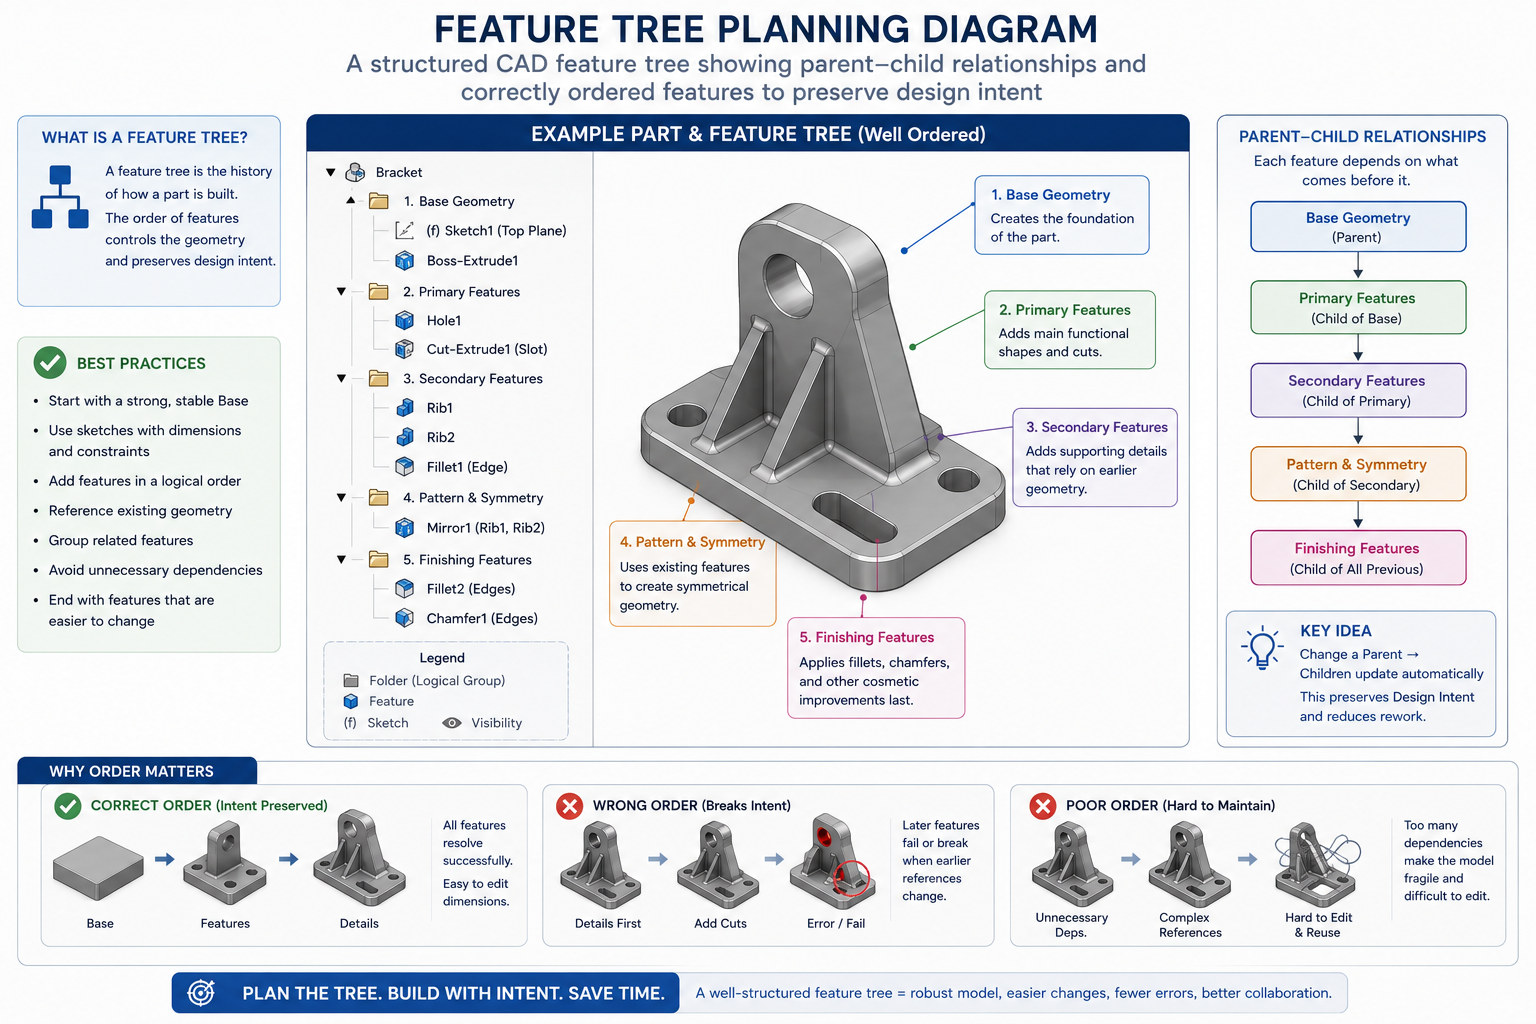
The order of features in your CAD feature tree is not just organizational housekeeping. It directly determines how robust your model will be when changes are made. Getting this order right is one of the most practical skills you can develop for reducing rework.
The Parent-Child Cascade Problem
Every feature in a parametric CAD model exists in a dependency chain. A hole references a face. That face is generated by an extrusion. That extrusion references a sketch. That sketch is constrained to a reference plane. Change anything in that chain and everything downstream is affected.
The problem comes when high-level decisions are buried deep in the tree, or when stable features depend on unstable ones. Plan your tree so that the most fundamental, least-likely-to-change features sit at the top, and the details that are more likely to evolve sit further down.
Best Practices for Feature Tree Organization
Start with reference geometry: origin planes, datum planes, axes, and coordinate systems
Follow with the primary body-defining features (base extrusions, revolves, lofts)
Add major form features next (flanges, bosses, ribs)
Apply detail features later (fillets, chamfers, cosmetic features)
Add holes, cutouts, and patterns after the primary geometry is established
Use folders or groups to organize related features and keep the tree readable
Name every feature descriptively, not as the default “Extrude1” or “Cut2”
Fillets: Why They Should Almost Always Come Last
This is a tip that trips up many newer engineers. Fillets add curvature to edges. When placed early in the feature tree, they create curved surfaces that other features reference. If you later modify the geometry before the fillet, the fillet may fail or produce unexpected results. As a general rule, apply fillets and chamfers at the end of your feature sequence, after all structural geometry is complete.
8. Using Skeleton Models and Master Sketches
For complex parts or large assemblies, skeleton modeling is one of the most powerful design intent tools available. It may take a bit more setup upfront, but it pays dividends in dramatically reduced rework throughout the product lifecycle.
What Is a Skeleton Model?
A skeleton model is a simplified, lightweight master reference file that contains the key geometry that drives your entire assembly: critical interfaces, bolt patterns, envelope boundaries, datum planes, and axes. All individual part models reference this skeleton, so when the skeleton changes, every dependent part updates automatically.
This approach is particularly common in aerospace, automotive, and industrial machinery design, where assemblies contain hundreds or thousands of parts that must maintain precise spatial relationships.
Master Sketches in Single Parts
You do not need a complex assembly to benefit from skeleton modeling logic. In a single complex part, you can create a master sketch (sometimes called a layout sketch) at the very top of your feature tree that defines the overall envelope and key reference dimensions. All subsequent features reference this master sketch, so geometry changes propagate through the entire part automatically.
The Business Case for Skeleton Modeling
An aerospace engineering team that adopts skeleton-driven assembly modeling can reduce late-stage design change time by a significant margin. Instead of a cascading series of manual updates across dozens of part files, the engineer modifies the skeleton once and reviews the downstream updates. The investment in setting up the skeleton pays back on the very first major engineering change.
9. Naming Conventions and Documentation Inside Your Model
This section is often skipped in CAD training, and it shows. Walk through any large engineering company and you will find CAD files with features named “Boss-Extrude47” and parameters called “d1@Sketch3”. This kind of naming makes models nearly impossible to understand, maintain, or modify without the original author present.
Why Naming Conventions Reduce Rework
When features and parameters are named clearly, every engineer who opens the file can immediately understand what each element represents. Changes become safer because the intent is visible. Troubleshooting a failed rebuild is faster because you can identify which feature broke and why. And onboarding new team members to existing models becomes a fraction of the time it would otherwise take.
Practical Naming Guidelines
Features: Use format [Type_Description_Reference]. Examples: Extrude_BasePlate, Cut_BoltHole_M8, Fillet_FlangeToCylinder
Parameters/Dimensions: Use clear noun phrases. Examples: FlangeDiameter, WallThickness, BoltCirclePCD, ThreadDepth_M10
Sketches: Name each sketch by what it drives. Examples: Sketch_BaseProfile, Sketch_MountingPattern, Sketch_RibLayout
Reference Geometry: Name planes and axes by their location or purpose. Examples: Plane_TopOfFlange, Axis_BoltCircleCenter
In-Model Documentation
Most CAD tools allow you to add notes or comments directly within the model or feature tree. Use these to explain non-obvious decisions. Why is the rib at 45 degrees and not 60? Why is the wall thickness driven by an equation rather than a direct input? These decisions, documented in the model, transform it from a collection of geometry into a record of engineering reasoning.
10. Design Intent in Assemblies vs. Individual Parts
Design intent applies differently depending on whether you are working on a standalone part or a complex assembly. Understanding the distinction helps you apply the right strategies in the right context.
Part-Level Design Intent
At the part level, design intent is primarily about how the geometry responds to dimensional changes. The tools are parametric sketches, feature ordering, named parameters, equations, and in-part reference geometry. The goal is a model that correctly captures one component’s functional behavior and physical geometry.
Assembly-Level Design Intent
At the assembly level, design intent extends to how parts relate to each other. Mates in SolidWorks, constraints in Inventor, or assembly constraints in CATIA define positional and orientation relationships between components. These should be driven by the same philosophy: mate to meaningful geometry (functional surfaces, centerlines, symmetry planes) rather than arbitrary edges or vertices.
Assembly design intent also involves deciding the hierarchy of component relationships. Which part is the anchor? Which parts move relative to which others? How are kinematic constraints expressed? Getting this right prevents assembly rebuild failures and reduces the manual effort required when component geometry changes.
Top-Down vs. Bottom-Up Assembly Modeling
Bottom-up modeling means building each part independently and assembling them afterward. It is faster for individual components but can miss interface requirements.
Top-down modeling means using the assembly context to drive individual part geometry. Parts are modeled in place, referencing each other through the skeleton or through in-context references. It is more complex to set up but preserves design intent far more effectively in large assemblies.
Most experienced engineers use a hybrid approach: define key interfaces top-down, then detail individual parts bottom-up.
11. Common Design Intent Mistakes That Cause Rework
Even experienced engineers make these mistakes. Knowing them helps you avoid them, and recognizing them in existing models helps you fix them before they compound.
Mistake 1: Referencing Unstable Geometry
Referencing a specific edge, face, or vertex that is likely to change is one of the most common causes of feature failures. When that edge is modified or deleted, every downstream feature that references it breaks. Use reference planes, axes, and named parameters instead of direct edge references wherever possible.
Mistake 2: Building Long, Linear Feature Trees
A feature tree where every feature depends on the one directly above it is fragile. Change anything near the top and everything below must rebuild. Use parallel feature structures and reference geometry to reduce these long dependency chains.
Mistake 3: Hardcoding Repeated Values
If the same dimension appears in multiple places (bolt diameter, clearance gap, material thickness), it should be a named parameter that appears once and is referenced everywhere. Hardcoding the same value in twelve different sketches means that a change to that dimension requires twelve manual edits, with a high risk of missing one.
Mistake 4: Suppressing Instead of Deleting
Suppressing a failed or unwanted feature feels like a quick fix. But suppressed features remain in the tree, continue to affect rebuild time, and can cause confusing behavior if accidentally re-enabled. Fix or delete features rather than suppressing them as a workaround.
Mistake 5: Ignoring the Feature Tree Until It Is a Mess
The feature tree is a living document of your modeling decisions. Clean it up as you go. Rename features when you create them. Reorganize when you add a major design section. Leaving cleanup to later usually means it never happens, and the next engineer to open the file spends hours deciphering what the model does before they can change anything.
12. Comparison: Modeling Approaches and Their Rework Risk
Not all CAD modeling approaches carry equal rework risk. The table below summarizes how different approaches perform across key design intent criteria.
Modeling Approach
Design Intent Preserved?
Rework Risk
Flexibility
Parametric modeling with constraints
Yes
Low
High
Direct modeling (no constraints)
No
High
Low
Parametric with poor feature order
Partial
Medium
Medium
Skeleton-driven assembly modeling
Yes
Very Low
Very High
Copy-paste geometry (dumb solids)
No
Very High
Very Low
As the table makes clear, parametric modeling with well-planned constraints and skeleton references consistently delivers the lowest rework risk. The upfront investment in structure pays back many times over across the life of a design.
13. Real-World Examples of Design Intent in Action
Example 1: Automotive Bracket Family
A tier-one automotive supplier needed to produce five variants of a suspension bracket for different vehicle platforms, each with a slightly different bolt pattern, wall thickness, and overall envelope. Rather than building five separate models, their lead engineer created one parametric model with a configuration table. Each variant was a configuration driven by named parameters. When a material change required a 10% increase in wall thickness across all variants, the engineer changed one parameter and all five configurations updated in under a minute. Manual approach would have required hours of rework across five files.
Example 2: Industrial Machine Redesign
A manufacturing equipment company received a request to scale up an existing machine frame by 25% while maintaining all interface dimensions at the control panel. The original model had been built without design intent: dimensions were hardcoded, features were randomly ordered, and nothing was named. The redesign took two weeks of rework. The company subsequently invested in rebuilding their standard frame models with full parametric intent. The next scale-up request, which came eight months later, was completed in a single afternoon.
Example 3: Aerospace Assembly Change Management
An aerospace design team used skeleton-driven assembly modeling for a complex wing rib assembly. When a structural analysis revealed that the main spar needed to shift forward by 12 millimeters to optimize load distribution, the engineer updated the spar reference plane in the skeleton model. All 47 dependent rib components updated their positional relationships automatically. The design review the following day confirmed that all interfaces remained correct. Without the skeleton, each rib would have required individual manual repositioning.
14. Frequently Asked Questions
Q: What is design intent in CAD?
A: Design intent is the reasoning and logic behind how a CAD model is built. It defines the relationships between features, dimensions, and constraints so that the model behaves predictably when changes are made.
Q: How does design intent reduce CAD rework?
A: When a model is built with clear design intent, changes propagate automatically through related features. You do not have to manually fix every dimension or relationship each time the design evolves.
Q: What are the most common causes of CAD rework?
A: Common causes include poorly ordered feature trees, over-constrained or under-constrained sketches, hardcoded dimensions instead of parameters, lack of naming conventions, and missing documentation of modeling decisions.
Q: What is parametric modeling and how does it support design intent?
A: Parametric modeling uses dimensions and constraints to define geometry. Changing one parameter automatically updates all dependent features. This is the foundation of intent-driven CAD modeling.
Q: How do you document design intent in a CAD model?
A: Use descriptive feature and parameter names, add in-model notes and annotations, maintain a design rationale document, and structure your feature tree logically so that others can follow your modeling decisions.
Q: What is a skeleton model in CAD?
A: A skeleton model is a master reference geometry (planes, axes, key points) that drives the entire assembly. When one part changes, all others update through the skeleton, which drastically reduces rework in large assemblies.
Conclusion
Every hour you spend building design intent into your CAD models is an hour that prevents multiple hours of rework later. This is not a theoretical claim. It is the lived experience of every senior CAD engineer who has managed complex product designs through multiple revision cycles.
The practices covered in this guide, from fully constraining sketches and using named parameters with equations, to planning your feature tree order and adopting skeleton-driven assembly modeling, form a coherent system. They are not isolated tips. They are parts of an approach to modeling that treats the CAD file as a living engineering document rather than a static picture of geometry.
Start small if the full approach feels overwhelming. Pick one model you are currently building and apply just two or three of these principles: name your features properly, set up parameters before your first sketch, and plan your feature order on paper. Notice the difference when you make your first revision.
Then go further. Review your team’s modeling standards. Audit your most-modified models for design intent weaknesses. Invest in rebuilding your most frequently reused part templates with better parametric structure. Each of these steps compounds over time into a measurable reduction in engineering rework across your organization.
Design intent is not a feature in your CAD software. It is a skill. And like any engineering skill, it improves with deliberate practice.
Ready to reduce CAD rework in your team?
Explore related guides on parametric modeling best practices, CAD file management, and design for assembly to build a complete, rework-resistant CAD workflow.
Most AutoCAD users start their careers working in 2D: drawing lines, arcs, and polylines on a flat plane. At some point, the need arises to take those 2D drawings, whether they are orthographic views from a hand drawing, a scanned technical sketch, or an existing 2D CAD file, and construct a proper 3D solid model from them. This is the fundamental skill that bridges 2D drafting and 3D engineering design.
It is also, honestly, one of the tasks that AutoCAD tutorials handle poorly. Most guides either teach 3D modelling from scratch without explaining how to interpret existing 2D views, or they explain how to generate 2D drawings FROM an already-completed 3D model. Neither of those answers the question most engineers and students are actually asking: I have a set of 2D orthographic drawings and I need to build the 3D solid from them. Where do I start?
This guide answers that question from beginning to end. It covers the complete workflow: understanding orthographic projection, setting up the AutoCAD 3D modelling workspace, configuring the User Coordinate System (UCS) for each operation, building the 3D solid using EXTRUDE, REVOLVE, LOFT, SWEEP, and PRESSPULL, adding features using Boolean operations, and finally generating professional 2D drawing views from the completed 3D model using FLATSHOT and VIEWBASE. Every section includes numbered steps and practical guidance that works in the real drawing environment.
Quick Overview: The process of creating a 3D model from 2D views in AutoCAD has five stages: (1) Read and understand the 2D orthographic views to mentally reconstruct the 3D shape. (2) Set up the 3D Modelling workspace and configure visual styles. (3) Draw 2D profiles on the correct planes using the UCS. (4) Use solid creation commands (EXTRUDE, REVOLVE, LOFT, SWEEP, PRESSPULL) to generate 3D geometry from those profiles. (5) Use Boolean operations (UNION, SUBTRACT, INTERSECT) to combine and cut geometry to produce the final form.
Before touching AutoCAD, the most important skill for creating a 3D model from 2D views is the ability to read orthographic projection drawings correctly. Orthographic projection is the system used to represent a 3D object on a 2D drawing sheet using multiple flat views, each showing the object from a different direction.
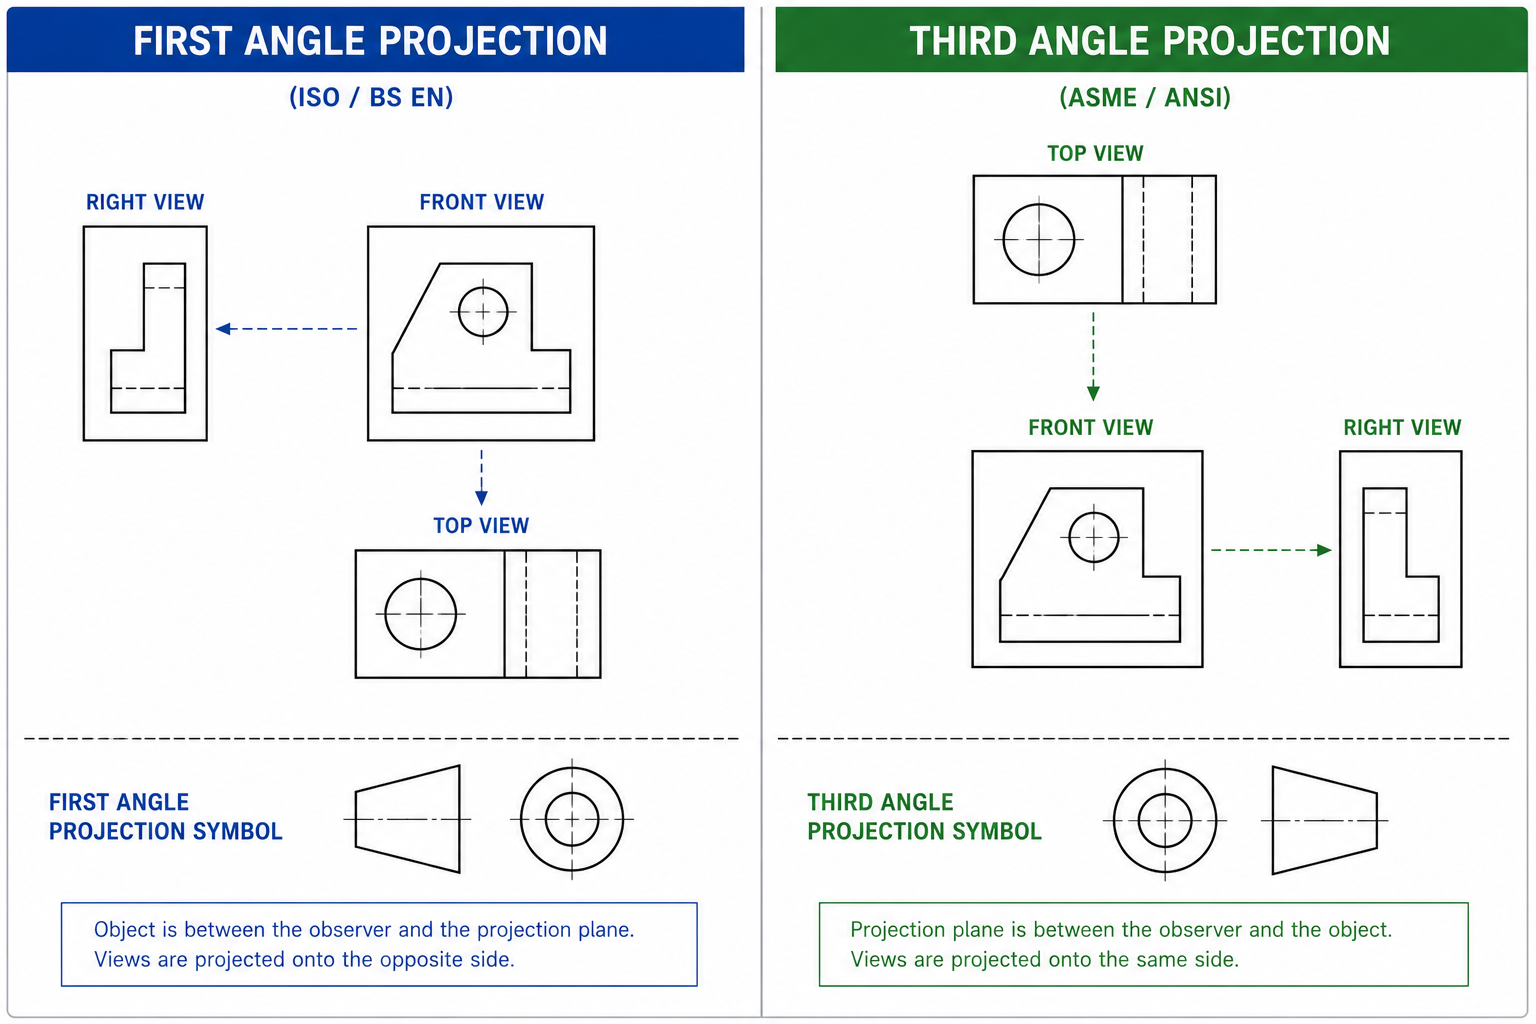
First Angle vs Third Angle Projection
There are two projection systems used globally, and confusing them leads to completely wrong 3D models:
Projection Type
Used In
View Arrangement
Symbol
First Angle (European)
UK, Europe, Asia (except USA/Canada/Australia)
The front view is in the centre. The right-side view is placed to the LEFT of the front view. The top view is placed BELOW the front view.
Circle with a truncated cone pointing left
Third Angle (American)
USA, Canada, Australia
The front view is in the centre. The right-side view is placed to the RIGHT of the front view. The top view is placed ABOVE the front view.
Circle with a truncated cone pointing right
Always check which projection system a drawing uses before modelling. The projection symbol is usually located in the title block. Building from the wrong projection system produces a mirror-image or incorrectly oriented 3D model.
The Three Standard Views and What Each Shows
Front View (Elevation): Shows the height and width of the object as seen from the front. This is almost always the most informative view and the starting point for 3D modelling.
Top View (Plan): Shows the width and depth of the object as seen from above. Reveals the footprint and any features on the top surface.
Side View (Right or Left): Shows the height and depth of the object. Reveals the profile of the side face and any features not visible from the front.
The golden rule of orthographic reading: any dimension that appears in two adjacent views refers to the same feature. Width is shared between the front view and the top view. Height is shared between the front view and the side view. Depth is shared between the top view and the side view. When a feature is visible in all three views, it is fully defined: you know its exact position, shape, and size in 3D space.
Hidden Lines and Centre Lines in 2D Views
On engineering drawings, hidden lines (dashed lines) indicate edges and features that exist behind the visible surface being shown. These are critically important when 3D modelling: they reveal holes, channels, recesses, and internal features that are not visible in the current view but must be represented in the 3D solid. Centre lines (dashed-dot lines) indicate the axis of symmetry, the centre of circular features, and the position of holes. Always account for every hidden line in your 3D model.
Read pillar content: AutoCAD tutorials for beginners and professionals
Setting Up the AutoCAD 3D Modelling Workspace
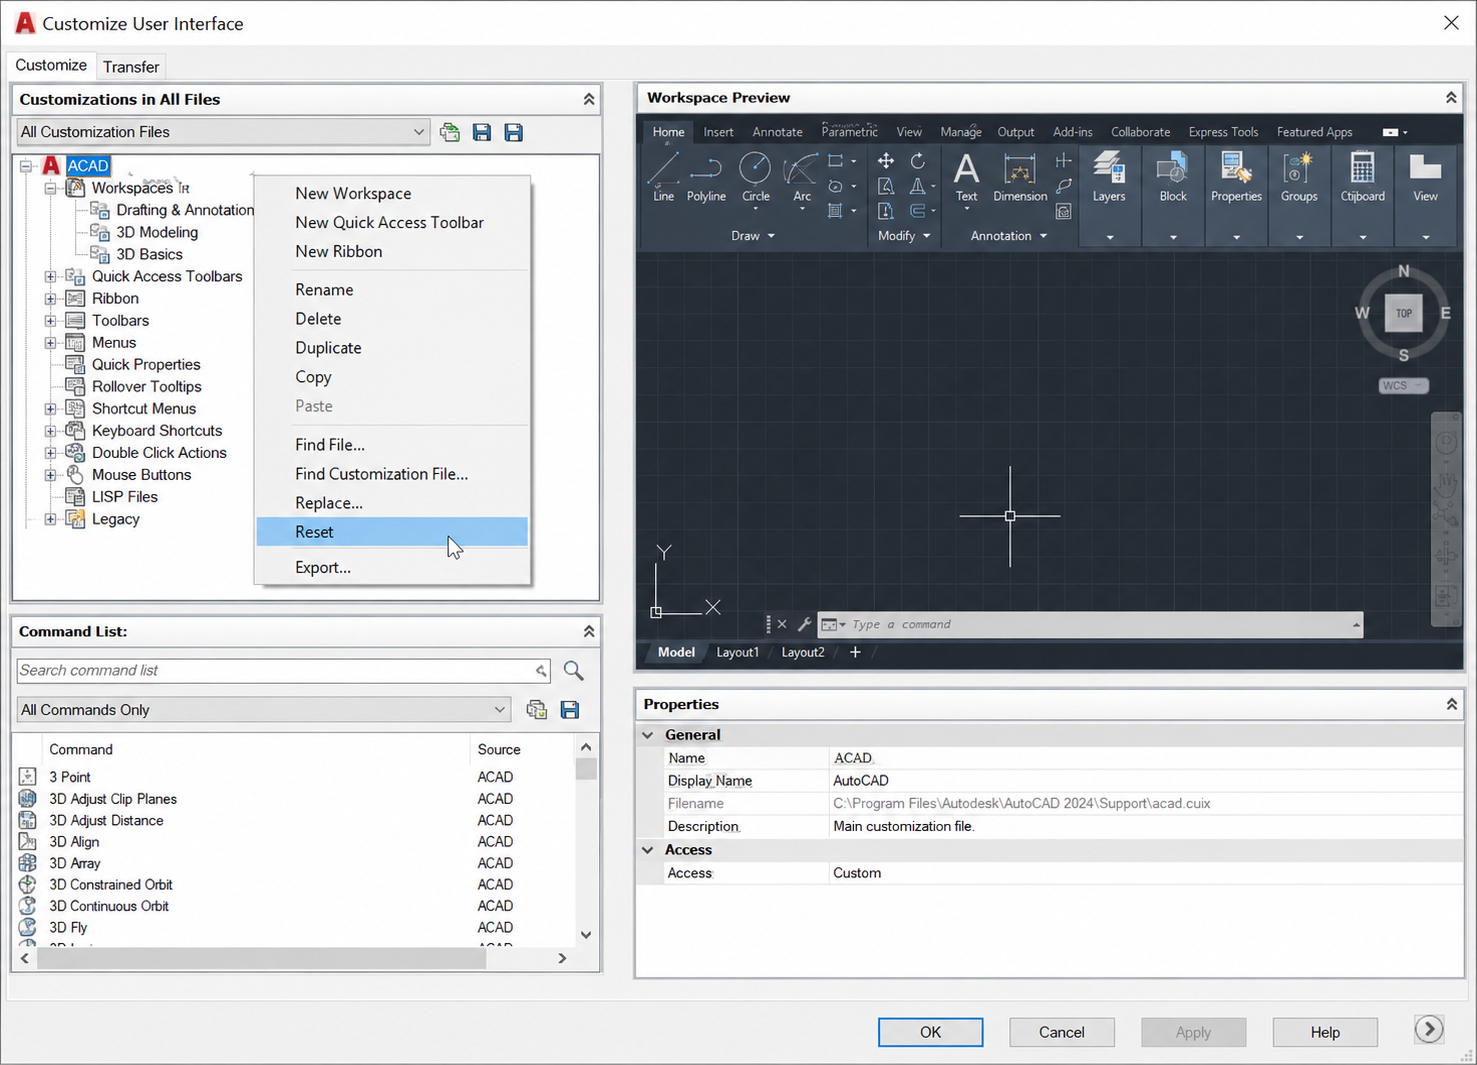
AutoCAD organises its tools into workspaces. The default Drafting and Annotation workspace is configured for 2D work and hides the 3D tools. Before any 3D modelling, switch to the dedicated 3D environment.
Switching to the 3D Modelling Workspace
Click the Workspace Switching icon in the bottom-right of the status bar (gear icon).
Select 3D Modelling from the menu. The ribbon updates to show 3D-specific tabs and panels: Home (with 3D tools), Solid, Surface, Mesh, Visualize, and others.
Setting Up the Visual Style
AutoCAD’s visual style controls how 3D geometry is displayed on screen. For most 3D modelling work, the ideal visual style is Conceptual or Shades of Gray: these display solid faces with shading that makes the 3D form clearly visible while keeping edges defined.
In the View tab > Visual Styles panel, click the dropdown and select Conceptual or Shades of Gray.
Alternatively, type VSCURRENT in the command line, press Enter, and type C for Conceptual.
Setting Up Multiple Viewports
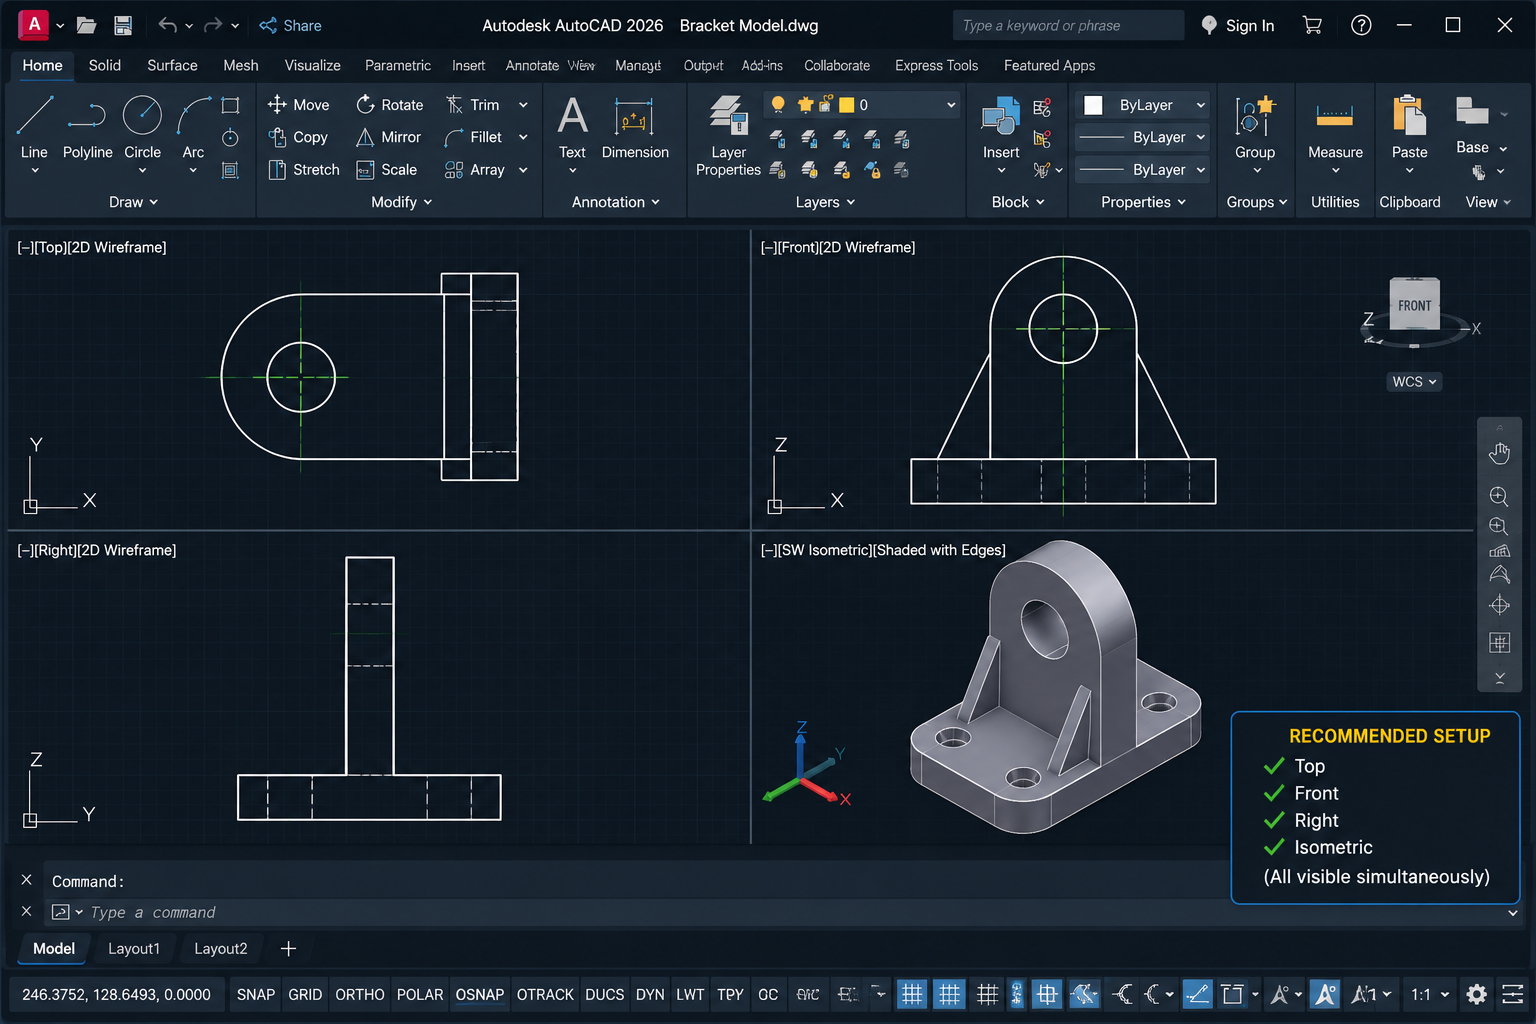
Working in 3D is significantly easier when you can see the model from multiple directions simultaneously. Setting up a four-viewport layout (Top, Front, Right, Isometric) at the start of any 3D session is strongly recommended.
Go to View tab > Viewports panel > Named Viewports.
Select Four: Equal from the standard viewports list and click OK.
Click in each viewport and use the View Cube (top-right corner) or type VIEW to set each viewport to a different view direction: Top, Front, Right/Left, and SE Isometric.
Professional Habit: Before starting 3D work, set your 3D coordinate system to World UCS by typing UCS and pressing Enter, then W and Enter. This resets the UCS to the standard X (right), Y (up), Z (toward you) orientation. All subsequent modelling operations will reference a known, consistent coordinate base.
Understanding the User Coordinate System (UCS) in 3D
The User Coordinate System (UCS) is the single most important concept to understand in AutoCAD 3D modelling. Every drawing operation in AutoCAD happens relative to the current UCS. In 2D work, the UCS is always flat on the screen and most users never think about it. In 3D, you must actively control the UCS to draw profiles on the correct planes.
Think of the UCS as a movable drawing board. When you draw a 2D profile to extrude, AutoCAD draws it on the current XY plane of the UCS. If the UCS is oriented with its XY plane aligned to the front face of your model, you will draw the front profile correctly. If you need to draw on the top face, you rotate or move the UCS so its XY plane aligns to the top. Getting the UCS wrong is the most common cause of 3D profiles appearing in the wrong position or orientation.
Key UCS Commands
Command / Option
What It Does
When to Use It
UCS > W (World)
Resets UCS to the default World coordinate system: X right, Y up, Z toward viewer
At the start of any modelling session and whenever you want to return to the global reference system
UCS > F (Face)
Aligns the UCS XY plane to a selected face of a 3D solid
When you need to draw on or extrude from a specific face of an existing solid
UCS > V (View)
Aligns the UCS to the current view direction (XY plane perpendicular to the view)
When you need to draw text or 2D annotation flat to the current view
UCS > 3P (3 Points)
Defines the UCS using three picked points: origin, X direction, Y direction
When you need to define a custom inclined or angled plane not aligned to any standard view
UCS > X / Y / Z
Rotates the current UCS around the specified axis by a defined angle
When you need to tilt the drawing plane by a known angle from its current orientation
UCSMAN (UCS Manager)
Opens the UCS Manager dialogue to save, restore, and manage named UCS configurations
In complex models where you use many different UCS orientations and need to switch between them reliably
The Most Common UCS Mistake: Drawing a 2D profile for extrusion without first verifying the current UCS orientation. If you draw what you think is a front-face profile but the UCS is still set to Top view orientation, the profile will be flat on the ground plane and the extrusion will go sideways rather than forward. Always check the UCS icon orientation before drawing. The X arrow should point in the direction you expect, and the Y arrow should point upward (for front-face profiles).
Step 1: Draw Your 2D Profiles in the Correct Planes
The foundation of AutoCAD 3D modelling is a correctly drawn 2D profile. A profile is a closed 2D shape (polyline, region, or a closed boundary of lines and arcs) that defines the cross-section or outline of a 3D feature. The accuracy of your 3D model depends entirely on the accuracy of these profiles.
Rules for Profiles That Work Reliably
Profiles must be closed: A polyline must have its last segment connecting back to its first point. Use PEDIT > Close to close an open polyline, or REGION to convert a set of connected objects into a closed region.
Profiles must be on the correct plane: Set the UCS before drawing. Draw all profile geometry while the UCS XY plane is aligned to the intended extrusion plane.
Profiles must be drawn at true scale: Draw dimensions exactly as stated on the 2D drawing. Use the exact dimensions from the front, top, or side view as appropriate. Do not scale or approximate.
Use OSNAP for all intersections: Ensure endpoints connect precisely. Use PEDIT > Join to combine separate line segments into a single closed polyline before extruding.
One profile per closed region: If your profile has nested closed shapes (for example, an outer rectangle with a circular hole), you can create both as separate closed profiles and then subtract the inner from the outer after extrusion.
Drawing a Profile from a 2D Front View
Set the UCS to World (type UCS, Enter, W, Enter).
In your isometric or front viewport, type PL (POLYLINE) and Enter.
Draw the outline of the front view profile using the dimensions from the 2D drawing, using ORTHO (F8) to constrain to horizontal and vertical.
When the polyline is closed back to the start point, type C and Enter to close it exactly. Verify closure with PEDIT > Close if needed.
To include arcs within a polyline profile, switch between line and arc mode within the POLYLINE command using the A (Arc) and L (Line) sub-options.
Step 2 EXTRUDE: Pushing a 2D Profile into a 3D Solid
EXTRUDE is the most fundamental and widely used 3D solid creation command in AutoCAD. It takes a closed 2D profile and pushes it a specified distance perpendicular to its plane, generating a 3D solid with the cross-section of the profile.
When to Use EXTRUDE
Use EXTRUDE for any component that has a consistent cross-section along one axis: prismatic parts, beams, channels, frames, extruded aluminium profiles, panels, plates with cutouts, and most architectural elements. It is the right command when the front view and side view are different but the top view shows a uniform shape.
Full Step-by-Step: EXTRUDE Command
Draw your closed 2D profile on the correct UCS plane (see Step 1).
Type EXT (EXTRUDE) and press Enter.
Select the closed profile (polyline or region). Press Enter to confirm selection.
AutoCAD prompts: Specify height of extrusion or [Direction/Path/Taper angle/Expression]:
For a straight extrusion to a specific depth, type the depth dimension from your 2D side view and press Enter. The profile extrudes perpendicular to its drawing plane.
The 3D solid appears. Use the orbit tool (type 3DORBIT or press Shift + middle mouse button) to inspect the result from different angles.
EXTRUDE Advanced Options
Direction: Specify two points to define the direction vector of the extrusion instead of the default perpendicular. Allows diagonal extrusions.
Path: Extrude the profile along a drawn path (line, arc, polyline, or spline). Produces tapered or curved extrusions following the path. Similar to SWEEP (covered next).
Taper angle: Adds a draft angle to the extrusion walls. Positive angle tapers inward, negative angle tapers outward. Used for injection moulded parts and castings requiring draft.
Best Practice: After extruding, immediately check the result in the isometric viewport. The depth of the extrusion should match the depth dimension shown in the top view of your 2D drawing. If the solid looks correct in the front viewport but wrong from above, the extrusion direction may need to be reversed. Type EXTRUDE, select the profile, and enter a negative depth value to extrude in the opposite direction.
Step 3 REVOLVE: Creating Solids of Revolution
The REVOLVE command creates a 3D solid by rotating a 2D profile around a specified axis. It is the correct command for any object that is radially symmetric: shafts, bolts, cylinders, cones, pipes, flanges, turned components, and any part whose cross-section, when rotated 360 degrees around its centre axis, produces the complete 3D form.
Identifying Parts That Require REVOLVE
On 2D orthographic drawings, parts suited to REVOLVE are easy to identify: the front view and side view are identical or nearly identical (circular symmetry), and the top view shows a circle or concentric circles. The 2D profile for REVOLVE is drawn as a half-section: the right half of the cross-sectional outline from the centre axis outward.
Full Step-by-Step: REVOLVE Command
Draw the half-profile of the component as a closed polyline or region. Draw it on the side you want to revolve: one edge of the profile must lie exactly on the intended axis of revolution.
Draw the axis line for the revolution, or identify that the profile’s straight edge will serve as the axis.
Type REV (REVOLVE) and press Enter.
Select the closed profile. Press Enter.
AutoCAD prompts: Specify axis start point or define axis by [Object/X/Y/Z]:. Click the first point of the revolution axis.
Click the second point of the revolution axis, or type X to revolve around the X axis, Y for Y axis, or Z for Z axis.
AutoCAD prompts: Specify angle of revolution:. For a complete solid, type 360 and press Enter. For a partial revolution (e.g. a half-pipe or swept arc), enter the angle.
Step 4 LOFT: Blending Between Two or More Profiles
The LOFT command creates a 3D solid or surface that blends smoothly between two or more cross-section profiles located at different positions along the model. It is the correct command when a component changes shape from one cross-section to another: tapered housings, aircraft fuselage shapes, transitions between square and round ducts, and any component whose profile varies along its length.
Full Step-by-Step: LOFT Command
Draw at least two closed 2D profiles at different positions along the intended axis of the solid. Each profile defines the cross-section of the solid at that location.
Type LOFT and press Enter.
Select the cross-section profiles in order from one end of the solid to the other. Press Enter after selecting all profiles.
AutoCAD prompts with options: Guides / Path / Cross-sections only / Settings. For most cases, press Enter to accept cross-sections only and AutoCAD creates the lofted solid.
In the Loft Settings dialogue, choose Smooth Fit for organic shapes or Ruled for a linear (flat-faceted) transition between profiles.
Step 5 SWEEP: Extruding a Profile Along a Path
The SWEEP command extrudes a 2D profile along any drawn path: a line, arc, polyline, circle, ellipse, or spline. Unlike EXTRUDE (which always extrudes perpendicular to the profile plane), SWEEP follows the geometry of the path. It is the correct command for curved parts: pipe bends, handrails, spiral springs, cam profiles, and any component with a consistent cross-section following a curved or complex path.
Full Step-by-Step: SWEEP Command
Draw the cross-section profile (the shape you want to sweep). This must be a closed polyline or region.
Draw the path that the profile will follow (a line, arc, polyline, circle, or spline).
Type SWEEP and press Enter.
Select the cross-section profile. Press Enter.
AutoCAD prompts: Select sweep path or [Alignment/Base point/Scale/Twist]:. Click the path object.
AutoCAD sweeps the profile along the entire path, generating the 3D solid.
Step 6 PRESSPULL: The Fastest Way to Add or Remove Material
PRESSPULL is one of the most intuitive and fastest tools for modifying 3D solids in AutoCAD. It detects closed bounded regions on the surface of a solid or within a 2D drawing and either pushes (removes material) or pulls (adds material) those regions to create features. It works like a physical push-and-pull action: click inside a bounded area and drag to add or subtract a boss or pocket.
Full Step-by-Step: PRESSPULL Command
Type PRESSPULL and press Enter.
Move the cursor over the bounded region you want to press or pull (a face of a solid, a closed polyline on a solid face, or a 2D closed boundary in model space). The region highlights.
Click inside the highlighted region.
Move the cursor upward to pull (add material) or downward to press (remove material). The solid face deforms dynamically.
Type the exact distance and press Enter, or click a second point to define the depth of the press or pull.
PRESSPULL vs EXTRUDE: PRESSPULL is best for quickly adding or removing features on an existing solid (adding a boss, cutting a pocket, pushing a hole). EXTRUDE is better for creating the initial solid from a flat profile or for complex extrusions with taper or path options. In practice, most engineers use EXTRUDE or REVOLVE to create the base solid and PRESSPULL to add or remove features.
Step 7 Boolean Operations: Combining and Cutting Solids
Boolean operations are the fundamental tools for combining, cutting, and intersecting 3D solids to create complex forms from simpler ones. In AutoCAD, the three Boolean commands are UNION, SUBTRACT, and INTERSECT. Together they form the backbone of constructive solid geometry (CSG) modelling, the approach underlying most 3D solid modelling workflows.
UNION: Combining Two or More Solids
UNION merges two or more overlapping or touching 3D solids into a single combined solid object. Use it to combine separate solid features into one complete component.
Type UNION and press Enter.
Select all the 3D solid objects you want to combine. Press Enter.
AutoCAD merges all selected solids into one unified solid.
SUBTRACT: Cutting One Solid from Another
SUBTRACT removes the volume of one solid from another. It is used to create holes, pockets, slots, recesses, and any feature that removes material. The workflow is: create the solid body first, then create the cutting solid (a cylinder for a hole, a box for a rectangular pocket), then subtract the cutter from the body.
Create the body solid (the part from which material will be removed).
Create the cutter solid (the shape of the material to be removed: a CYLINDER for a hole, BOX for a rectangular pocket, etc.). Position it precisely where the hole or pocket needs to be.
Type SU (SUBTRACT) and press Enter.
Select the body solid (the one you are cutting FROM). Press Enter.
Select the cutter solid (the one being subtracted). Press Enter.
AutoCAD removes the cutter volume from the body, creating the hole or pocket.
INTERSECT: Keeping Only the Overlapping Volume
INTERSECT retains only the volume where two or more solids overlap, discarding everything outside the intersection. It is useful for complex shapes that can be defined as the intersection of two simpler shapes, and for checking whether components clash in an assembly.
Type INTERSECT and press Enter.
Select the two or more solids to intersect. Press Enter.
AutoCAD keeps only the overlapping volume.
Step 8: Adding Holes, Fillets, and Chamfers to the 3D Model
After the primary 3D form is established using EXTRUDE, REVOLVE, LOFT, or SWEEP and combined using Boolean operations, most mechanical components require additional features: holes, fillets (rounded edges), and chamfers (bevelled edges). These are added directly to the 3D solid.
Adding Holes Using SUBTRACT
To add a hole to a 3D solid: type CYLINDER and press Enter. Specify the centre of the hole (snap to the exact position using OSNAP and the dimensions from the 2D drawing), the radius (from the drawing), and the height (at least as deep as the solid thickness). Then use SUBTRACT: select the body solid, Enter, select the cylinder, Enter. The hole is cut.
Adding Fillets Using the 3D FILLET Command
The FILLET command works on 3D solid edges as well as 2D objects. Type FILLET (or F) and press Enter. Select the edge(s) of the 3D solid you want to round. Type the fillet radius from the engineering drawing and press Enter. AutoCAD rounds the selected edges.
Adding Chamfers Using the 3D CHAMFER Command
Similarly, the CHAMFER command (CHA) works on 3D solid edges. Select the base surface first (AutoCAD may highlight a face), confirm the correct face, select the edge to chamfer, and specify the chamfer distances. Chamfers on external edges of machined components are common and necessary to represent accurately for manufacturing.
Step 9: Generating 2D Drawing Views from the 3D Model
Once the 3D model is complete, the final step in the workflow is generating professional 2D drawing views from it for documentation, manufacturing, or client delivery. AutoCAD provides two main approaches: FLATSHOT for quick 2D projections directly in model space, and VIEWBASE/VIEWPROJ for full paper space drawing view management.
Method A: FLATSHOT Quick 2D Projections
FLATSHOT creates a flat 2D projection of all visible geometry from the current view direction, placing the result as a block in model space. It is fast and simple, ideal for quickly generating a front, top, or side view outline.
Set the current view to the direction you want to flatten (e.g. Front View using the View Cube).
Type FLATSHOT and press Enter.
In the Flatshot dialogue, set visible lines to a solid line and hidden lines to the HIDDEN linetype (or no hidden lines if not required).
Click Create. AutoCAD asks where to insert the resulting block.
Click a location in model space to place the 2D view. Scale it to your requirements.
Method B: VIEWBASE Professional Drawing Views in Paper Space
VIEWBASE generates intelligent, associative 2D drawing views from a 3D model directly in a paper space layout. These views update automatically if the 3D model is modified, making VIEWBASE the professional standard for generating 2D documentation from AutoCAD 3D models.
Switch to a Layout tab (paper space).
Go to Layout tab > Create View panel > Base > From Model Space.
In the Drawing View Creation tab that appears, set the view orientation (Front, Top, etc.) and scale.
Click to place the base view on the layout sheet.
AutoCAD automatically prompts you to add projected views. Click to the right of the base view to add a right-side view, above for a top view, and diagonally for an isometric view.
Press Esc when all required views are placed.
Add dimensions, annotations, and title block as normal. If you later modify the 3D model, all views update automatically.
Complete Worked Example: Bracket from Orthographic Views
To tie all of the above together, here is a complete step-by-step workflow for building a typical mounting bracket from a three-view orthographic drawing. The bracket is an L-shaped plate with two mounting holes and a fillet on the internal corner.
Stage
What You Do
Commands Used
1. Read the drawing
Identify front, top, and side views. Note the L-shape in the front view, the depth dimension in the side view, and the hole positions in the top view.
None, analysis only
2. Set up workspace
Switch to 3D Modelling workspace. Set visual style to Conceptual. Set up 4 viewports (Top, Front, Right, Isometric). Type UCS > W to reset to World.
VSCURRENT, VPORTS, UCS
3. Draw base profile
On World UCS (XY = front plane), draw closed polyline of the L-shape from the front view dimensions. Include the inner corner at exact coordinates.
PL (POLYLINE), ORTHO (F8)
4. Extrude base
Select the L-profile, type EXT, press Enter. Enter the bracket thickness (depth from side view). 3D L-shape solid appears.
EXT (EXTRUDE)
5. Add fillet to internal corner
Type F (FILLET), select the internal vertical edge of the L-solid, enter fillet radius from drawing.
F (FILLET)
6. Create hole cutters
Type CYLINDER, snap to hole centre positions (from top view dimensions), enter hole radius and full height through bracket. Create one cylinder per hole.
CYLINDER, OSNAP
7. Subtract holes
Type SU (SUBTRACT). Select the L-solid (body). Press Enter. Select all cylinders (cutters). Press Enter. Holes are cut.
SU (SUBTRACT)
8. Inspect the model
Use 3DORBIT to rotate and inspect all faces. Check holes appear in correct positions, fillet is correct, proportions match the drawing.
3DORBIT, ZOOM
9. Generate 2D views
Switch to Layout tab. Use VIEWBASE > From Model Space to place Front, Top, Right, and Isometric views at correct scale in paper space.
VIEWBASE, VIEWPROJ
10. Add dimensions and annotations
Dimension all views using DIMLINEAR, DIMRADIUS, etc. Add surface finish, GD&T, and title block information.
DLI, DRA, MTEXT
Common Mistakes When Creating 3D Models from 2D Views
Mistake
What Happens
How to Avoid It
Drawing profiles without setting the UCS first
The profile is created on the wrong plane, and the extrusion goes in the wrong direction or appears at an unexpected location
Always type UCS > W (World) to reset first. Then reorient the UCS to the correct face before drawing any profile.
Open polyline profile
EXTRUDE fails with ‘Object is not a closed loop’ error, or creates a surface instead of a solid
Before extruding, type PEDIT, select the polyline, choose Close. Or use REGION to convert connected line objects into a closed region.
Not checking projection type (First vs Third Angle)
The side view is placed on the wrong side, leading to an incorrectly mirrored or rotated 3D model
Always check the projection symbol in the title block before reading any orthographic drawing.
Extruding in the wrong direction
The solid extrudes toward the viewer instead of into the screen, or vice versa
After extruding, inspect in the isometric viewport. If depth is wrong, use EXTRUDE with a negative value, or use MOVE to reposition the solid.
Forgetting to account for hidden lines
The 3D model represents only the visible features, missing internal channels, recesses, or holes shown by dashed lines in the 2D views
Go through every dashed line in every view before starting the model. Create a checklist of features represented by hidden lines.
SUBTRACT selecting objects in wrong order
The wrong object gets subtracted, leaving the cutter solid and removing the body instead
SUBTRACT: first click selects the body (what you cut FROM). Second click selects the cutter (what you remove). Always confirm which is body and which is cutter before pressing Enter.
Not verifying dimensions against all three views
A feature looks correct in one view but is the wrong size or position when checked against another view
After completing each feature, check it against all three views. The object must read consistently from front, top, and side.
Frequently Asked Questions (FAQ)
How do you create a 3D model from 2D views in AutoCAD?
To create a 3D model from 2D views in AutoCAD: (1) Read the orthographic projection views to understand the 3D shape. (2) Switch to the 3D Modelling workspace and set the visual style to Conceptual. (3) Set the UCS (User Coordinate System) to align with the plane you want to draw on. (4) Draw closed 2D profiles representing the cross-sections of the component. (5) Use EXTRUDE, REVOLVE, LOFT, or SWEEP to generate 3D solids from those profiles. (6) Use UNION and SUBTRACT to combine and cut solids. (7) Add fillets, chamfers, and holes. (8) Use VIEWBASE to generate 2D drawing views from the completed model.
What is the EXTRUDE command in AutoCAD?
The EXTRUDE command (EXT) in AutoCAD takes a closed 2D profile (polyline or region) and pushes it a specified distance perpendicular to its plane, creating a 3D solid with that profile’s cross-section. It is the most commonly used 3D modelling command for prismatic parts, plates, frames, and any component with a consistent cross-section. It supports tapered extrusions (with a draft angle) and path-following extrusions.
What is the difference between EXTRUDE and REVOLVE in AutoCAD?
EXTRUDE creates a 3D solid by pushing a 2D profile straight in one direction (or along a path). It is used for prismatic parts with a constant cross-section. REVOLVE creates a 3D solid by rotating a 2D profile around a specified axis, producing a radially symmetric solid. It is used for turned parts, shafts, cylinders, flanges, and any component that is symmetric around an axis of rotation. If the front and side views are identical in shape, REVOLVE is almost certainly the right command.
What is the UCS in AutoCAD 3D and why does it matter?
The User Coordinate System (UCS) defines the orientation of the drawing plane in AutoCAD 3D. All drawing operations happen relative to the current UCS’s XY plane. In 3D modelling, you must actively manage the UCS to ensure profiles are drawn on the correct face or plane of the model. If the UCS is on the wrong plane, your 2D profiles will be in the wrong position and your extrusions will go in the wrong direction. Type UCS > W to reset to World UCS, or UCS > F to align to a specific face of an existing solid.
How do I generate 2D drawings from a 3D model in AutoCAD?
AutoCAD provides two main methods. FLATSHOT creates a quick 2D projection from the current view direction directly in model space as a block. VIEWBASE (in a paper space layout) creates intelligent, associative drawing views that update automatically if the 3D model changes. VIEWBASE is the professional standard: switch to a Layout tab, go to Layout > Create View > Base > From Model Space, place the base view, then add projected views (right, top, isometric) using VIEWPROJ. Annotate with dimensions in the layout as normal.
What are Boolean operations in AutoCAD 3D?
Boolean operations are commands that combine or modify 3D solids by performing mathematical set operations on their volumes. UNION merges two or more solids into one. SUBTRACT removes one solid’s volume from another (used to cut holes, slots, and pockets). INTERSECT keeps only the overlapping volume of two solids. Together, these three commands allow complex 3D forms to be built from combinations of simpler solid primitives (boxes, cylinders, cones) and profile-based solids (extruded or revolved shapes).
Can I create a 3D model from a scanned 2D drawing in AutoCAD?
Yes, with some preparation. Insert the scanned 2D drawing as an image (use INSERT > Attach or the IMAGEATTACH command) and scale it to the correct dimensions using a known reference length. Then trace the 2D profiles over the image using POLYLINE with OSNAP. Once you have accurate traced profiles, delete or turn off the image reference and use EXTRUDE, REVOLVE, or other solid creation commands as normal. This method works well for relatively simple parts. For complex components, redrawing the profiles from the scanned dimensions (rather than tracing) typically produces more accurate results.
Conclusion
Creating a 3D model from 2D views in AutoCAD is the skill that completes the engineering CAD workflow. It transforms flat orthographic drawings into solid models that can be inspected from any angle, analysed, modified, and documented to manufacturing standards. The workflow is logical and methodical: read and understand the 2D views, set up the 3D environment correctly, draw accurate profiles on the right planes, build the solid geometry using the appropriate creation commands, combine and cut using Boolean operations, and generate professional 2D drawing output.
The UCS is the key that unlocks everything in AutoCAD 3D. Getting comfortable with setting and re-setting the UCS to align with different faces and planes is the single skill that most transforms a beginner’s 3D modelling ability. Every other concept in this guide builds on it.
Practise the worked example in this guide using a simple bracket or plate, then progress to more complex parts. The same workflow read, profile, extrude/revolve, boolean, document applies whether you are modelling a simple bracket or a multi-feature mechanical component.
Continue building your AutoCAD 3D skills: read How to Make a 3D Solid from Profile Outlines for a deeper dive into profile-based modelling, or return to the full guide: AutoCAD Tutorials for Beginners and Professionals.
A mid-size manufacturer of industrial packaging equipment was eighteen months into a new product development cycle. The project had consumed significant internal engineering time, produced three physical prototypes, each requiring expensive rework, and was already six months behind the original launch date. When they finally brought in an external engineering design firm for a DFM (design for manufacturability) review, the outside team identified eleven design features that were unnecessarily expensive to produce and two assembly sequences that could be consolidated. The resulting redesign cut per-unit manufacturing cost by 23 percent and the remaining development timeline by four months.
This is not an exceptional outcome. It is a typical one when engineering design services are applied at the right stage of product development. What is exceptional about that company’s situation is how long they waited before bringing outside expertise in.
Engineering design services encompass a broad range of specialized capabilities: mechanical and industrial design, CAD modeling and detailing, design for manufacturability analysis, FEA and CFD simulation, value engineering, prototyping support, and full product development outsourcing. When applied strategically, they compress development timelines, reduce manufacturing costs, and prevent the expensive late-stage rework that consumes R&D budgets and delays market entry.
This guide explains exactly how each mechanism works, backs every claim with published research and market data, and gives you a practical framework for identifying where engineering design services can create the most impact for your specific development challenge.
1. The Scale of the Problem: What Product Development Really Costs
Before examining how engineering design services reduce development costs, it is worth establishing what those costs actually look like and where the largest waste occurs.
Product development costs for a new physical product range from $20,000 for a simple consumer product with established manufacturing processes to well over $1 million for complex hardware in regulated industries. The wide range reflects differences in development complexity, required certifications, tooling costs, and the number of prototype iterations needed. For most industrial, mechanical, or electromechanical products, the realistic range is $150,000 to $500,000 from concept to production-ready design.
DATA POINT: PwC digital product development research. Digital product development is expected to increase efficiency by 19%, reduce time-to-market by 17%, and reduce production costs by 13% compared to conventional processes (PwC, cited in multiple 2025 research analyses).
Where Development Waste Actually Occurs
Most product development cost overruns and timeline delays share common root causes. Understanding where the waste occurs is essential to understanding how engineering design services address it.
Waste Category
Description
Typical Cost Impact
Primary Cause
Late-stage design changes
Changes to design after tooling has been committed or prototypes have been built
$10,000 – $500,000+ per significant change
Manufacturability issues not identified in design phase
Excess prototype iterations
Building more physical prototypes than necessary because simulation was insufficient
$5,000 – $50,000 per iteration plus time
Under-investment in simulation and analysis upfront
Overly tight tolerances
Specifying precision tighter than functional requirements demand
15-40% cost increase on affected features
Design engineers specifying to what they can model, not what manufacturing requires
Over-engineered components
Parts designed to perform beyond requirements, adding material and complexity cost
10-30% avoidable material cost
Lack of value engineering discipline; conservative design culture
Rework from drawing errors
Manufacturing errors caused by ambiguous or incorrect engineering drawings
$2,000 – $50,000+ per incident
Inadequate drafting standards, no QC review of drawings
Sequential development delays
Each phase waiting for the previous to complete (design finishes before manufacturing input begins)
4-12 additional weeks per project
Lack of concurrent engineering approach
KEY FINDING: The 70% rule. Research consistently shows that approximately 70% of a product’s total manufacturing cost is determined by design decisions made in the early engineering phase. Changes made after tooling commitment are exponentially more expensive than those made on screen.
2. The Data: How Engineering Design Services Impact Time and Cost
The claims made about engineering design services, faster timelines and lower costs, are backed by a consistent body of research across industry reports, academic studies, and documented project outcomes. Here is what the evidence actually shows.
Metric
Finding
Source / Context
Project completion time reduction
30-50% reduction in project completion times for companies outsourcing engineering services
IDC research, cited across multiple 2025 engineering outsourcing analyses
Manufacturing cost reduction via DFM
15-30% manufacturing cost reduction typical when DFM is applied early in design
Multiple DFM implementation studies; Modus Advanced, Source Engineering, SixSigma.us analyses
CAD software prototype cost reduction
Up to 25% reduction in physical prototype costs in some industries through advanced CAD-driven digital validation
Intelevo Research Engineering Design Software Market Report, 2025
DFM assembly time reduction
30% reduction in assembly time demonstrated in smartphone manufacturing case study through DFM implementation from initial design phase
SixSigma.us DFM implementation analysis
DFM ROI timeline
15-25% ROI improvement within 12-24 months for companies implementing DFM discipline
Source Engineering DFM analysis, 2025
Digital development efficiency
19% efficiency increase, 17% time-to-market reduction, 13% production cost reduction from digital product development
PwC digital product development research
Engineering design software simulation savings
Organizations report cuts of up to 30% in physical prototyping costs and time savings of several weeks per project from simulation-driven workflows
These figures deserve honest contextualization. The 30 to 50 percent project completion time reduction is an aggregate finding that reflects well-managed outsourcing arrangements on appropriate project types. It does not mean every project becomes half as long by bringing in external engineers. The savings are most pronounced in specific scenarios: projects where specialist skills are the bottleneck, organizations with under-resourced internal engineering teams, and products where DFM has not previously been applied. The following sections explain the specific mechanisms through which these savings are generated.
3. Mechanism 1: Design for Manufacturability (DFM) — Solving Cost Problems at the Source
Design for manufacturability is the single highest-impact mechanism through which engineering design services reduce product development cost. It is also the most consistently underused discipline in product development, particularly at small and mid-size manufacturers whose internal teams are primarily trained in design and modeling, not in manufacturing process optimization.
What DFM Actually Does
DFM is the engineering practice of designing a product to reduce the cost and complexity of its manufacture, without compromising its functional performance. It operates on a fundamental principle that is easy to state and surprisingly difficult to implement internally: the design phase is the cheapest and most powerful place to make cost decisions.
Research from multiple DFM implementation studies confirms that approximately 70% of a product’s total manufacturing cost is locked in by design decisions made before a single physical part is produced. Material selection, part geometry, tolerance specifications, assembly sequence, and component count: each of these decisions, made on screen by a design engineer, determines what a machinist, fabricator, or assembler will spend years executing.
When those decisions are made by engineers who understand manufacturing processes deeply, costs are naturally controlled. When they are made by designers optimizing primarily for function and aesthetics, manufacturing inefficiencies are designed in and discovered later, at much greater expense.
Specific DFM Cost Levers
Tolerance rationalization: Overly tight tolerances are a pervasive and silent cost driver. A tolerance specification that requires specialized fixturing, slower machining, or 100% inspection adds cost with no functional benefit if the tolerance is tighter than the application demands. DFM review consistently finds opportunities to relax non-critical tolerances, often reducing machining costs by 20 to 40% on affected features.
Part count reduction: Every component in an assembly adds cost: material cost, machining or molding cost, inventory cost, assembly labor, inspection, and potential failure points. DFM analysis looks for opportunities to combine functions into fewer parts. A two-part assembly that becomes a one-part assembly eliminates an entire component’s cost stack.
Standardized hardware: Custom fasteners, specialty hardware, and non-standard materials add procurement cost and supply chain risk. DFM substitutes standard hardware wherever functional requirements permit, reducing both per-unit cost and purchasing complexity.
Manufacturing process alignment: A design that looks manufacturable in CAD may be difficult or impossible to produce efficiently with the actual manufacturing processes available to your supply chain. DFM bridges this gap, ensuring that geometry, features, and tolerances align with what your specific manufacturing partners can do efficiently.
Assembly sequence optimization: Assembly operations are labor-intensive and error-prone. DFM reviews assembly sequences to reduce the number of steps, eliminate orientations that require skilled judgment, and design for assembly automation where volume justifies it.
REAL WORLD: DFM cost reduction in practice. A smartphone manufacturer integrating DFM principles from the initial design phase achieved a 30% reduction in assembly time for their latest model (SixSigma.us case study). Effective DFM implementation typically reduces manufacturing costs by 15-30% without compromising functionality, with some comprehensive programs reporting even higher savings.
Why Internal Teams Miss DFM Opportunities
The reason DFM is underused is structural, not a matter of skill or intention. Internal design engineers are evaluated primarily on whether the product works. Their performance metrics rarely include manufacturing cost or assembly time. External engineering design service firms, whose value proposition includes manufacturability optimization, approach the same design from a different incentive structure. They are looking for cost and complexity that can be removed, not just function that needs to be preserved.
This is not a criticism of internal engineering teams. It is an observation about organizational incentive structures. The most effective approach is to ensure that DFM discipline, whether delivered internally or through an engineering design service partner, is applied before tooling commitments are made.
Physical prototyping is expensive. A machined prototype of a moderately complex mechanical component can cost $1,000 to $10,000 and take one to four weeks to produce. An injection-molded prototype, if the mold is purpose-built, can cost $5,000 to $50,000. Complex assembly prototypes for industrial products can run $50,000 to $200,000 each. Most product development programs require multiple iteration cycles.
Engineering design services that include advanced CAD modeling, FEA (finite element analysis), and CFD (computational fluid dynamics) simulation reduce the number of physical prototypes required by validating designs digitally before physical production. The savings are substantial and well-documented.
How Simulation Replaces Physical Prototyping
FEA simulation allows engineers to apply virtual loads, stresses, temperatures, and forces to a 3D CAD model and observe how it responds, identifying failure points and optimization opportunities without building a physical part. CFD simulation models fluid flow, heat transfer, and pressure distribution for fluidic and thermal applications. Both capabilities are standard offerings of experienced engineering design service firms.
Engineering design software market research published in late 2025 documents that organizations using simulation-driven workflows report cuts of up to 30% in physical prototyping costs and time savings of several weeks per project. The mechanism is straightforward: a simulation run that takes hours replaces a prototype iteration that takes weeks.
DATA POINT: Simulation-driven development. Organizations report up to 30% reduction in physical prototyping costs and several weeks of time savings per project when simulation-driven workflows replace or supplement physical prototyping (Intelevo Research Engineering Design Software Market Report, 2025).
The Role of Expert CAD in Reducing Rework
Beyond simulation, the quality of CAD modeling and drawing production directly affects downstream cost. Ambiguous drawings, incorrect tolerances, missing specifications, or drawing errors discovered during first article inspection create costly correction cycles. Engineering design service firms with experienced drafters and established QA processes produce fewer drawing errors, which translates directly to fewer manufacturing corrections and lower first article failure rates.
This is a cost savings that is invisible until you calculate what manufacturing corrections actually cost: rescheduled production runs, material waste, expedited re-delivery, and the project management time spent resolving a problem that originated on a drawing. For complex mechanical assemblies, a single undetected drawing error can cost $10,000 to $50,000 in manufacturing consequences.
Digital Twins and Their Growing Role
At the enterprise end of engineering design services, the integration of digital twin capabilities is extending the simulation advantage further. A digital twin is not just a simulation model; it is a continuously updated virtual replica of the physical product that can be used throughout the product’s lifecycle for ongoing validation, maintenance prediction, and design iteration. Established engineering design service firms offering digital twin capabilities are enabling clients to compress not just initial development cycles but ongoing product evolution cycles as well.
5. Mechanism 3: Concurrent Engineering Compressing the Development Timeline
Traditional product development follows a sequential model: concept is approved, then detailed design begins, then manufacturing planning begins, then procurement begins, then tooling is ordered. Each phase waits for the previous to complete. In a complex product development program, this sequential handoff structure can add 12 to 20 weeks of elapsed time to a development cycle that has no functional reason to be that long.
Concurrent engineering, also called simultaneous engineering, overlaps development phases so that manufacturing planning, procurement qualification, and tooling design begin while detailed engineering is still in progress. Engineering design service firms that work alongside client engineering teams facilitate concurrent engineering in ways that internal teams often cannot, simply because a client’s internal engineers are already fully occupied with the design work itself.
How It Works in Practice
An external engineering design services partner can take ownership of detailed drawing production, BOM development, and supplier qualification while the client’s internal team focuses on design decisions and customer requirement management. This parallel workflow structure removes the sequential wait times that inflate development timelines.
Research published by IDC and cited across multiple 2025 engineering services analyses finds that companies outsourcing engineering services experience 30 to 50 percent reductions in project completion times. The concurrent engineering effect is a primary driver of the upper end of this range.
DATA POINT: Concurrent engineering timeline impact. Companies outsourcing engineering services to enable concurrent workflows experience 30-50% reduction in project completion times compared to sequential internal development models (IDC research, 2025).
The Follow-the-Sun Advantage
For organizations engaging offshore engineering design service partners, the time zone difference that initially sounds like a communication challenge can become a timeline accelerator. A design change reviewed internally at 5 PM can be modeled and returned as updated drawings by 8 AM the next morning, because the engineering team in a complementary time zone was working while the client team slept. For projects on tight timelines, this follow-the-sun workflow can reduce elapsed calendar time by 15 to 25 percent on drawing-intensive phases.
6. Mechanism 4: Value Engineering — Cost Reduction Without Compromising Performance
Value engineering is a structured methodology for analyzing the function of a product, component, or process and finding ways to deliver the same function at lower cost. It is different from cost-cutting in a critical way: cost-cutting reduces cost by reducing what you do. Value engineering reduces cost while preserving or improving what the product does.
Engineering design service firms experienced in value engineering bring an external perspective that is extremely difficult to replicate internally. When your engineers have been working on a product for two years, they have cognitive ownership of design decisions that made sense when they were made. Questioning whether a part needs to be aluminum or whether a five-component assembly could be one injection-molded part requires fresh eyes and process discipline that external partners provide naturally.
Value Engineering in Action: Key Techniques
Material substitution: Replacing an over-specified material with one that meets functional requirements at lower cost. Aluminum for steel where weight is not a concern, commodity-grade plastics for engineering polymers where chemical resistance requirements do not justify the premium.
Process substitution: Changing the manufacturing process to one that is more cost-effective for the required quantity. Switching from CNC machining to casting for high-volume components, or from welded fabrication to bent-and-formed sheet metal for certain enclosure geometries.
Assembly consolidation: Redesigning multi-component assemblies into single molded or formed parts. Fewer parts mean less assembly labor, fewer inventory line items, fewer potential failure points, and lower total cost.
Standard component substitution: Replacing custom or specialty components with standard catalog items. Standard bearings, fasteners, seals, and hardware are less expensive, more reliably available, and supported by established maintenance practices.
Tolerance optimization: Identifying and relaxing tolerances that are tighter than functional requirements. This is a DFM concept applied through a value engineering lens: every tolerance that can be relaxed reduces manufacturing cost without reducing product performance.
INSIGHT: When to apply value engineering. The highest-value window for value engineering is during design development, before tooling commitments. Applied after tooling, value engineering still has potential, but it must work within the constraints of existing tooling geometry. Applied at the design stage, it has full freedom.
7. Mechanism 5: Access to Specialization — Solving Problems Faster with the Right Expertise
One of the least quantified but most practically significant ways engineering design services reduce development time is by eliminating the learning curve that occurs when an internal team encounters a design challenge outside their primary expertise.
A mechanical engineering team with deep expertise in rotating equipment may spend three weeks researching best practices for designing a compliant mechanism that is new to their portfolio. An engineering design service firm that has designed fifty compliant mechanisms can solve the same problem in three days. The difference is not capability; it is accumulated domain knowledge that is not worth building internally for a one-time challenge.
Where Specialization Creates the Biggest Timeline Advantage
Specialization Area
When It Creates Timeline Advantage
Typical Internal vs. External Timeline Difference
Structural simulation (FEA)
When internal team has limited simulation expertise and is iterating physically
3-5 weeks physical vs. 3-5 days simulation
GD&T and tolerance stack analysis
When drawings are being returned by manufacturers due to ambiguous tolerances
Days of correction cycles vs. hours with an expert
Medical device design controls
When product must meet FDA 21 CFR Part 820 or ISO 13485 requirements
Months of compliance learning vs. weeks with a specialist
BIM coordination and clash detection
When construction project has multi-discipline coordination requirements
Weeks of manual coordination vs. days with BIM specialists
DFM for a new manufacturing process
When product design requires a process the internal team has not used before
Multiple prototype iterations vs. expert guidance upfront
When designers are modeling geometry that is expensive or impossible to produce
Multiple quote rejections vs. producible geometry first time
ASME Y14.5 GD&T compliance
When drawings must meet standard for a defense, aerospace, or regulated client
Redline review cycles vs. correct first submission
The market data reflects the economic value of this specialization access: the global product engineering services market was valued at approximately $1.38 billion in 2025 and is projected to grow at a compound annual growth rate of 9.7% through 2034, driven substantially by organizations accessing specialized engineering capabilities they do not maintain internally. According to Fortune Business Insights, the growing focus on faster product deliveries and time-to-market systems is a primary driver of this sustained market expansion.
8. Mechanism 6: Elastic Capacity — Scaling Without Hiring Cycles
Hiring a mechanical engineer in a competitive market takes three to six months from job posting to productive contributor. An experienced senior mechanical engineer with the specific specialization you need may take longer. During that period, your product development program either waits, proceeds with understaffed engineering resources and accepts the quality consequences, or pays premium contract rates for interim coverage.
Engineering design services provide elastic capacity: the ability to scale engineering bandwidth up or down in response to project demand without the fixed cost commitment of employment or the delays of a recruiting cycle. This elasticity directly reduces development time by ensuring that engineering bandwidth is never the bottleneck.
Where Elastic Capacity Has the Highest Impact
Program surges: When a large contract win or accelerated launch date requires engineering bandwidth that exceeds internal team capacity, engineering design services provide immediate scale-up without a hiring cycle.
Specialist gaps: When a specific phase of development requires expertise (BIM coordination, FEA simulation, medical device design controls) that the internal team does not maintain, engineering services fill the gap without requiring permanent headcount.
Geographic expansion: When projects require knowledge of local building codes, regional standards, or specific regulatory environments, engineering service partners with local expertise eliminate the learning curve.
Peak-and-valley workloads: Many product development organizations have inherently cyclical workloads: intense during design and development phases, lower during production. Engineering design services allow organizations to staff their engineering function for average load and supplement at peak, rather than staffing for peak and carrying idle capacity at valley.
DATA POINT: Elastic capacity economics. Large enterprises dominated the product engineering services market in 2025 with 61% market share, driven by their need for flexible, scalable engineering resources that can be deployed without fixed overhead commitments (SNS Insider Market Report, 2026).
9. Industry-Specific Impact: Where Engineering Design Services Deliver the Most Value
The impact of engineering design services is not uniform across industries. The following analysis identifies where the benefits of time reduction, cost savings, and specialized expertise are most pronounced.
Reduced first article rejections; lower audit finding rate
SME manufacturers
Access to capabilities not maintained internally
Full product development outsourcing; DFM review; CAD modeling support
Access to senior engineering capability without full-time employment cost
10. Where Engineering Design Services Do NOT Reduce Costs or Time
Intellectual honesty requires naming the situations where engineering design services do not produce the outcomes described in vendor marketing. Understanding these limits prevents misaligned expectations and poor procurement decisions.
When the Brief Is Inadequate
An engineering design service firm, however experienced, cannot produce accurate, manufacturable, cost-optimized drawings from a vague or incomplete brief. The output quality of engineering design services is directly bounded by the quality of input they receive. Organizations that engage external engineering partners without investing in clear scope definition, organized input materials, and responsive communication during execution will not see the timeline and cost benefits described in this guide. The fault will be on the client side, not the provider side, but the result is the same: wasted time and rework.
When IP Risk Is Undermanaged
For organizations with highly proprietary designs, outsourcing engineering work without proper contractual protections (work-for-hire clauses, NDAs, data handling agreements) creates IP risk that can offset the economic benefits. This does not mean outsourcing is inappropriate; it means the legal and contractual infrastructure must be established before any design files are shared. Organizations that skip this step, often because the procurement felt informal or the timeline was tight, create vulnerabilities that can be costly to resolve.
When the Work Is Too Context-Dependent
Some engineering design work is so deeply embedded in institutional knowledge, customer relationships, and ongoing system context that external partners cannot contribute effectively without a disproportionate knowledge transfer investment. If explaining the project context to an external partner would take longer than doing the work internally, the economics of outsourcing break down. This is particularly true for complex systems with years of accumulated design decisions, regulatory certifications, and customer-specific requirements.
When Cost Savings Come at the Expense of Quality
Selecting an engineering design service partner primarily on price, particularly for offshore providers at the lowest end of the market rate range, can produce drawings and models that require extensive internal correction before they are usable. The cost of that correction often exceeds the price savings from the low-cost provider. The quality of engineering design services varies significantly across providers, and the selection process must include portfolio review, standards compliance verification, and ideally a pilot project before committing to a major engagement.
WATCH OUT: The low-cost trap. A per-sheet rate that looks 60% cheaper than market rate may result in drawings that require three rounds of redlining before they are useful. Calculate the total cost of engagement, including your internal review time, not just the provider’s quoted rate.
11. How to Evaluate Whether Engineering Design Services Are Right for Your Project
Not every product development challenge benefits from external engineering design services. The following decision framework helps identify the scenarios where the time and cost benefits are most likely to be realized.
The High-Value Indicators
Engineering design services are most likely to reduce your development time and cost when one or more of the following conditions apply:
Specialist skill gap: Your project requires expertise your internal team does not have. Bringing in specialists is faster and cheaper than building the skill internally for a single application.
Capacity constraint: Your internal engineering team is already fully occupied. Adding external resources is more efficient than delaying the project or burning out internal staff on overtime.
DFM opportunity: Your product is in design development and has not yet undergone a formal manufacturability review. The 70% rule applies: this is your best window to lock in cost-efficient design decisions.
High prototype count: Your recent development programs have required more physical prototypes than planned. Simulation and expert design review can reduce that number on the next program.
Cyclical workload: Your engineering demand peaks during design phases and drops during production. External services allow you to match capacity to demand rather than staffing for peak.
Regulated environment with compliance gaps: Your product must meet FDA, AS9100, ITAR, or similar regulatory requirements that your team is not fully experienced with. External partners with compliance expertise reduce risk and timeline.
The Low-Value Indicators
Engineering design services are less likely to reduce time and cost when:
Institutional knowledge is the primary bottleneck: If the limiting factor is deep product-specific knowledge that cannot be efficiently transferred, external engineers will spend more time learning context than producing output.
The brief cannot be clearly defined: If the project scope is genuinely ambiguous and exploratory, an external partner working from an unclear brief will require extensive revision cycles that negate the timeline benefit.
IP sensitivity is high and legal infrastructure is not in place: If you cannot establish appropriate contractual protections before sharing design files, the risk may outweigh the benefit.
Volume is too low to justify onboarding: A single two-hour drafting task does not justify the time investment of briefing, standards transfer, and QC review for a new external partner. Minimum economics apply.
12. FAQ: Engineering Design Services and Product Development Efficiency
How much can engineering design services actually reduce development time?
The documented range is 17 to 50 percent, depending on project type and the specific services applied. PwC research on digital product development documents a 17 percent time-to-market reduction from digital development practices. IDC research on engineering outsourcing documents 30 to 50 percent project completion time reduction. The upper end of that range reflects concurrent engineering arrangements where external resources run in parallel with internal development, compressing the elapsed timeline. The lower end reflects more targeted applications like simulation-based prototype reduction or specialist skills engagement. Neither figure applies universally. The specific impact on your program depends on where your current development process has the most friction.
What is the most cost-effective first step when evaluating engineering design services?
For most manufacturers, a DFM review of a product that is currently in design development or has recently entered production is the highest-confidence first engagement. It is contained in scope, has a clear deliverable (a list of design changes with estimated cost impact), and the ROI is directly measurable by comparing manufacturing costs before and after implementation. A DFM review for a moderately complex product typically costs $3,000 to $15,000 and can identify cost savings of $30,000 to $150,000 or more on a product with meaningful production volume. That is a risk-justified first engagement that establishes the value of the relationship.
How do engineering design services compare to hiring internally for reducing development costs?
The cost comparison favors external services when specialization access, capacity flexibility, or time-to-market speed is the primary objective. Published analyses from engineering outsourcing practitioners show cost savings of 30 to 50 percent compared to equivalent internal hiring when fully loaded employee costs (salary, benefits, software, training, onboarding) are included. The case for internal hiring is strongest when the design work is ongoing, deeply context-dependent, requires real-time collaboration throughout the day, or involves highly sensitive IP that needs to remain within your own infrastructure. Many organizations reach the optimal outcome with a hybrid model: core engineering capability internally, supplemented by external services for specialist tasks and volume overflow.
Does outsourcing engineering design work create quality risks?
It can, if the engagement is managed poorly. The quality risks associated with external engineering design services are well-understood and manageable: inadequate brief causing misaligned output, insufficient QC review before drawings enter production, and standards compliance gaps if the provider is not familiar with your applicable standards. Organizations that establish clear drawing standards documentation, include a defined QC review step in the workflow, and vet providers on their specific discipline experience routinely achieve quality equivalent to or better than their internal baseline. The risk is real but not inherent. It is a function of process discipline, not of the outsourcing model itself.
At what stage of product development should engineering design services be engaged?
The greatest leverage is at design development, before tooling commitments. This is where DFM review, value engineering, and simulation-driven prototype reduction deliver the most impact. The 70 percent cost-determination rule makes this timing critical. After tooling is committed, value engineering and DFM still have potential, but they work within constraints that limit the available savings. At concept stage, engineering services are most valuable for feasibility analysis and technology selection. At production stage, the primary engineering service value shifts to as-built documentation, manufacturing support drawings, and process improvement analysis.
How do I measure ROI from engineering design services?
The most accessible ROI metrics are manufacturing cost per unit before and after DFM engagement, number of prototype iterations per development program, elapsed development time from design freeze to production release, first article acceptance rate, and engineering revision cycles per drawing release. For an organization new to measuring engineering design service ROI, we recommend selecting one clear baseline metric from your most recent comparable development program and tracking it against the program where engineering design services are applied. A single metric tracked rigorously tells you more than multiple metrics tracked loosely.
Conclusion:
The framing of engineering design services as a cost center, something to minimize or avoid, is the most expensive mistake organizations make in managing their product development operations. The data is consistent: applied strategically, engineering design services reduce product development costs by 15 to 30 percent, compress timelines by 17 to 50 percent, and produce ROI improvements of 15 to 25 percent within 12 to 24 months.
Those outcomes are not generated by simply hiring a cheaper external engineer to do work your internal team would otherwise do. They are generated by applying specific mechanisms, DFM, simulation-driven validation, concurrent engineering, value engineering, and specialization access, at the right stage of development, with sufficient organizational discipline to act on what those services recommend.
The 70 percent rule is the most important number in this entire discussion. Seventy percent of your product’s manufacturing cost is determined by design decisions made before a single physical part is produced. Every week you spend in design development without DFM discipline, simulation validation, and expert review is a week of cost decisions being locked in by default rather than by intent.
Engineering design services give you the ability to make those decisions intentionally, with the specialized knowledge and fresh perspective that internal teams, however capable, often cannot provide for themselves. The organizations that treat this as a strategic investment rather than an operational cost are the ones whose products consistently reach market faster, cost less to produce, and require fewer post-launch corrections.
Ready to reduce your product development time and cost?
Explore our related guides on in-house versus outsourced CAD drafting, how to write a comprehensive RFQ for engineering design services, and what CAD drafting costs in 2026 to build a complete procurement and operational framework for your engineering projects.
Xometry Aug 2025 tested seven AI text-to-CAD tools and found all required substantial engineering refinement before the output could be used for manufacturing 600 DPI minimum scan resolution for clean raster-to-vector conversion; below this threshold, noise interferes with line recognition in both manual and AI workflows Ragnar CAD February 2026 sketch-to-3D AI tool claims to close the gap between ‘I can see it’ and ‘I can model it’ for concept geometry from annotated sketches Gartner 2026 projects that a majority of digital design workflows will include some level of AI-assisted modelling, with sketch interpretation as a growing entry point
Introduction:
Before any engineer opens CAD software, before any parametric model is built, before any drawing is dimensioned, there is usually a sketch. On the back of an envelope, on a whiteboard, on graph paper in a site meeting, on a napkin at a client conversation. The sketch is where the design intent lives in its earliest, most honest form.
The challenge is that a sketch, no matter how clear to the person who drew it, is not a manufacturing instruction. It has no scale guarantee, no tolerance definition, no projection convention, no standard symbol for surface finish or weld specification. A fabricator or machinist working from a hand sketch is working from engineering intent without the engineering rigour that turns that intent into a part.
Converting a hand drawn sketch to CAD is the process that bridges that gap. It is not simply tracing lines. It is a structured engineering activity that takes the intent captured in the sketch and translates it into a document that carries enough information for a manufacturer to build the part correctly without needing to contact the engineer for clarification.
This guide covers the complete workflow for sketch to CAD conversion, from preparing the sketch before scanning to issuing the final drawing for manufacturing. It also covers where AI tools genuinely help in 2026, where they do not, and the mistakes that produce wrong geometry at every stage of the process.
Quick answer: To convert a hand-drawn sketch into a CAD drawing: annotate the sketch with all critical dimensions before scanning, scan at 600 DPI minimum, import as a scaled underlay in your CAD software, trace geometry with geometric constraints applied, add dimensions from the sketch annotations, apply GD&T and manufacturing specifications, verify against the original sketch, and peer-review before issue. AI tools can assist with concept geometry but cannot yet produce manufacturing-ready drawings without engineering validation.
The sketch is the idea. The CAD drawing is the instruction. The conversion is an engineering activity, not a drawing exercise.
Choosing Your Conversion Approach: Five Methods and When to Use Each
Before starting any CAD drawing from sketch work, the most important decision is which conversion method is appropriate for the output required. The method determines how much time the conversion takes, what quality of output it produces, and whether that output is suitable for its intended use.
Sketch is complex, requires GD&T, or is destined for a manufacturing drawing package
AI-assisted sketch conversion
Upload sketch to AI tool; AI generates geometry; engineer validates and refines
Simple geometry, concept visualisation, or getting a 3D starting point quickly
AutoCAD Markup Import
Import scanned or PDF sketch; AutoCAD interprets marks and suggests geometry
Existing AutoCAD workflow; sketch is relatively clean and line-based
Photogrammetry + CAD
Photograph physical object or model; import into CAD as reference mesh or point cloud
Part physically exists but no drawing exists; RE workflow supplements sketch
Outsourced sketch-to-CAD
Provide annotated sketch to a CAD specialist; they produce the drawing
Team lacks CAD capability; volume of conversions is high; deadline is tight
The Honest Reality About AI Sketch Conversion in 2026
The AI sketch-to-CAD landscape in 2026 is significantly more active than it was two years ago. Ragnar CAD, launched in February 2026, describes itself as purpose-built to close the gap between seeing an idea and modeling it. AutoCAD Markup Import has been present since the 2023 release and handles line-based sketches reasonably well. Autodesk Raster Design converts scanned images to editable vector geometry in AutoCAD.
However, when Xometry, a major manufacturing marketplace, tested seven text-to-CAD and sketch-to-CAD tools in August 2025, the findings were consistent: all tools produced geometry that required significant engineering refinement before it could be used for manufacturing. The AI is interpreting visual patterns, not engineering intent. It does not know that a circle represents a through-hole of a specific standard size. It does not apply geometric constraints that would make two lines parallel. It does not understand that a tangent transition must be mathematically smooth.
This does not make AI tools useless. For concept geometry, early-stage visualisation, and getting a 3D starting point from an annotated sketch, tools like Ragnar CAD can save meaningful time. But the output requires validation, refinement, and the addition of all manufacturing information before it can be used as a production drawing. The engineer remains responsible for every dimension that appears on the final drawing, regardless of how it was generated.
AI sketch conversion red flag: Any tool that claims to convert a hand sketch directly to a manufacturing-ready DWG or STEP file without engineering input is making a claim that current technology cannot support. A sketch has no tolerances, no GD&T, no datum structure, and no manufacturing specifications. None of these can be inferred from sketch geometry alone. They must be added by an engineer. The AI handles geometry interpretation. The engineer handles engineering.
Preparing Your Sketch for CAD Conversion: The Step Most People Skip
The quality of the CAD drawing you produce is determined before you open the software. A sketch that is fully annotated, clearly drawn, and systematically organised converts quickly and accurately. A sketch that is vague, proportionally distorted, and missing dimensions forces the CAD operator, whether that is you or an outsourcing partner, to make engineering decisions that should have been made by the designer.
The time spent annotating the sketch thoroughly before scanning pays back immediately in the conversion process and many times over if the drawing is being produced by a CAD specialist. Every query raised during conversion, every dimension that must be estimated rather than read, adds cost and delay and risks introducing errors that the original sketch did not contain.
Sketch Element
What Makes It CAD-Ready
What Causes Problems at the CAD Stage
Line clarity
Bold, continuous lines; no broken strokes
Faint pencil lines that digitise as noise; overlapping smudged strokes
Dimension annotations
All critical dimensions written clearly next to features
Missing dimensions force CAD operator to guess or query; incorrect output guaranteed
Proportions
Sketch roughly to scale; major features proportionally correct
Wildly distorted proportions make the CAD baseline incorrect before any refinement
Feature identification
Each feature clearly bounded; circles closed; arcs labelled as arcs
Ambiguous lines that could be a tangency, a step, or a gap produce wrong geometry
Orthographic views
Front, top, and side views clearly labelled and positioned
Missing view or mislabelled projection produces 3D model with features on wrong faces
Reference planes
Centre lines, axis of symmetry, and datum planes marked
No reference planes forces CAD operator to assume datum structure; may be wrong
Notes and callouts
Material, finish, special requirements noted on the sketch
Undocumented requirements surface after CAD is complete; rework cycle begins
Scale reference
One known dimension or scale bar present
No scale reference means AI tools guess proportions; manual trace loses context
The Annotation Checklist: What to Add Before You Scan
All critical dimensions written in pen next to every feature. Length, width, height, hole diameter, radius, depth, thread specification. Not ‘approximately 50mm’. Exactly 50mm or the correct tolerance range.
Orthographic view labels. Write ‘FRONT VIEW’, ‘TOP VIEW’, ‘RIGHT SIDE VIEW’ clearly next to each view. Label the projection method if you know it (first-angle or third-angle).
Centre lines and axes of symmetry drawn as thin lines with alternating long-short dashes, or simply labelled ‘CL’ or ‘SYM’. These define the datum structure that the CAD model must reference.
At least one scale reference. Either a dimensioned scale bar or one known dimension from which everything else can be scaled. Without this, the CAD operator has no way to set the underlay at the correct scale.
Material and surface finish notes. Write the material grade and any surface finish requirement directly on the sketch. Add thread standards where relevant (M12x1.75, 1/2-13 UNC).
Special requirements and constraints. If a feature must be concentric with another, write it. If a surface must be flat within a stated tolerance, note it. If there is a mating part, sketch the mating geometry or note the mating part number.
The pre-scan annotation habit: Treat the annotation step as a design review of your own sketch. If you cannot write a dimension next to a feature because you do not yet know what the dimension should be, the design is not ready for CAD conversion. The sketch annotation step forces every engineering decision to be made before the drawing production starts, which is exactly when those decisions cost the least to change.
Step-by-Step: Converting a Hand Sketch to a CAD Drawing
This is the complete workflow for converting a hand-drawn sketch into a professional CAD drawing in AutoCAD or SolidWorks. The same sequence applies for most CAD platforms. The tool names vary but the logic is the same.
The annotation is not extra work. It is the engineering work. The CAD conversion is just the documentation
Step
What Happens
Key Action Required
Common Error at This Step
1. Prepare
Annotate sketch fully before scanning
Add all dimensions, labels, and reference marks to the physical sketch
Scanning first then trying to add annotation to the digital image
2. Scan / photograph
Create a clean digital image of the sketch
600 DPI minimum for scanning; good lighting for photography; no distortion
Low-resolution scan; angled photograph; shadow across sketch
3. Import underlay
Bring the image into CAD as a reference underlay
Scale the underlay using a known dimension (INSUNITS + reference scale)
Importing without scaling; drawing on top of wrong-scale reference
4. Set up drawing
Configure units, projection method, layers, and template
Use company drawing template before creating any geometry
Starting on Layer 0 with no template; default settings applied
5. Trace 2D geometry
Draw CAD lines and arcs over the underlay
Use constraints to make geometry geometrically correct, not just visually close
Tracing visually without applying geometric constraints; drawing remains unconstrained
6. Apply dimensions
Dimension every feature required for manufacture
Check every dimension against the sketch annotation; query anything unclear
Scaling dimensions from the underlay instead of reading the sketch annotation
7. Add GD&T
Apply tolerances, datum structure, and surface finish callouts
Use the drawing standard appropriate to the manufacturing destination
Skipping GD&T entirely and relying on general tolerance for everything
8. Add 3D model
Extrude or revolve 2D profile to create 3D solid if required
Verify every sketch profile is a closed loop before 3D operation
Open profiles that prevent extrusion; missing fillet or chamfer detail
9. Final check
Overlay CAD drawing on original sketch to verify correspondence
Every feature in the sketch should be present in the CAD; every dimension should match
Missing features; dimensions that do not match the annotated sketch values
10. Issue
Release drawing through normal review and approval process
Peer review against the drawing standard; title block complete
Issuing without peer review; reverting to the sketch as the production reference
Step 1 to 3: Preparing and Importing the Sketch
The first three steps happen before you draw a single CAD line. Sketch annotation ensures every engineering decision is made before conversion starts. Scanning at 600 DPI minimum produces an image with enough resolution for clean line recognition, whether you are tracing manually or using an AI assist tool. Anything below 400 DPI produces a raster image where sketch lines are broken or blurred at the edges, making accurate tracing significantly harder.
Scaling the underlay correctly is the most technically critical step in the import process. The INSUNITS system variable in AutoCAD controls how the software interprets the scale of inserted content. If INSUNITS is set to millimetres and you import an image scanned at 96 DPI (standard screen resolution), the image will import at screen-pixel scale, not millimetre scale. Use the SCALE command with the reference option immediately after import: select the underlay, pick two points at either end of a known dimension on the sketch, and type the known dimension value. The software scales the underlay so that dimension matches exactly.
Step 4 to 6: Setting Up, Tracing, and Dimensioning
Setting up the drawing before tracing is not optional. Tracing on Layer 0 without a template is the single most common error in sketch-to-CAD conversion work. Layer 0 geometry cannot be managed by layer, cannot have line weights assigned correctly, and creates a drawing that does not meet any professional drawing standard. Open your company template file or create a new drawing with the correct layer structure, then import the underlay into that environment.
When tracing, work with geometric constraints active. Every relationship visible in the sketch that should be geometric, not just visual, must be applied as a constraint. Two lines that look parallel are not necessarily parallel until a parallel constraint is applied. A circle that appears tangent to a line may not be until a tangent constraint is set. Geometry that is visually approximate but not mathematically constrained produces a drawing that cannot be used reliably for manufacturing because the relationships it shows are not guaranteed to hold.
Dimensioning from the sketch annotation, not from the underlay geometry, is the rule that prevents scale errors from propagating into the drawing. The underlay is a reference image. Its geometric proportions may be accurate or may not, depending on how the original sketch was drawn. The annotations on the sketch are the engineering values. Always type the annotated value into the dimension, not the measured distance from the underlay.
Step 7 to 10: GD&T, 3D, Checking, and Issue
Adding GD&T from a sketch is a translation exercise. The sketch may show a circle with a note ‘concentric with boss’. The CAD drawing translates that into a position tolerance referenced to the appropriate datum axis. The sketch may show a surface with a note ‘flat, smooth surface’. The CAD drawing translates that into a flatness tolerance and an Ra surface finish callout. The sketch provides the design intent. The CAD drawing provides the engineering specification.
For 3D modeling from a sketch, the critical check is profile closure. Every 2D sketch profile that will be extruded, revolved, or used as a sweep path must be a closed loop with no gaps, overlaps, or branching lines. In SolidWorks, use the Sketch Doctor tool before any 3D operation to identify open contours. In Fusion 360, the extrude command will warn if the profile is not closed. In AutoCAD, the BOUNDARY command helps identify closed regions from traced geometry.
The final check is the overlay: place the completed CAD drawing alongside the original sketch and compare every feature. Every view that existed in the sketch should exist in the CAD drawing. Every dimension that was annotated on the sketch should appear on the CAD drawing with the correct value. Any feature present in the sketch that is absent from the CAD drawing is a missing element that must be added before issue.
Using AutoCAD Markup Import for Sketch Conversion
AutoCAD Markup Import, introduced in AutoCAD 2023 and developed further in subsequent releases, is Autodesk’s built-in tool for converting scanned drawings and markups into editable CAD geometry. It handles the most common use case for sketch to AutoCAD conversion: a sketch or marked-up drawing on paper, scanned to PDF or image, that needs to become editable DWG geometry.
How Markup Import Works
The workflow: import the scanned image or PDF markup into AutoCAD, which places it as a background reference. Markup Import’s AI analyses the image and identifies lines, arcs, circles, and text. It then overlays suggested geometry on the image, which the engineer accepts, rejects, or modifies. Accepted geometry becomes editable AutoCAD objects on specified layers.
The tool is genuinely useful for drawings with clear, clean lines, straight edges, and simple geometry. It struggles with freehand curves, overlapping lines, and complex connection points. It does not interpret engineering intent: a circle with four lines radiating from it at 90-degree intervals might be a bolt circle pattern, a wheel, a connection diagram, or a structural element. Markup Import will create a circle and four lines. Deciding what they mean is an engineering judgment that the tool does not make.
Autodesk Raster Design: The More Powerful Alternative
For organisations with more demanding raster-to-vector conversion requirements, Autodesk Raster Design (a free add-on for AutoCAD subscribers) provides more comprehensive raster image processing. It cleans image noise, straightens lines, converts raster arcs to vector arcs, and handles complex legacy drawing conversion more reliably than Markup Import alone.
Raster Design is particularly useful for converting large volumes of legacy scanned drawings to editable CAD, a common requirement in industries that have paper drawing archives from pre-CAD decades. For converting fresh hand sketches, Markup Import is usually sufficient.
AI Sketch-to-CAD Tools: What Actually Works in 2026
The AI sketch to CAD market in 2026 is loud and active. New tools appear regularly with significant marketing claims. The honest engineering assessment is that all current tools sit somewhere on the spectrum between ‘useful starting point for concept geometry’ and ‘requires complete engineering rebuild before manufacturing use’. None sits at ‘production-ready manufacturing drawing from sketch without engineering input’.
Tool
Type
What It Actually Does
Best Realistic Use Case
Honest Limitation
Ragnar CAD
Sketch-to-3D AI
Interprets sketch geometry; generates 3D mesh or solid
Concept geometry from annotated sketch
Output needs significant refinement for manufacturing use
AutoCAD Markup Import
Drawing import
Recognises lines and shapes in scanned markup; suggests CAD geometry
Upgrading scanned 2D drawings to editable DWG
Does not understand engineering intent; produces dumb geometry
Autodesk Raster Design
Raster-to-vector
Converts scanned raster image to vector lines in AutoCAD
Existing AutoCAD workflow with scan input
Manual cleanup of noise and artefacts still required
Leo AI
Engineering AI
Searches existing CAD vault; assists with design intent; not sketch-to-CAD
Finding similar existing parts; reuse of previous designs
Not a sketch conversion tool; often mispositioned in marketing
Pixa / similar
AI image-to-visual
Generates technical-style visual from sketch image
Visualisation and presentation images
Not a CAD file; not manufacturable; not dimensioned
SketchUp
Manual 3D modeling
Simple push-pull 3D from 2D sketch input; not AI-driven
Architecture concept models from floor plan sketch
No engineering GD&T capability; not suitable for manufacturing
Traditional tracing
Manual CAD
Engineer manually traces sketch in AutoCAD or SolidWorks
Any application requiring a production-ready drawing
Slowest method; most reliable for manufacturing output
The Xometry Test Results: What the Data Actually Shows
When Xometry tested seven AI sketch and text-to-CAD tools in August 2025, the findings were consistent across all tools: simple prismatic geometry was handled reasonably; complex geometry with multiple interacting features was inconsistent; none produced output with tolerances, GD&T, or manufacturing specifications; all required significant engineering review and refinement.
This is not a criticism of the tools. It reflects the fundamental challenge: interpreting sketch geometry is a different problem from understanding engineering intent. A sketch line that represents a wall might be 2mm thick, 20mm thick, or structural steel. The sketch looks the same. The engineering specification does not. Until AI tools can reliably infer engineering intent from visual sketch input, the engineer remains essential to every sketch-to-CAD workflow that produces a manufacturing deliverable.
Where AI Sketch Tools Add Genuine Value
Concept geometry for client presentations. Getting a rough 3D view of a concept in minutes rather than days. The geometry does not need to be manufacturing-ready.
Starting point acceleration. A reasonable first-pass geometry from Ragnar CAD or Markup Import gives the engineer a starting model to refine rather than building from a blank file.
Legacy drawing digitisation at volume. Converting hundreds of scanned paper drawings to editable DWG where speed matters more than perfection on each individual drawing.
Rapid iteration on proportions. Testing multiple layout interpretations of the same sketch quickly before committing to detailed CAD work.
AI tools accelerate the geometry step. The engineering steps remain the same.
Working in SolidWorks: Converting a Sketch to a Parametric 3D Model
When the end deliverable is a 3D parametric model rather than a 2D drawing, SolidWorks (or Creo, Inventor, or Fusion 360) is the appropriate tool. The workflow differs from AutoCAD in a fundamental way: instead of tracing the sketch as a 2D drawing, you trace it as a 2D sketch profile inside SolidWorks that will then be extruded, revolved, or used as a path sweep to create the 3D solid.
The SolidWorks Sketch Import Workflow
Create a new part document using your company SolidWorks template.
Insert the scanned sketch as a sketch picture on the front plane or the plane most representative of the primary view in the sketch.
Scale the sketch picture by dragging the scale handle or entering a scale factor. Use the same reference dimension method: identify a known dimension on the sketch and scale until the measured distance in SolidWorks matches the annotated value.
Trace the 2D profile over the sketch picture using sketch tools. Apply all geometric constraints. Every relationship in the sketch that should be mathematical must be a constraint, not an approximation.
Verify closure before any 3D operation. Use Sketch Doctor or the profile highlighting that appears when you hover over the Extrude feature to confirm the sketch is fully closed.
Apply driving dimensions from the sketch annotations. Make the sketch fully defined before extruding.
Extrude or revolve to create the 3D body. Delete or hide the sketch picture underlay after the 3D model is complete.
Create the 2D drawing from the 3D model using SolidWorks Drawing. The drawing views are generated from the model, ensuring the drawing and model are always consistent.
Why SolidWorks Produces a More Complete Output
The SolidWorks workflow produces two deliverables from one sketch: a parametric 3D model and a manufacturing drawing derived from that model. The drawing and model are linked: change the dimension in the drawing and the model updates; change the model and the drawing views update. This is significantly more valuable than a 2D AutoCAD drawing alone for parts that will be revised, analysed, or used as the basis for a part family.
For straightforward 2D applications (construction drawings, civil layouts, P&IDs, structural floor plans) AutoCAD is the more efficient route. For mechanical part design that will go through multiple iterations, SolidWorks or an equivalent parametric 3D platform produces an output that serves the full product development lifecycle, not just the initial manufacturing order.
Outsourcing Sketch-to-CAD Conversion: When and How
Sketch-to-CAD conversion is one of the most commonly outsourced engineering drawing activities, and for good reason. It is a well-defined scope of work with a clear input (the annotated sketch) and a clear output (the CAD drawing), and it benefits from specialists who do this type of work repeatedly and efficiently.
The conditions under which outsourcing sketch-to-CAD conversion makes sense: the volume of conversions is higher than in-house capacity can handle efficiently, the in-house team lacks CAD capability or CAD proficiency for the specific type of drawing required, the deadline is tighter than the in-house workflow can meet, or the drawing type (architectural floor plans, structural steel, MEP schematics) requires specialist CAD knowledge that the in-house team does not have.
What to Give an Outsourcing Partner for Sketch Conversion
The annotated sketch: fully dimensioned, labelled, with material and finish notes, and at least one scale reference. If the sketch is inadequately annotated, the partner will query or guess. Both add cost and risk.
The drawing specification: your drawing standard (ASME Y14.5 or ISO 1101), CAD software and version, file format required, layer naming convention, and title block template. Without these, the partner produces a technically competent drawing in their own style, not yours.
Go-by drawings: two or three representative drawings from your existing archive that show your exact style, layer structure, line weights, and annotation conventions. A written specification and a visual example together eliminate virtually all style-related rework.
A clear brief of any constraints not visible in the sketch: mating part requirements, assembly context, functional requirements that affect manufacturing priority. The sketch shows geometry. The brief provides the engineering context that the sketch cannot communicate.
Common Mistakes in Sketch-to-CAD Conversion
These are the errors that most consistently produce wrong output from sketch to CAD conversion, whether the work is done in-house or by an outsourcing partner.
Mistake
What Goes Wrong
Prevention
Scanning sketch before annotating it
Digital image has no dimensions; guessing from proportions throughout
Complete all annotations on the physical sketch before scanning. Scanning is the last step in sketch preparation.
Importing at wrong scale (INSUNITS mismatch)
All traced geometry is at the wrong scale; dimensions incorrect
Set INSUNITS before import. Scale the underlay using one known dimension immediately after import.
Tracing visually without geometric constraints
Lines appear parallel but are not; circles appear tangent but are not
Apply constraints (parallel, perpendicular, tangent, concentric) to every geometric relationship in every sketch.
Using scale from underlay for dimensions
Dimensions reflect the scan proportions, not the design intent
Always read dimensions from the sketch annotation. Never scale from the underlay image.
Treating AI-generated geometry as production-ready
Mesh or approximated geometry sent to manufacturer; parts cannot be made
AI tools produce starting points. Every AI output requires engineering validation before manufacturing release.
Skipping the 3D profile closure check
Extrude fails or creates wrong solid because sketch profile is not closed
Check every sketch profile for closure before any 3D operation. Use the profile analysis tool before extruding.
No peer review before issue
Drawing released with errors that a second set of eyes would have caught
Apply the pre-release checklist. Require a second engineer to sign off before any drawing is issued from a sketch.
Losing the original sketch after CAD is complete
Conflict between sketch intent and CAD output cannot be resolved
Archive the annotated sketch alongside the CAD file as a permanent project record.
The final overlay check: The single most effective quality check in any sketch-to-CAD workflow is placing the finished CAD drawing alongside the original annotated sketch and comparing them feature by feature. Every view present in the sketch should be present in the CAD. Every annotated dimension should appear in the CAD with the correct value. Every note should be accounted for. This check takes five minutes and catches the majority of conversion errors before the drawing is issued.
Conclusion:
A hand-drawn sketch is the most natural form of engineering communication. It is fast, flexible, and honest. It captures proportions, relationships, and intent in a way that talking around a table cannot. But it is not an engineering instruction. It is the raw material that an engineering drawing is made from.
The process of converting a hand drawn sketch to CAD is the process of translating that raw material into a precise, complete, and unambiguous manufacturing instruction. It requires engineering judgment at every step: which tolerances apply, which GD&T controls are needed, which dimensions govern assembly, and which features are critical versus general. These judgments cannot be made by tracing lines. They cannot be made by AI tools in 2026. They are made by the engineer who understood what the sketch was trying to say.
AI tools are genuinely useful for concept geometry, for getting a 3D starting point from an annotated sketch, and for converting large volumes of legacy scanned drawings. They are not yet useful for producing manufacturing-ready engineering drawings from sketches without engineering validation. The tools are evolving quickly. The engineering requirement remains constant.
Annotate the sketch fully. Import it correctly. Trace with constraints. Dimension from the sketch, not the underlay. Verify against the original. Then issue.
Frequently Asked Questions
How do you convert a hand-drawn sketch into a CAD drawing?
To convert a hand-drawn sketch into a CAD drawing, follow this sequence: annotate the sketch with all critical dimensions, notes, and labels before scanning; scan at a minimum of 600 DPI or photograph with good even lighting; import the image into your CAD software as an underlay; scale the underlay using a known reference dimension; set up your drawing template with correct units, layers, and projection method; trace the geometry over the underlay and apply geometric constraints to all relationships; add dimensions, GD&T, surface finish, and material callouts; verify the CAD output against the original sketch by overlaying; and peer-review before issuing the drawing for manufacturing.
Can AI tools convert a hand-drawn sketch to a CAD file automatically?
AI tools can interpret sketch geometry and generate a starting point for a CAD model, but they cannot currently produce manufacturing-ready drawings from sketches without significant engineering input. When Xometry tested seven text-to-CAD tools in August 2025, all required substantial refinement for engineering use. Tools like Ragnar CAD (February 2026) and AutoCAD Markup Import can accelerate the process for simple geometry. For production drawings requiring GD&T, tolerances, and manufacturing specifications, human engineering validation remains essential regardless of which AI tool is used.
What makes a hand-drawn sketch ready to convert to CAD?
A hand-drawn sketch is ready to convert to CAD when it includes: all critical dimensions written clearly next to every feature, orthographic views labelled by name (front, top, side), centre lines and axes of symmetry marked, a scale reference or at least one known dimension, all feature boundaries clearly closed with no ambiguous lines, material and surface finish notes where relevant, and any special requirements or constraints annotated on the drawing. A sketch without dimensions is not a CAD input. It is a visual concept that requires engineering decisions before CAD work can begin.
What is the difference between tracing a sketch in CAD and using AI conversion?
Manual tracing in CAD involves importing the sketch as an underlay, drawing lines and arcs over it with geometric constraints applied, dimensioning every feature from the sketch annotations, and adding GD&T and manufacturing specifications. The result is an engineering drawing with full design intent. AI conversion interprets sketch geometry automatically and generates geometry without manual input. It is faster for simple shapes but produces approximate geometry without constraints, tolerances, or manufacturing specifications. Manual tracing is required for any drawing that will be used for manufacturing. AI conversion is useful for concept visualisation and early-stage geometry.
How do I scale a hand-drawn sketch correctly in AutoCAD?
To scale a hand-drawn sketch correctly in AutoCAD: first set the INSUNITS variable to match the unit system of your drawing before importing the image. Import the scanned image using the IMAGEATTACH command. Identify one dimension on the sketch where you know the exact real-world value. Use the SCALE command with the reference option to scale the image so that the known dimension matches its correct value in the drawing. Once the underlay is correctly scaled, all traced geometry will automatically be at the correct scale provided your INSUNITS setting is correct.
Should I use AutoCAD or SolidWorks to convert a sketch to CAD?
The choice between AutoCAD and SolidWorks depends on the output required. For 2D manufacturing drawings, construction drawings, or any application where a flat drawing set is the deliverable, AutoCAD is the more efficient tool. The underlay workflow is well-established and the 2D output is directly usable. For parts that require a 3D parametric model, assembly checking, FEA, or a manufacturing drawing derived from a 3D model, SolidWorks is more appropriate. The sketch becomes the reference for a 2D sketch profile in SolidWorks, which is then extruded or revolved to create the solid body. For most engineering manufacturing applications, SolidWorks produces a more complete and useful output from a hand sketch.
Every time you buckle your seatbelt, turn on a fan, or ride an elevator, you are experiencing the work of a mechanical engineer. Mechanical engineering is one of the oldest and broadest disciplines in the engineering world, and it quietly underpins almost every product, machine, and system you interact with daily.
If you have ever wondered what mechanical engineering actually is, what mechanical engineers do for a living, or whether it might be the right career path for you, this guide covers all of it. We have written this from the ground up for beginners, so no prior technical knowledge is required. By the end, you will have a thorough understanding of the field, from its ancient roots to its role in shaping technologies like robotics, AI-driven design, and renewable energy.
What Is Mechanical Engineering?
Mechanical engineering is the branch of engineering that applies the principles of physics, mathematics, and materials science to design, analyze, manufacture, and maintain mechanical systems. In simpler terms, it is the discipline that focuses on how things move, how forces interact with structures, and how energy flows through systems.
From micro-scale medical devices to massive power plant turbines, mechanical engineering operates across an enormous range of scales and industries. It is often called the “mother of all engineering disciplines” because it was one of the first formalized branches of engineering and its foundational principles overlap with virtually every other engineering field.
A simple definition:Mechanical engineering is the application of engineering principles and problem-solving techniques to design and manufacture anything that moves, generates energy, or requires structural support.
According to the American Society of Mechanical Engineers (ASME), mechanical engineering is one of the broadest engineering disciplines and involves the design, production, and operation of machinery and tools.
A Brief History of Mechanical Engineering
Mechanical engineering did not begin in a university classroom. It began with human curiosity and the need to solve practical problems.
Ancient Origins
The roots of mechanical engineering stretch back thousands of years. Ancient civilizations in Egypt, Greece, China, and Mesopotamia all developed mechanical devices long before the term “engineering” existed. The Egyptians used ramps and levers to build the pyramids. The ancient Greeks produced remarkable mechanical inventions, including the Antikythera mechanism, often considered the world’s first analog computer.
Archimedes (287-212 BC) is one of the earliest figures we can point to as a proto-mechanical engineer. His work on levers, pulleys, and the screw pump laid conceptual groundwork that still informs engineering education today.
The Industrial Revolution: A Turning Point
The most transformative period for mechanical engineering was the Industrial Revolution, which began in Britain around the 1760s and spread rapidly across Europe and North America. Steam engines, textile machinery, and iron manufacturing processes transformed societies and created enormous demand for trained engineers who could design, build, and operate complex machines.
James Watt’s improvements to the steam engine in the late 18th century are widely credited as one of the most important engineering innovations in human history, setting the template for how mechanical systems could be designed to maximize efficiency.
The 20th Century and Beyond
The 20th century brought mechanical engineering into aerospace, automotive, nuclear, and eventually digital technologies. The development of the combustion engine transformed transportation. The space race pushed mechanical engineering to new extremes of precision and reliability. Computer-Aided Design (CAD) software, introduced commercially in the 1960s and 1970s, fundamentally changed how engineers conceived and communicated designs.
Today, mechanical engineering is at the intersection of traditional manufacturing, digital simulation, artificial intelligence, and sustainable energy systems. It has never been a more dynamic time to enter the profession.
Core Subjects and Fundamental Principles
A mechanical engineering education is built on a set of core technical subjects. Understanding these areas gives you a sense of how broad and intellectually demanding the discipline really is.
Statics and Dynamics
Statics is the study of bodies at rest and the forces acting on them. Dynamics extends this to bodies in motion. These are the foundational mechanics courses that teach engineers how structures bear loads and how objects accelerate or decelerate under applied forces.
Thermodynamics
Thermodynamics deals with heat, energy, and how they convert between different forms. It is essential for designing engines, refrigeration systems, HVAC units, and power generation equipment. The laws of thermodynamics set hard physical limits on what any energy system can achieve.
Fluid Mechanics
Fluid mechanics covers the behavior of liquids and gases in motion and at rest. Mechanical engineers use fluid mechanics principles when designing pipelines, aircraft wings, pumps, and hydraulic systems.
Mechanics of Materials (Strength of Materials)
This subject examines how materials deform, stress, and fail under applied loads. It is critical for any engineer who needs to ensure a structure or component will not break under real-world conditions.
Heat Transfer
Heat transfer studies how thermal energy moves through conduction, convection, and radiation. Engineers apply these principles when designing cooling systems for electronics, engines, or industrial processes.
Manufacturing Processes
Understanding how things are made is just as important as designing them. Mechanical engineers study casting, machining, welding, additive manufacturing (3D printing), and composite fabrication to ensure designs can actually be built at scale.
Control Systems and Mechatronics
Modern mechanical systems often require automated control. Control systems engineering deals with feedback loops, sensors, and actuators that allow machines to regulate their own behavior. Mechatronics blends mechanical, electrical, and software engineering into a unified discipline.
What Does a Mechanical Engineer Do?
The day-to-day work of a mechanical engineer varies enormously depending on the industry, company size, and career stage. However, certain core activities are common across most roles.
Designing components and systems using CAD software
Running simulations to test designs before physical prototypes are built
Analyzing data from tests, sensors, and field performance
Collaborating with manufacturing teams to ensure designs can be produced efficiently
Writing technical reports and design documentation
Managing projects and coordinating with other engineering disciplines
Improving existing products through redesign and optimization
Ensuring designs comply with safety standards and industry regulations
In a typical week, a junior mechanical engineer might spend significant time in CAD software creating or modifying part drawings, attending design review meetings, running Finite Element Analysis (FEA) to check structural integrity, and communicating with suppliers about material specifications. A senior engineer or engineering manager might spend more time on strategic planning, budget oversight, and mentoring junior team members.
One of the most appealing aspects of the profession is its variety. A mechanical engineer working in the medical device industry faces completely different daily challenges from a colleague designing offshore wind turbines or automotive components.
Industries Where Mechanical Engineers Work
The breadth of mechanical engineering means that qualified engineers are in demand across a huge range of sectors. Below are the industries that employ the largest numbers of mechanical engineers globally.
Process engineer, tooling designer, quality engineer
DFM, lean manufacturing, automation
Medical Devices
Biomedical device engineer, prosthetics designer
Precision, biocompatibility, miniaturization
HVAC & Building Services
HVAC design engineer, energy consultant
Heat transfer, fluid flow, energy efficiency
Robotics & Automation
Robotics engineer, mechatronics specialist
Control systems, kinematics, actuators
Consumer Products
Product development engineer, R&D engineer
Ergonomics, manufacturing cost, durability
Tools and Software Used in Mechanical Engineering
Modern mechanical engineers are expected to be proficient with a range of software tools alongside traditional analytical methods.
CAD Software
SolidWorks: One of the most widely used parametric 3D CAD platforms in industry
AutoCAD: The industry standard for 2D technical drawings and drafting
CATIA: Used extensively in aerospace and automotive for complex surface modeling
Fusion 360: Cloud-based CAD popular with startups and smaller engineering teams
NX (Siemens): Favored for high-complexity mechanical and aerospace applications
Simulation and Analysis Software
ANSYS: The leading platform for FEA, CFD, and multiphysics simulation
MATLAB and Simulink: Used for mathematical modeling, control systems, and data analysis
SolidWorks Simulation: Integrated FEA tools within the SolidWorks environment
COMSOL Multiphysics: Specializes in coupled physics simulations
Project and Data Management
PLM software (Teamcenter, Windchill): Manages product lifecycle data across large teams
Microsoft Excel: Still heavily used for hand calculations, data analysis, and reporting
Python: Increasingly used for automation, data processing, and scripting in engineering workflows
CAD and Simulation in Mechanical Engineering
Computer-Aided Design (CAD) and simulation have transformed mechanical engineering practice more than almost any other development in the past 50 years. Before CAD, engineers produced every design by hand on drawing boards, a process that was time-consuming and made design changes expensive and slow.
Today, a mechanical engineer can create a fully parametric 3D model of a complex assembly, test it under simulated load conditions, check it for manufacturability, and generate engineering drawings, all before a single physical component is made.
Finite Element Analysis (FEA)
FEA is a computational technique that divides a physical structure into thousands of small elements and solves the governing equations of mechanics for each element. This allows engineers to predict where stresses will be highest, where deformation will occur, and whether a design will survive its intended loading conditions. FEA has made it possible to design lighter, stronger structures with significantly less physical testing.
Computational Fluid Dynamics (CFD)
CFD applies similar numerical methods to fluid flow problems. An automotive engineer can simulate airflow around a car body to reduce drag. An HVAC engineer can model airflow through a building to optimize comfort and energy use. CFD reduces the need for expensive wind tunnel testing and physical flow experiments.
Digital Twins
A digital twin is a real-time virtual model of a physical asset, updated continuously with live sensor data. Mechanical engineers increasingly use digital twins to monitor industrial equipment, predict maintenance needs, and optimize performance without interrupting physical operations. This technology is growing rapidly across manufacturing, energy, and infrastructure sectors.
Mechanical Engineering vs. Other Engineering Branches
Feature
Mechanical Eng.
Civil Eng.
Electrical Eng.
Chemical Eng.
Primary Focus
Machines, motion, energy
Structures, infrastructure
Electricity, electronics
Chemical processes, reactions
Core Tools
CAD, FEA, thermodynamics
Structural analysis, geotechnics
Circuit design, signal processing
Process simulation, reaction kinetics
Typical Projects
Engines, robots, turbines
Bridges, buildings, roads
Power grids, microchips
Refineries, pharmaceuticals
Overlap With ME
Closely linked via mechatronics
Shared structural analysis methods
Shared in electromechanical systems
Shared in energy and thermal systems
It is worth noting that the boundaries between engineering disciplines have blurred considerably in recent decades. A mechanical engineer working in electric vehicles needs a solid understanding of electrical systems. One working in biomedical engineering will collaborate closely with chemical and materials engineers. Cross-disciplinary competence is increasingly valued in the modern engineering workplace.
Education and Degree Options
Becoming a licensed mechanical engineer typically requires a formal university education, though the specific path can vary by country.
Undergraduate Degree (BEng / BASc / BS)
A Bachelor’s degree in Mechanical Engineering typically takes three to four years and covers the core technical subjects described earlier in this guide. Accredited programs from institutions recognized by bodies such as ABET (in the US) or the Institution of Mechanical Engineers (IMechE in the UK) are generally required for professional licensure.
Master’s Degree (MEng / MS / MSc)
A postgraduate Master’s degree allows engineers to specialize in a specific area such as robotics, aerospace systems, thermal engineering, or advanced manufacturing. It typically adds one to two years of study after an undergraduate degree and opens doors to more senior research and development roles.
PhD and Research Positions
For those interested in pushing the boundaries of the discipline, a PhD in mechanical engineering leads to careers in academic research, government research laboratories, or R&D leadership positions in industry.
Professional Certifications and Licenses
Professional Engineer (PE) license (US): Requires passing the FE exam, gaining work experience, and passing the PE exam
Chartered Engineer (CEng) status (UK): Awarded by institutions such as IMechE to engineers who meet experience and competency standards
CAD and software certifications: SOLIDWORKS Certified Professional (CSWP), ANSYS certifications, and similar credentials are valued in many job markets
Mechanical Engineering Career Paths
One of the great strengths of a mechanical engineering degree is the range of career directions it opens up. The following paths represent common trajectories for mechanical engineers.
Design Engineer
Design engineers focus on creating new products or improving existing ones. They spend significant time in CAD software and work closely with manufacturing and procurement teams to bring concepts to life.
Manufacturing / Process Engineer
Manufacturing engineers focus on how products are made. They optimize production processes, reduce waste, improve quality control, and implement lean and Six Sigma methodologies on factory floors.
Structural / Stress Analyst
Stress analysts use FEA and hand calculations to verify that components and structures can withstand their operating loads. This role is common in aerospace, automotive, and civil-mechanical hybrid environments.
Research and Development (R&D) Engineer
R&D engineers work at the frontier of technology, exploring new materials, processes, and design concepts. These roles often exist within large corporations, government labs, or startups developing disruptive technologies.
Project Manager
Many experienced mechanical engineers transition into project management roles, using their technical background to oversee engineering projects, manage teams, and communicate technical requirements to non-engineering stakeholders.
Consulting Engineer
Independent or firm-based consulting engineers provide specialist technical advice to clients across multiple industries. This career path tends to suit experienced engineers who enjoy variety and problem-solving across different contexts.
Mechanical Engineering Salary and Job Outlook
Mechanical engineering consistently ranks as one of the highest-paying undergraduate engineering disciplines globally.
Region
Average Starting Salary
Mid-Career Salary
Senior / Specialist Salary
United States
$65,000 – $75,000
$90,000 – $110,000
$120,000 – $150,000+
United Kingdom
GBP 28,000 – 35,000
GBP 45,000 – 65,000
GBP 70,000 – 100,000+
Germany
EUR 45,000 – 55,000
EUR 65,000 – 85,000
EUR 90,000 – 120,000+
Australia
AUD 65,000 – 80,000
AUD 95,000 – 120,000
AUD 130,000 – 170,000+
India
INR 400,000 – 600,000
INR 800,000 – 1,500,000
INR 2,000,000+
According to the US Bureau of Labor Statistics, employment of mechanical engineers is projected to grow steadily over the coming decade, with particularly strong demand in areas including renewable energy, advanced manufacturing, robotics, and medical devices. The global push toward decarbonization and electrification is creating entirely new categories of mechanical engineering work that did not exist even ten years ago.
Future Trends and Emerging Technologies in Mechanical Engineering
The mechanical engineering profession is evolving rapidly. Several major trends are reshaping what engineers need to know and what they will be working on over the next decade.
Additive Manufacturing and 3D Printing
Industrial 3D printing has moved well beyond plastics and prototypes. Metal additive manufacturing now enables the production of complex geometries that are impossible to machine, leading to lighter aerospace components, custom medical implants, and optimized heat exchangers. Mechanical engineers who understand both traditional manufacturing and additive processes are highly sought after.
Electrification and Energy Transition
The global shift toward electric vehicles, renewable energy systems, and hydrogen power is generating enormous demand for mechanical engineers with expertise in battery thermal management, wind turbine structural design, electric motor integration, and fuel cell systems. This is one of the fastest-growing areas in the profession today.
AI and Generative Design
Artificial intelligence is beginning to change how designs are created. Generative design tools use AI algorithms to explore thousands of potential design configurations based on engineering constraints and objectives, often producing optimized geometries that a human designer would not intuitively conceive. Mechanical engineers are increasingly expected to understand and direct AI-assisted design workflows.
Robotics and Autonomous Systems
The robotics industry is expanding rapidly into logistics, healthcare, construction, and agriculture. Mechanical engineers are central to the design of robotic actuators, end effectors, structural frames, and motion systems. Mechatronics expertise, which blends mechanical, electrical, and software skills, is particularly valued.
Sustainability and Life Cycle Engineering
Modern engineering practice increasingly demands that engineers consider the full environmental impact of their designs, from raw material extraction through to end-of-life disposal. Life cycle assessment (LCA) tools and circular economy principles are becoming standard parts of the mechanical engineer’s toolkit.
Advantages and Challenges of Mechanical Engineering
Advantages
Exceptionally wide career options across virtually every industry
Strong, consistent earning potential throughout a career
Tangible, visible impact: mechanical engineers build and improve things that exist in the real world
Cross-disciplinary skills open doors to roles in management, consulting, and entrepreneurship
Growing demand driven by energy transition, automation, and medical technology expansion
Strong international mobility: mechanical engineering qualifications are recognized globally
Challenges
The undergraduate degree is mathematically and technically demanding
Keeping technical skills current requires ongoing professional development
Some manufacturing-adjacent roles face employment volatility linked to economic cycles
Early career salaries, while solid, may lag behind finance or software engineering roles
Project timelines and budget pressures can create significant professional stress
Frequently Asked Questions (FAQ)
What is mechanical engineering in simple terms?
Mechanical engineering is the branch of engineering that focuses on designing, building, and maintaining mechanical systems and machines. It applies physics, mathematics, and materials science to create everything from car engines to medical devices. If something moves, generates energy, or requires structural support, a mechanical engineer was likely involved in its creation.
What does a mechanical engineer do on a daily basis?
On a typical day, a mechanical engineer might use CAD software to create or modify designs, run simulations to test how components perform under stress or heat, attend design review meetings with cross-functional teams, write technical reports, and communicate with suppliers or manufacturing teams about production requirements.
Is mechanical engineering a good career?
Yes, mechanical engineering is widely regarded as an excellent career choice. It offers strong earning potential, job stability across multiple industries, opportunities for international work, and genuine intellectual challenge. The ongoing energy transition and growth in robotics and medical technology are creating new job opportunities that are expected to sustain demand for mechanical engineers for decades.
How many years does it take to become a mechanical engineer?
A Bachelor’s degree in mechanical engineering typically takes three to four years. In some countries (such as the UK with an MEng program), an integrated master’s qualification takes five years. Gaining full professional licensure or chartered status typically requires an additional three to five years of supervised work experience after graduation.
What is the difference between mechanical engineering and civil engineering?
Mechanical engineering focuses on machines, mechanical systems, and energy, whereas civil engineering focuses on structures, infrastructure, and the built environment. Mechanical engineers tend to work on products that move or convert energy, such as engines, turbines, and robots. Civil engineers design and oversee bridges, roads, buildings, and water systems. Both disciplines share some analytical foundations but apply them to very different problems.
What software do mechanical engineers use?
The most commonly used software includes SolidWorks, AutoCAD, and CATIA for 3D and 2D design; ANSYS and COMSOL for simulation and analysis; and MATLAB for mathematical modeling and data processing. Many engineers also use project and lifecycle management software such as Teamcenter or Windchill for managing large product development programs.
What is the average salary for a mechanical engineer?
Salaries vary significantly by country, industry, and experience level. In the United States, the median annual salary for mechanical engineers is approximately $95,000 to $100,000 according to Bureau of Labor Statistics data, with senior and specialist engineers commonly earning well over $120,000. In the UK, mid-career salaries typically range from GBP 45,000 to GBP 65,000.
Conclusion
Mechanical engineering is one of the most versatile, impactful, and intellectually rewarding careers available to anyone with an interest in how the physical world works. From the principles of thermodynamics that govern every engine ever built, to the AI-assisted generative design tools reshaping product development today, the discipline sits at the intersection of tradition and innovation.
Whether you are a student deciding what to study, a professional considering a career change, or simply someone curious about the engineering that shapes the world around you, mechanical engineering offers a rich and rewarding path. The problems are real, the impact is tangible, and the field is evolving faster than ever.
On this website, we publish in-depth guides on the tools, techniques, and concepts that mechanical engineers use every day. Whether you want to learn AutoCAD, master SolidWorks, understand FEA, or explore the latest advances in the field, you will find detailed, practical resources here.
Ready to go deeper? Explore our complete guide to AutoCAD Tutorials for Beginners and Professionals, or discover the Best CAD Software for Engineers to find the tools that professional mechanical engineers rely on.
A few years ago, the engineering software industry seemed to reach a collective agreement: AI was going to change everything. Vendors rewrote their marketing pages. Conference keynotes promised autonomous design systems that would shrink development cycles from months to days. Engineering managers were told to prepare for transformation.
It is now 2026, and the honest assessment is more nuanced than the pitch decks suggested. Some of what was promised is genuinely here, deployed in real workflows at real companies, producing real time and cost savings. A meaningful part of it is still vendor theater: capable in demos, limited in production, and often solving the wrong problems.
This article is written for engineers, engineering managers, and technical decision-makers who want a clear-eyed view of what AI is actually doing in engineering design today. Not what it might do by 2030. Not what a simulated benchmark shows. What is working right now, what is not, and what you should actually be paying attention to in your organization this year.
We draw on the SimScale 2026 State of Engineering AI Report, Autodesk’s State of Design and Make survey, Gartner’s 2025 hype cycle analysis, firsthand feedback from engineers, and published research to give you a ground-level view of the current state of the art.
1. The State of AI in Engineering Design: 2026 at a Glance
Before separating real from hype, you need a baseline picture of where the industry actually stands.
Metric
Data Point
Source
Organizations using AI in at least one business function
88%
McKinsey / Intuit survey, 2026
AEC firms that have formally adopted AI
27%
ASCE survey, late 2025
AEC AI adopters planning to expand usage in 2026
94%
ASCE survey, late 2025
Engineering teams using AI generating design variants per program
~4x more than non-AI teams
SimScale 2026 State of Engineering AI Report
Simulation request speed-up for AI-enabled engineering workflows
2.8x faster than conventional
SimScale 2026 Report
Top barrier to scaling AI in engineering
Data preparation and availability (74%)
SimScale 2026 Report
Organizations getting measurable ROI from AI projects (2025 MIT study)
5% (95% report zero ROI)
MIT NANDA GenAI Divide Report, 2025
Digital twin market projected value by 2030
$150 billion (from $21B in 2025)
Industry analyst consensus
These numbers tell a revealing story. Adoption is accelerating, particularly in engineering-heavy industries. But the gap between organizations that have installed AI tools and those generating measurable business impact from them remains enormous. The 95 percent figure from MIT’s NANDA report deserves direct acknowledgment: most AI projects in enterprise settings have not yet produced return on investment. That does not mean AI is failing. It means most organizations have not yet done the hard work of integrating AI meaningfully into real workflows.
The engineering firms and manufacturing organizations that are generating impact share a common pattern, noted in the SimScale report: they are embedding AI into core engineering workflows rather than running it as a parallel experiment. The ones still running AI ‘pilots’ are, in most cases, not generating results.
2. Understanding the Hype Cycle: Where Engineering AI Sits Right Now
Gartner’s 2025 Hype Cycle for AI is instructive. Generative AI, after dominating the Peak of Inflated Expectations in 2023 and 2024, is now beginning its descent toward the Trough of Disillusionment. This is not a disaster. It is a normal and healthy maturation. The technologies that survive the trough, and most of the genuinely useful ones do, emerge on the slope of enlightenment as practical, well-understood tools that deliver consistent value.
For engineering specifically, Autodesk’s State of Design and Make 2025 report found a meaningful drop in positive AI sentiment compared to the prior year. Fumihiro Ojima, general manager of digital innovation at Tokyu Construction, captured the shift clearly when he said the industry has come to understand that AI is suited to some things and not others, and that the initial impression of AI being able to do everything has passed.
That recalibration is healthy for the engineering profession. It creates space for a more honest question: not ‘what can AI do eventually?’ but ‘what is AI reliably doing right now in engineering workflows, and what should I actually invest in?’
DATA: Gartner Trough Finding. Generative AI moved from Peak of Inflated Expectations toward Trough of Disillusionment in 2025. Technologies entering the trough typically reach practical productivity 2 to 5 years after initial peak hype.
3. What Is Actually Working: AI Applications Delivering Measurable Value
Let us be direct. These are the areas where AI in engineering design is producing documented, repeatable, commercially meaningful results in 2026, not in lab conditions, and not in vendor demos.
Simulation Acceleration
This is arguably the most consequential real-world application of AI in engineering today. Traditional finite element analysis (FEA) and computational fluid dynamics (CFD) simulation runs are computationally expensive and slow. A complex thermal analysis might take 12 to 48 hours to run on conventional infrastructure. AI surrogate models, trained on prior simulation data, can approximate simulation results in minutes, sometimes seconds, at acceptable accuracy for early-stage design decisions.
The SimScale 2026 report found that engineering teams using AI-enabled simulation workflows process requests 2.8 times faster on average than those using conventional workflows. More significantly, these teams test nearly four times as many design variants per program. That is not marginal improvement. That is a structural change in what is practically possible within a given development timeline.
REAL: Simulation surrogate models. AI-accelerated simulation is working in production environments now. Teams at aerospace and automotive companies are using it to explore design spaces that were previously computationally prohibitive.
Automated Drawing Production
Autodesk’s Fusion has shipped an Automated Drawings feature that auto-generates 2D engineering drawings from 3D models, with automatic view selection, dimension placement, and basic annotation. Since launch, millions of automated dimensions and constraints have been applied. Engineers using it describe the feature as having moved from experimental to genuinely useful for routine drawing production over the past 12 months.
SolidWorks 2026 has introduced a Command Predictor (currently in beta) that anticipates the next modeling command based on session context, a Contextual Assistant that recommends workflow optimizations in real time, and a Fastener Recognition feature that identifies and mates hardware components automatically. These are not capabilities that transform the design process on their own, but they represent real, daily time savings in routine modeling work.
REAL: Automated drawing generation. Autodesk Fusion’s Automated Drawings and SolidWorks’ Sketch AutoConstrain are in daily production use at engineering firms globally. Real time savings, not just demo capabilities.
Topology Optimization
Topology optimization is the process of computationally determining the most efficient material distribution within a defined design space, given specified loads and constraints. This is not a new idea, but AI has meaningfully improved both the speed of optimization runs and the manufacturability of the resulting geometries.
Aerospace and automotive applications have been the primary beneficiaries. Airbus famously used topology optimization to redesign a cabin bracket, reducing its mass by 45 percent while meeting the same structural performance requirements. That specific project predates current AI tools, but it established the value proposition. Current AI-enhanced topology optimization in tools like Autodesk Fusion’s Generative Design, Siemens NX, and Altair OptiStruct is producing similar results with significantly shorter compute times and better integration with manufacturing constraints.
REAL: Topology optimization. Working reliably for structural, thermal, and aerospace applications. Best results come from combining AI topology output with engineer-applied manufacturing feasibility judgment.
Part Search and Design Reuse
One of the less glamorous but high-impact AI applications in engineering is intelligent part search. Most engineering organizations maintain libraries of thousands of existing parts, but engineers routinely create new parts that are near-duplicates of ones that already exist because finding the right existing part is harder than building a new one. AI-powered geometry search (tools like Leo AI and integrated PDM search in Siemens Teamcenter and PTC Windchill) allows engineers to search by shape similarity rather than name or part number.
This addresses a genuine bottleneck that generative design tools largely ignore. According to Leo AI’s 2026 analysis of the CAD workflow, the biggest time sink in engineering design is not generating new geometry from scratch. It is finding and reusing what already exists.
REAL: AI-powered part search. Geometry-based part retrieval is delivering measurable productivity gains in organizations with large existing CAD libraries. High ROI with relatively low implementation complexity.
Predictive Maintenance in Manufacturing
AI-driven predictive maintenance has moved firmly from pilot to operational deployment in manufacturing. Systems that analyze sensor data from production equipment to predict failure before it occurs are now standard infrastructure at large manufacturers in automotive, aerospace, and process industries.
A 2025 research analysis of 1,094 manufacturing companies in Visegrad Group countries found that companies deploying predictive maintenance algorithms generated higher operational profits and lower sales costs relative to those using conventional maintenance approaches. A separate 2025 publication in the American Journal of Advanced Technology and Engineering Solutions reported that AI-driven predictive maintenance for electrical systems now reaches 85 to 95 percent accuracy in failure prediction.
REAL: Predictive maintenance. This is the most commercially mature AI application in engineering-adjacent domains. Production deployments with documented ROI exist across automotive, aerospace, energy, and process manufacturing.
4. Generative Design: Genuine Breakthrough or Overhyped Feature?
Generative design is the poster child of AI in engineering, and it deserves honest examination. The concept, that you define your design constraints (loads, materials, manufacturing methods, cost targets) and an AI generates multiple optimized geometry options that meet those constraints, is genuinely powerful. It is also genuinely limited in ways that vendor marketing does not advertise.
Where Generative Design Delivers
For well-defined, single-objective design problems with clear constraints, generative design works well. Structural components that must meet specific load cases with minimum weight, under manufacturing constraints like casting or CNC machining: this is the sweet spot. Autodesk’s generative design in Fusion, SolidWorks’ generative capabilities, and Altair OptiStruct have produced documented weight reductions and performance improvements in aerospace, automotive, and industrial applications.
The SimScale report finding that AI-enabled engineering teams generate nearly four times as many design variants is substantially powered by generative design tools that can produce dozens of candidate geometries in the time it would take an engineer to produce one manually. That expanded design space exploration is real.
Where Generative Design Falls Short
The limitations are significant and are not often discussed in vendor materials. Dessia, a specialist in AI-based design engineering, published a direct 2026 analysis of what generative design still cannot do, and the list is instructive:
Multi-objective tradeoffs requiring human judgment: Generative algorithms can optimize for a stated objective. They cannot resolve unstated tradeoffs, manage competing stakeholder priorities, or understand that a design needs to be manufacturable by a specific supplier’s existing tooling, not just theoretically manufacturable in principle.
Context beyond the model: Generative design operates on the geometry and constraints you define. It has no awareness of supply chain realities, assembly ergonomics, serviceability requirements, cost of manufacturing change, or the political realities of getting a new design approved by a customer.
Selection and judgment: Generative design produces candidates. It does not select the right one. That decision requires engineering judgment that weighs factors the system cannot model. The bottleneck shifts from generation to evaluation, and evaluation is still a human job.
Novel design problems: AI-driven generative design is essentially extrapolating from patterns in training data and prior simulations. For genuinely novel engineering problems, outside the distribution of what the system has seen, the output quality degrades and engineer oversight becomes critical.
HYPE: Generative design as autonomous design tool. Generative design is a powerful computational tool. It is not an autonomous design system. The claim that it eliminates the need for experienced design engineers misrepresents what the technology actually does.
5. AI in Simulation and Digital Twins: The Most Consequential Development
If you want to identify the AI application in engineering with the greatest long-term structural impact, the combination of AI and digital twins is the leading candidate. And unlike many AI applications in engineering, this one has a solid foundation of peer-reviewed research, commercial deployment cases, and measurable outcomes.
What a Digital Twin Actually Is (and Is Not)
A digital twin is a continuously updated virtual model of a physical asset or system, connected to real-time data from sensors on the physical counterpart. The digital twin does not just represent the asset as-designed; it represents the asset as it actually exists and behaves in its current operational state. This is fundamentally different from a CAD model or a simulation model, both of which are static snapshots.
The combination with AI adds the capability to run predictive models against the digital twin: predicting how the physical asset will behave under future conditions, identifying early signs of degradation before failure, and optimizing operational parameters in real time. Published research in Frontiers in Artificial Intelligence (December 2025) describes how this architecture enables real-time monitoring, predictive maintenance, and intelligent process optimization in manufacturing environments.
Real Deployments and Outcomes
Digital twin deployments are no longer confined to aerospace primes and automotive OEMs with unlimited R&D budgets. Cloud platforms from Siemens (Teamcenter X), PTC (ThingWorx), and Ansys (twin builder) have made digital twin infrastructure increasingly accessible to mid-size manufacturers.
The Ansys 2026 R1 release, launched March 2026, introduces generative AI and the portfolio’s first agentic capabilities into simulation workflows. The release specifically addresses faster design exploration, validation earlier in development, and reduced reliance on physical testing. These are not theoretical roadmap items; they are shipping in the current product.
In civil infrastructure, published 2026 research in Spectrum of Engineering Sciences documents digital twin deployments using AI-based structural performance modeling for predictive maintenance of bridges and buildings, integrating IoT sensor data with BIM models to create assets that self-monitor and flag deterioration before it becomes a structural risk.
REAL: AI-powered digital twins. This is the most technically mature and commercially deployed application of AI in engineering systems today. ROI cases exist across manufacturing, aerospace, energy, and civil infrastructure.
Where Digital Twins Are Still Maturing
The implementation complexity is substantial. Building a functioning digital twin requires clean, structured sensor data (74 percent of organizations in the SimScale study cite data preparation as their top AI scaling barrier), integration between IT and OT systems, ongoing model maintenance as the physical asset evolves, and cybersecurity infrastructure to protect what is essentially a real-time data connection to critical equipment.
For organizations that have not yet built clean data infrastructure, the digital twin is not a starting point. It is a destination that requires significant foundational work first.
6. AI Copilots in CAD: What the Major Platforms Are Actually Shipping
Every major CAD platform now has an AI story. The critical question is whether the features being shipped are solving problems that engineers actually have in daily work, or whether they are impressive demos that engineers rarely reach for after the first week.
Full workflow automation still requires significant setup; best results require experienced NX users directing the AI
PTC Creo 12 / Onshape
AI-driven generative design with thermal physics integration, AI Advisor, Design Assistant, real-time Ansys simulation integration
Onshape AI Advisor useful for beginners; Creo’s generative design strong for mechanical-thermal combined optimization
Complex regulatory and standards compliance still manual; AI outputs require experienced engineer review
Ansys 2026 R1
Generative AI, first agentic capabilities, AI-enhanced simulation, digital twin integration
AI-accelerated simulation workflows delivering 2-3x speed improvement in benchmarks; agentic features in early access
Full agentic automation requires clean data infrastructure most organizations do not yet have
The pattern across platforms is consistent. Features that accelerate routine, well-defined tasks (auto-dimensioning, fastener recognition, documentation lookup, view generation) are genuinely useful and widely adopted. Features that promise to generate complex designs from high-level intent are more constrained in practice than their marketing suggests and require experienced engineers to evaluate, filter, and refine their outputs before anything is usable.
Leo AI’s 2026 analysis of the CAD tool landscape makes this point precisely: most AI CAD tools in 2026 solve problems engineers do not actually have, while leaving the painful ones untouched. Documentation chatbots, for instance, primarily help new users find commands. Experienced engineers already know the commands. The bottleneck they face is workflow context and institutional knowledge, not documentation lookup.
7. Predictive Maintenance and AI in Manufacturing: Real Outcomes, Honest Limitations
The Clear Successes
AI-driven predictive maintenance is the commercial success story of AI in engineering-adjacent domains. The application is well-suited to AI: large volumes of structured sensor data, clear ground truth labels (a machine either failed or it did not), and high economic value in predicting failure before it occurs.
Published research now consistently demonstrates prediction accuracy of 85 to 95 percent for failure events in electrical and mechanical systems. Industry deployments at automotive manufacturers, energy companies, and aerospace maintenance organizations have documented reductions in unplanned downtime of 30 to 50 percent, with corresponding maintenance cost reductions.
What Makes Predictive Maintenance Different from Other AI Applications
Predictive maintenance works in practice where many other AI engineering applications struggle because the problem is well-structured. The data is digital (sensor readings), the label is binary (failure/no failure), the business case is directly quantifiable (cost of downtime), and the human oversight model is clear (the AI flags, the maintenance engineer decides). This combination of clear problem definition, clean training data, and a well-designed human-in-the-loop process is the template for AI engineering applications that actually deliver ROI.
Honest Limitations
Not every manufacturing environment has the sensor infrastructure to make predictive maintenance viable. Older equipment may lack the connectivity to generate the data the models need. Environments with significant process variability can degrade model performance. And the maintenance scheduling integration, ensuring that flagged maintenance actions are actually acted on within the right window, requires operational discipline that is not automatically provided by the AI system.
REAL: Predictive maintenance. ROI is documented and consistent across industries. This is the application to prioritize if you are looking for near-term, provable AI value in a manufacturing context.
8. The Hype That Has Not Delivered Yet (And Why)
Intellectual honesty requires naming the capabilities that were widely promoted but have not materialized as advertised.
Fully Autonomous AI Design Systems
The vision of describing what you want in plain language and receiving a production-ready engineering design back has not been realized. This is not surprising to anyone who understands what engineering design actually involves: managing constraints that are never fully specified, resolving tradeoffs between competing stakeholder requirements, applying domain knowledge about manufacturing realities, supply chains, standards compliance, and product history. AI can assist at many points in this process. It cannot replace it.
HYPE: Autonomous engineering design from natural language. No shipping product in 2026 can accept a high-level engineering brief and return a production-ready design without substantial expert human involvement. This capability may eventually arrive, but it is not here.
AI Completely Eliminating Physical Prototyping and Testing
AI-accelerated simulation is reducing the number of physical prototypes needed and shifting testing earlier in the design cycle. It is not eliminating physical testing. Physical testing remains essential for safety validation, regulatory certification, and the discovery of failure modes that simulation models, however sophisticated, do not capture. Structural engineers still certify and stamp. Aerospace hardware still goes through qualification programs. Medical devices still require bench and clinical validation. AI makes the front end faster. It does not make the back end disappear.
HYPE: AI replacing physical testing. AI simulation reduces but does not eliminate the need for physical validation. In regulated industries (aerospace, medical devices, structural engineering), this will remain true for the foreseeable future due to liability and certification requirements.
AI Copilots Usable Without Engineering Expertise
Several CAD vendors have suggested that AI copilots will lower the barrier to entry so significantly that non-engineers can produce engineering-grade designs. This has not happened. The AI tools shipping today augment experienced engineers. They do not substitute for engineering knowledge. An AI assistant that generates a structural joint geometry means nothing to a user who cannot evaluate whether the result is appropriate for the application, the material, the manufacturing process, and the applicable standard. The expertise required to use AI engineering tools well has not decreased; it has shifted toward higher-order judgment.
Agentic AI Running Autonomous Engineering Workflows
Agentic AI, systems that autonomously plan and execute multi-step engineering tasks without continuous human oversight, is a genuine research direction and an area of active development. In 2026, it is arriving in early access form in tools like Ansys 2026 R1. But the CIO article on agentic AI in engineering workflows (February 2026) offers the most accurate framing: agents remain brittle and are currently reliable only in constrained, well-defined domains. The engineer of 2026 is spending less time on keyboard-level execution and more time directing AI systems, but the idea that agentic AI will autonomously execute complex engineering workflows end-to-end is still a 2028-and-beyond conversation.
9. Will AI Replace Engineers? The Honest Answer
This question generates significant anxiety and no shortage of confident predictions from people who are not practicing engineers. Here is what the actual data and documented trends say in 2026.
The Numbers Do Not Support a Replacement Narrative
The BLS projects 9 percent job growth for mechanical engineers through 2034. The digital twin market alone is projected to grow from 21 billion dollars to 150 billion dollars by 2030, and that growth will require more engineers to design, validate, and maintain the systems involved, not fewer. Germany’s Bitkom 2025 survey of 855 companies found 109,000 unfilled IT and engineering positions, with 42 percent of those companies expecting to need additional technical specialists specifically because of AI adoption. The Jevons Paradox is already visible: cheaper AI-assisted engineering is not reducing demand for engineers. It is making more engineering work economically viable.
The ASCE survey finding that only 27 percent of AEC firms have formally adopted AI, while 94 percent of adopters plan to expand, signals an industry approaching an inflection point. The firms moving first will have a structural competitive advantage in 2027 and 2028. They will not have fewer engineers. They will have engineers who are dramatically more productive.
What Is Changing Is What Engineers Spend Time On
The genuine transformation is in the nature of engineering work, not the existence of engineering jobs. The CIO analysis of agentic AI in engineering frames this clearly: the engineer of 2026 is moving from hands-on execution of routine design tasks toward directing AI systems, defining objectives and constraints, validating outputs, and making judgment calls that AI tools cannot make.
A mechanical engineer who previously spent 40 percent of their time creating standard 2D drawings from 3D models can now delegate much of that to automated drawing tools. That time shifts to design exploration, FEA interpretation, supplier communication, and the contextual judgment calls that are genuinely hard for an AI to make. The job has not disappeared. The ratio of creative to mechanical work has shifted.
The Risk Is Real But Concentrated
The risk to individual engineers is not uniform. Entry-level positions that consist primarily of routine, well-defined tasks are genuinely more exposed. Junior engineering roles at large companies that have already deployed AI tools are seeing reduced new-grad hiring. Senior engineers, those with domain expertise, stakeholder judgment, systems thinking, and the ability to validate AI outputs critically, are not at meaningful risk and in many cases are in higher demand.
The World Economic Forum’s Future of Jobs Report 2025 listed AI and big data as the fastest-growing skills category. Engineers who develop AI fluency in their specific technical domain in 2026 are positioning themselves as organizational leaders. The window for building that differentiated advantage is open now, but it is not going to stay open indefinitely.
DATA: What this means practically. The engineers most at risk are those whose work consists entirely of tasks AI tools now automate reliably: routine 2D drafting, standard part modeling, documentation lookup. Engineers who combine domain depth with AI tool fluency are increasingly valuable.
10. What Engineering Managers Should Actually Do in 2026
If you manage an engineering team or an engineering-dependent business, here is practical guidance based on what is working, not on what the industry hopes will be working by 2030.
Start with simulation acceleration, not generative design.If you want near-term ROI from AI, invest in AI-assisted simulation. Teams using AI simulation workflows are generating nearly three times more design iterations at 2.8 times the speed. The productivity case is documented and the tooling is mature enough to deploy. Generative design is worth experimenting with for constrained structural applications, but it should not be your first AI investment.
Fix your data infrastructure before buying AI tools.74 percent of organizations in the SimScale report cited data preparation as their top barrier. AI tools run on clean, structured, accessible data. If your CAD library is disorganized, your simulation results are inconsistently named, and your sensor data is siloed in proprietary formats, investing in an AI overlay will not help. Fix the foundation first.
Pilot predictive maintenance if you have production equipment.This is the highest-confidence AI application in manufacturing. Mature tooling, documented ROI, clear human-in-the-loop model. If your organization has production equipment with connectivity, a predictive maintenance pilot has the best probability of delivering measurable results within a 6 to 12 month timeframe.
Evaluate the CAD AI features your team already has access to.SolidWorks 2026, Autodesk Fusion, Siemens NX, and PTC Creo all include AI features in your existing license. Before buying new AI tools, audit what your current software already provides. Automated drawing generation, sketch autoconstraint, command prediction, and geometry search may be available today with no additional investment.
Invest in AI fluency for your mid-level engineers.Mid-level engineers, experienced enough to evaluate AI outputs critically but adaptable enough to learn new workflows, are the optimal AI adoption target. The World Economic Forum identifies skill gaps as the primary barrier to AI-driven business transformation. Training your team to use AI tools effectively in your specific engineering domain will generate faster ROI than buying more software.
Resist the pressure to over-invest in agentic AI right now.Agentic engineering workflows are a genuine future direction. In 2026, they are fragile in production environments and most valuable in narrow, well-defined tasks. Gartner recommends pursuing agentic AI only where it delivers clear, defined value. Identify one or two high-value, well-defined workflow automation candidates and pilot those, rather than pursuing broad autonomous engineering as an organizational initiative.
11. Real vs Hype: Quick-Reference Verdict Table
Based on research, vendor disclosures, and firsthand engineering practitioner feedback, here is our 2026 verdict on the major AI claims in engineering design:
AI Application
Verdict
Evidence Basis
Practical Guidance
AI simulation acceleration
REAL
SimScale 2026: 2.8x speed, 4x design variants
Invest now; mature tooling, documented ROI
Automated 2D drawing from 3D models
REAL
Autodesk Fusion: millions of auto-dims applied
Adopt in current license; immediate daily time savings
Topology optimization for structural/aero
REAL
Documented weight reductions at Airbus, automotive OEMs
Useful for well-constrained, single-discipline problems
Predictive maintenance (manufacturing)
REAL
85-95% failure prediction accuracy in peer-reviewed studies
Highest-confidence ROI application in manufacturing
AI-powered part search and reuse
REAL
Documented productivity gains at large CAD library orgs
High ROI, often overlooked; lower complexity than generative design
Digital twins with AI for asset monitoring
REAL (growing)
Deployed at scale in aerospace, energy, civil infrastructure
Requires data infrastructure investment; powerful when built correctly
Generative design as autonomous design tool
HYPE
Works for constrained structural problems; fails at multi-objective, context-rich design
Useful as a starting point generator; not a design replacement
AI eliminating physical testing
HYPE
Not supported; regulations and liability require physical validation
AI reduces prototype count; physical testing remains mandatory
AI copilots usable by non-engineers
HYPE
No deployed tool produces engineering-grade output without expert evaluation
AI augments engineering expertise; does not substitute for it
Full agentic engineering automation
HYPE (for now)
Ansys 2026 R1 early access; described as brittle outside narrow domains
Watch actively; not ready for broad deployment in 2026
AI replacing engineers at scale
HYPE
BLS projects 9% growth; digital twin market growth drives more demand
Roles are transforming, not disappearing; AI fluency is the differentiator
12. FAQ:
Is generative design the same as AI design?
No, though the terms are often conflated in marketing. Generative design is a specific application where an algorithm explores a defined design space to produce geometry that meets stated constraints (loads, materials, manufacturing methods). AI in engineering design is a broader category that includes simulation acceleration, predictive maintenance, drawing automation, digital twins, copilot assistants, and generative design. Generative design is one subset of AI’s applications in engineering, and the one that receives the most marketing attention.
Which CAD software has the best AI features in 2026?
This depends on your discipline and workflow. For mechanical product design, SolidWorks 2026 and Autodesk Fusion lead in practical, daily-use AI features. For simulation-heavy work, Ansys 2026 R1 is the most advanced. For BIM and AEC workflows, Autodesk Revit and Bentley’s AI-integrated civil tools are the market leaders. All major platforms have shipped meaningful AI features in the 2025-2026 product cycle, but the quality gap is wide between features that are in general release versus features that are still in beta or limited preview.
How much faster does AI actually make engineering design?
Context-specific, but the SimScale 2026 data is instructive: teams using AI-enabled workflows process simulation requests 2.8 times faster and generate nearly four times as many design variants per program compared to conventional teams. For routine drawing production tasks, automated drawing generation can reduce drafter time by 40 to 70 percent on standard deliverables. Topology optimization can reduce structural mass 20 to 45 percent compared to manually designed baseline components. These numbers come from real deployments, not benchmarks.
What is stopping AI from fully automating engineering design?
Several things that are not going to be resolved quickly. Engineering design requires managing constraints that are never fully specified in a brief, resolving conflicts between stakeholder requirements that contradict each other, applying judgment about manufacturing realities that are not in any database, complying with regulations and standards that change and require interpretation, and taking legal and professional liability for signed and sealed documents. Until AI systems can reliably navigate all of those dimensions, experienced engineering professionals will remain essential for design work that matters.
Should engineering firms invest in AI tools right now?
For simulation acceleration, automated drawing generation, and predictive maintenance: yes, now. These applications are mature enough to deliver ROI within a 6 to 12 month window for most organizations. For broader generative design and agentic AI applications: selective pilots are appropriate, but full investment should wait until your data infrastructure is solid and you have engineering staff trained to critically evaluate AI outputs. The organizations generating the most value from AI in 2026 are those that started with specific, well-defined applications and built systematic competency before scaling.
How is AI affecting the engineering job market in 2026?
AI is shifting the distribution of engineering work more than it is reducing the total volume of engineering employment. Entry-level roles focused on routine drafting and standard modeling are seeing more pressure. Senior engineers and specialists are in higher demand. The World Economic Forum identifies AI fluency as the fastest-growing skills requirement for engineering professionals. Engineers who develop practical AI tool skills in their specific domain in 2026 are building a differentiator that will compound over the next three to five years.
Conclusion:
The most useful frame for AI in engineering design in 2026 is neither the vendor promise nor the skeptic’s dismissal. It is the practitioner’s view: AI is a genuine and growing capability that is delivering measurable value in specific, well-suited applications while falling well short of its most ambitious marketing claims in others.
The SimScale data showing that AI-enabled teams generate nearly four times as many design variants is not a technology prediction. It is a current operational reality at the firms doing this right. The MIT NANDA finding that 95 percent of enterprise AI projects generate zero ROI is equally real, reflecting the majority of organizations that have bought AI tools without the foundational workflow integration needed to make them productive.
The difference between those two outcomes is not the technology. It is the discipline of identifying where AI genuinely helps, building the data and workflow infrastructure to support it, training the humans who work alongside it, and maintaining the engineering judgment that no current AI system can replace.
For engineers reading this in 2026: AI is not going to make your expertise irrelevant. It is going to make your expertise more valuable if you develop the fluency to direct AI tools effectively. The competitive window for building that advantage is open now. Do not wait for the technology to mature further before starting.
Want to go deeper on AI in your engineering workflow?
Explore our related guides on CAD software comparison, in-house versus outsourced CAD drafting, and version control for engineering drawings to build a complete picture of modern engineering operations for your organization.
A mid-size mechanical engineering firm in Ohio recently found itself in a familiar bind. Their one full-time CAD drafter was maxed out, a large product redesign project had just landed, and the choice was either hire someone new or send overflow work to an outside firm. The owner asked what most business leaders eventually ask: which model actually makes more sense for us?
It is a question that sounds simple but gets complicated fast. The answer changes depending on how much drafting work you have, how sensitive your designs are, whether your projects are continuous or cyclical, and what your long-term business strategy looks like. Most articles on this topic give you a pros and cons list and leave the decision entirely to you. This guide does something different.
We have researched real salary benchmarks, actual outsourcing cost structures, and the practical operational realities that both models create. By the end, you will have a concrete framework for making the right call for your specific business, including a decision scorecard you can apply immediately.
1. What Is CAD Drafting and Why the Sourcing Decision Matters
CAD drafting is the process of creating precise technical drawings and 2D or 3D models using computer-aided design software such as AutoCAD, SolidWorks, Revit, CATIA, or MicroStation. These drawings serve as the authoritative technical language between designers, engineers, fabricators, contractors, and clients. A floor plan, a mechanical assembly drawing, an HVAC layout, a structural detail sheet: all of these are products of CAD drafting.
For most businesses in engineering, architecture, construction, and manufacturing, CAD drafting is not an optional activity. It underpins every project. The question is not whether to do it, but how to staff it.
Getting this decision wrong is expensive. Hire a full-time drafter when your workload does not justify it, and you are paying for idle capacity. Outsource when you should not, and you risk IP exposure, communication failure, and quality inconsistency. The right answer depends on a careful analysis of your workload pattern, budget, project complexity, and strategic direction.
2. What the Top-Ranking Articles on This Topic Miss
Before building this guide, we reviewed the articles currently ranking at the top of search results for this topic. They share a consistent set of weaknesses that leave business owners without the information they actually need to make this decision.
No real cost data: Most articles say outsourcing ‘saves money’ without citing any salary figures, hourly rates, or total cost calculations. We have included current 2025-2026 market data from salary.com, Glassdoor, and Indeed.
No hybrid model: Every top-ranking article treats this as a binary either/or choice. The reality is that most growing engineering businesses use a hybrid approach, and we cover exactly how that works.
No decision framework: Readers get a list of advantages and disadvantages but no structured way to weigh them against their specific situation. This guide includes a scored decision matrix you can actually use.
No vetting guidance: Articles that recommend outsourcing give no practical advice on how to find, evaluate, and manage an outsourcing partner responsibly.
No IP protection strategies: Intellectual property risk is mentioned as a concern but never addressed with actionable solutions like NDAs, data handling standards, or contractual protections.
No transition guidance: None of the top-ranking articles address what happens when your business needs to change models, either adding in-house capacity or transitioning to outsourcing.
This guide fills those gaps directly.
3. The Real Cost of In-House CAD Drafting
The most common mistake businesses make when evaluating in-house CAD staffing is looking only at salary. Salary is the largest line item, but the true cost of an in-house employee runs significantly higher when you account for the full cost stack.
Current CAD Drafter Salary Benchmarks (United States, 2025-2026)
Based on data from Salary.com, Glassdoor, and Indeed as of early 2026:
Experience Level
Annual Salary Range
Median
Hourly Rate
Entry Level (0-2 years)
$51,675 – $75,848
$66,200
~$32/hr
Mid-Level (3-6 years)
$65,000 – $90,000
$75,335
~$36/hr
Senior / Experienced
$75,433 – $105,809
$91,290
~$44/hr
Specialist / Expert
$100,000 – $138,000+
$117,900
~$57/hr
Source: Salary.com, Glassdoor (May 2026). Rates vary by geography. California and Massachusetts average 10-15% above national median.
The Full Cost of an In-House Employee: Beyond Salary
When businesses calculate ‘what it costs to hire a drafter,’ they almost always undercount. A commonly accepted rule of thumb in HR is that the fully loaded cost of an employee runs 1.25 to 1.4 times their base salary, accounting for:
Benefits (health, dental, vision): Typically 15-30% of base salary for employer contributions.
Payroll taxes (FICA, FUTA, SUTA): Approximately 7.65% federal, plus state unemployment taxes.
Paid time off: 10-15 days PTO plus holidays represents roughly 5-7% of total work capacity that is paid but non-productive.
Software licenses: AutoCAD seats run $2,500 to $4,500 per year. SolidWorks with PDM ranges from $4,000 to $10,000+ per year. CATIA and similar enterprise platforms cost considerably more.
Hardware: A capable CAD workstation costs $2,000 to $5,000 upfront with a typical 3-4 year refresh cycle.
Training and onboarding: Industry estimates place onboarding costs at one to three months of salary. Ongoing training for software updates, new standards, or skill development adds further cost.
Recruitment: Recruiting fees (if using an agency) run 15-20% of first-year salary. Internal recruiting time has an opportunity cost even without an agency.
Real-world example : A business that hires a mid-level CAD drafter at $75,000/year salary is likely incurring a true annual cost of $94,000 to $105,000 when all the above factors are included. A senior drafter at $91,000 salary likely costs $113,000 to $127,000 fully loaded.
Overhead and Utilization: The Hidden Efficiency Problem
In-house drafters have a fixed cost whether they are fully occupied or not. For businesses with cyclical project loads, this means paying for underutilized capacity during slow periods. If your drafting demand fluctuates significantly across quarters, the periods of low utilization are essentially a cost with no corresponding revenue-generating output.
At the same time, if a key drafter leaves the company, you face recruiting, onboarding, and knowledge transfer costs all over again. Industry data suggests the cost of replacing a technical employee runs between 50% and 200% of annual salary when you factor in lost productivity, recruiting fees, and training time.
4. The Real Cost of Outsourced CAD Drafting
The appeal of outsourcing is straightforward: you pay only for the work you actually need, with no payroll overhead, benefits, or idle capacity. The reality is nuanced. Outsourcing costs vary enormously depending on the provider’s location, specialization level, and engagement model.
Outsourced CAD Drafting Rate Ranges
Provider Type / Region
Typical Hourly Rate
Strengths
Considerations
Domestic US freelancer
$45 – $95/hr
Time zone alignment, no language barrier
Higher cost, limited scale
Domestic US firm
$65 – $150/hr
Accountability, quality standards
Most expensive outsource option
India-based firm
$8 – $25/hr
Large talent pool, established industry
Time zone gap, quality varies
Philippines-based firm
$10 – $30/hr
English proficiency, cultural alignment
Still requires vetting
Eastern Europe (Poland, Romania)
$25 – $55/hr
High technical quality, EU compliance
Higher than Asian rates
Latin America (Mexico, Colombia)
$20 – $45/hr
Near-shore, time zone proximity to US
Growing but smaller talent pool
Note: Rates as of 2025-2026. Actual pricing depends on project complexity, drawing type, software required, and contract structure (hourly vs. per-sheet vs. dedicated resource).
Hidden Costs in Outsourcing That Are Rarely Discussed
The advertised hourly rate is only part of the total outsourcing cost. Businesses that do not plan for these additional factors often find that their outsourcing savings are smaller than expected:
Management overhead: Someone on your internal team must coordinate with the outsourcing partner, review deliverables, and manage revisions. This is real labor time with a real cost.
Rework and revision cycles: If the outsourcing partner misunderstands your standards or specifications, correction cycles add time and cost. Proper brief writing and QC processes are essential.
Onboarding new partners: Every time you switch providers or onboard a new firm, there is a learning curve. They need to understand your drawing standards, title block formats, layer conventions, and project context.
Legal and compliance setup: NDAs, data handling agreements, and IP transfer clauses require legal review upfront.
Data transfer and file management: Secure file sharing platforms, version control, and format compatibility all have costs in time and sometimes in software.
Quality assurance: Building or buying a QA process for outsourced drawings adds cost that in-house work often absorbs implicitly.
Key insight : A project-based outsourced drawing that appears to cost $500 may actually cost $700 or more once management time, revision cycles, and QA are accounted for. This does not make outsourcing a bad choice – it simply means the comparison to in-house cost needs to be honest and complete on both sides.
5. In-House CAD Drafting: Advantages and Honest Disadvantages
Genuine Advantages of an In-House Team
Contextual knowledge: An in-house drafter who has worked with your team for two years understands your design standards, preferred tolerances, drawing conventions, and client preferences without being told. This institutional knowledge has real value and is genuinely difficult to replicate with an outside provider.
Speed on urgent requests: When a last-minute client change comes in at 4 PM, an in-house drafter can respond immediately. Outsourcing introduces a communication and handoff step that adds time, even with the best partners.
Collaboration and iteration: When engineering design and CAD drafting happen in the same room (or on the same Slack channel), iteration cycles are faster. Engineers can sketch something on a whiteboard and a drafter can model it in real time.
Quality consistency: In-house teams develop consistent habits and standards over time. Drawing quality tends to be predictable once onboarding is complete.
IP security: Proprietary designs and sensitive technical data stay within your organization’s own infrastructure, under your own security policies.
Career investment: Building an in-house team allows you to develop people who grow with the business, take on more responsibility, and become genuine technical assets.
Skills ceiling: A small in-house team’s expertise is bounded by who you hired. If a project requires specialized skills in, say, pressure vessel detailing or complex assembly animation, your team may simply not have that capability.
Single point of failure: One-person CAD teams are surprisingly common in small and mid-size firms. When that person is sick, on vacation, or resigns, the entire drafting workflow stops. This is a serious operational vulnerability.
Technology lag: Keeping an in-house team current on the latest CAD software versions, new BIM standards, and emerging tools requires dedicated investment in training. Busy teams often fall behind because there is never a ‘good time’ to upskill.
Recruiting difficulty: Skilled CAD drafters, particularly those with mechanical or structural specializations, are not always easy to hire. In markets with strong engineering employment, competition for qualified drafters is real.
Scalability limit: If a large project suddenly doubles your drafting workload for six months, an in-house team has limited ability to absorb the surge without significant overtime or delays.
6. Outsourced CAD Drafting: Advantages and Honest Disadvantages
Genuine Advantages of Outsourcing CAD Drafting
Cost flexibility: You pay only for the work performed, with no fixed overhead during slow periods. For businesses with irregular drafting workloads, this is a genuine and significant financial benefit.
Immediate access to specialization: Need BIM coordination drawings for a complex MEP project? Structural steel shop drawings for a one-off job? Outsourcing firms often have specialists in these areas ready to go, without the cost of maintaining those skills in-house year-round.
Scalability on demand: A reputable outsourcing firm can deploy multiple drafters to a large project simultaneously, compressing timelines in ways that a small in-house team simply cannot.
Around-the-clock production: Offshore partners in India or Southeast Asia can work while your team sleeps, creating a true follow-the-sun workflow that can significantly reduce project cycle times on deadline-driven engagements.
Access to current software: Established CAD outsourcing firms maintain current licenses across multiple platforms. You get access to those tools without carrying the license cost yourself.
Reduced management complexity: With a fixed-scope outsourcing arrangement, the provider manages their own team, quality control, and delivery. You own the brief and the outcome.
Honest Disadvantages (That Deserve Direct Acknowledgment)
Communication overhead: Every instruction must be clearly documented. Ambiguities that would be resolved in 30 seconds face-to-face can become multi-day email chains with an offshore team. This is a manageable problem with good process, but it is a real one.
Time zone challenges: A 12-hour time zone difference means that a question asked at the end of your day may not be answered until the next morning. For fast-moving projects, this rhythm can create friction.
Knowledge transfer loss: Every time you use a new outsourcing partner, you start from scratch on standards and context. Switching partners frequently is inefficient and error-prone.
Quality control responsibility: With in-house work, quality problems surface naturally through daily interaction. With outsourcing, you need a deliberate QC process for every deliverable, or problems may not be caught until late in the project.
IP exposure: Proprietary designs are transmitted to external systems and sometimes to individuals in jurisdictions with different IP law frameworks. This is manageable but requires contractual and technical safeguards.
Dependency risk: If a key outsourcing partner loses staff, changes ownership, or closes, you may face a sudden gap in your drafting capability with no internal fallback.
7. The Hybrid Model: Why the Best Answer Is Often ‘Both’
One of the most significant gaps in the existing literature on this topic is the failure to address the hybrid model seriously. The framing of ‘in-house versus outsourced’ suggests these are mutually exclusive choices. They are not, and treating them as such leads many businesses to a suboptimal decision.
The hybrid model involves maintaining a core in-house CAD capability while using outsourcing partners for specific, well-defined needs. This approach is increasingly common among mid-size engineering and architecture firms, and it often delivers better results than either pure model.
What the Hybrid Model Looks Like in Practice
Core team for context-sensitive work: The in-house drafter or drafting team handles complex or confidential drawings, works directly with engineers and clients, manages document control, and builds institutional knowledge.
Outsourcing for volume overflow: During peak periods or large project surges, the outsourcing partner handles defined, standardized drafting tasks with a clear brief. This avoids overtime burn and hiring cycles.
Outsourcing for specialty disciplines: When a project requires a skill set not maintained in-house (BIM clash detection, 3D rendering, structural steel detailing), the outsourcing partner fills that gap without requiring permanent headcount.
In-house oversight of outsourced work: The in-house team serves as QC reviewers and project coordinators for the outsourced output, ensuring it meets your standards before it enters your workflow.
Real-world example : A UK-based architectural firm maintains two in-house CAD technicians who handle all permit drawings and client-facing documentation. During planning submission seasons, they engage an outsourcing partner in the Philippines for as-built drawing production and drawing set formatting, reducing turnaround time by approximately one week without hiring additional permanent staff.
When the Hybrid Model Makes the Most Sense
Workload pattern: If your drafting workload peaks predictably (end of quarter, permitting seasons, product launch cycles), hybrid is usually more cost-effective than pure in-house.
Confidentiality stratification: If some of your work is highly sensitive and some is routine, keeping the sensitive work in-house while outsourcing routine production is a natural and efficient division.
Growth stage: If your business is growing but not yet large enough to justify a full drafting department, a hybrid approach bridges the gap while you scale.
8. Industry-Specific Guidance
The right model varies by industry. The following guidelines reflect the practical norms and specific pressures of different sectors.
Industry
Typical Best Fit
Key Reason
Common Outsource Use Case
Architecture / AEC
Hybrid
High project volume with cyclical peaks
As-builts, permit sets, BIM modeling
Mechanical / Product Mfg
In-house or Hybrid
IP sensitivity, tolerance precision, iteration speed
Overflow drafting, 3D rendering
Structural Engineering
Hybrid
Specialty detailing needs + standard production
Steel shop drawings, rebar detailing
Civil Engineering
Hybrid or Outsource
High drawing volume, standardized deliverables
Site plans, survey drawings, grading plans
Defense / Aerospace
In-house only
ITAR and security restrictions (see below)
N/A – regulatory prohibition
MEP Contracting
Outsource or Hybrid
High drawing volume, tight margins
Fabrication drawings, coordination drawings
Medical Device
In-house
FDA design control, quality system requirements
Typically not outsourced for IP and regulatory reasons
Construction Management
Outsource or Hybrid
Project-based, no sustained in-house need
Shop drawing review, record drawings
A Note on ITAR and Export Control
For US companies in defense, aerospace, or any program involving export-controlled technical data under ITAR (International Traffic in Arms Regulations), outsourcing CAD drafting to foreign nationals or overseas firms can constitute a violation of federal law without proper export licenses. ITAR restrictions apply to the sharing of technical drawings, not just physical items. If your projects involve defense hardware, munitions, or space systems, consult your legal counsel before considering any form of offshore outsourcing. The penalties for ITAR violations are severe.
9. The Decision Framework: A Practical Scorecard
Rather than leaving you with a list of considerations, this section gives you a structured scoring approach. Rate your business against each factor below using the scale provided, then total your score to see which model best fits your current situation.
Scoring Guide: Rate Each Factor 1-3
Factor
Score 1 (Points to Outsource)
Score 2 (Neutral / Hybrid)
Score 3 (Points to In-House)
Monthly drafting volume
Low (less than 40 hrs/month)
Medium (40-120 hrs/month)
High (120+ hrs/month)
Workload consistency
Highly variable / project-based
Seasonal peaks and valleys
Consistent year-round
IP sensitivity
Low sensitivity, generic drawings
Mixed sensitivity levels
High sensitivity, proprietary designs
Drawing complexity
Standardized, repeatable tasks
Mixed complexity
Complex, iterative, specialized
Response time needs
Days or weeks acceptable
Same-day to 48 hours
Hours – face-to-face access needed
Budget constraint
Minimize fixed overhead
Balance cost and quality
Can justify fixed headcount cost
Industry regulation
No special restrictions
Some compliance needs
ITAR / FDA / AS9100 restricted
Internal oversight capacity
Limited (no one to manage outsourcing)
Some management bandwidth
Sufficient to manage internal team
Interpretation: Total scores of 8-13 suggest outsourcing is likely the better fit. Scores of 14-19 suggest a hybrid model. Scores of 20-24 suggest in-house staffing makes the most business sense. Use this as a starting framework, not an absolute answer.
The One Question That Clarifies Most Decisions
If you find the scorecard ambiguous, ask yourself this: Is CAD drafting a core competency of our business, or is it a support function?
If drafting is core to your value proposition (a custom fabrication shop that differentiates on drawing quality, a design-build firm that competes on speed-to-drawing), in-house capability is a strategic asset worth the investment. If drafting is a support function that enables your core work but is not the reason clients choose you, it is a strong candidate for outsourcing or hybrid treatment.
10. How to Vet and Manage an Outsourcing Partner
If your decision scorecard points toward outsourcing or a hybrid model, the quality of your outsourcing partner will determine whether the arrangement succeeds or fails. These are the criteria that experienced firms use when evaluating CAD outsourcing providers.
Vetting Criteria
Portfolio and samplesReview actual deliverables from previous clients in your industry. Look for drawing quality, layering conventions, title block formatting, and annotation standards. Generic portfolio samples that do not reflect your type of work are a warning sign.
Industry specializationA firm that does mechanical engineering shop drawings every day will outperform a general drafting service on mechanical work. Ask specifically about their experience with your drawing type and industry.
Software capabilitiesConfirm the firm uses current, licensed versions of the CAD software your workflow requires. Ask about file format delivery (DWG, DXF, STEP, native CAD, PDF). Mismatched file formats create unnecessary friction.
Communication practicesAsk how they handle questions during a project. What is their typical response time? Do they assign a dedicated project manager or coordinator? Good communication infrastructure is predictive of successful engagements.
Quality control processAsk specifically: what does your internal QC process look like before drawings are delivered? A firm that cannot describe its QC process does not have one.
Data security practicesAsk about their data handling protocols. Do they use encrypted file transfer? Do they have NDAs with their own staff? Are drawings stored on isolated servers or on shared infrastructure?
ReferencesAsk for references from clients with similar project types and follow up with at least one call. A simple 10-minute reference conversation reveals more than any portfolio.
Managing an Outsourcing Partner Effectively
Create a drawing standards brief: Document your layer conventions, title block requirements, dimension and annotation standards, and file naming rules. Share this at the start of every new engagement and update it when your standards change.
Start with a paid pilot project: Do not commit to a large engagement without first running a smaller, lower-stakes project to evaluate the partner’s actual output quality. This is worth the extra time investment.
Establish clear communication rhythms: Agree on communication channels (email, Slack, a project management tool), response time expectations, and who the point of contact is on both sides.
Build a review and approval step: No outsourced drawing should enter your production workflow without a QC review by someone on your team. Build this step into your project schedule explicitly.
Define escalation paths: If a drawing is wrong, who gets contacted? What is the correction turnaround commitment? Agree on this upfront, before problems occur.
11. Protecting Your Intellectual Property When You Outsource
IP risk is the most frequently cited concern about CAD outsourcing, and the least frequently addressed in practical terms. Here is what actually needs to happen to protect your designs.
Contractual Protections
Non-Disclosure Agreement (NDA): Require a signed NDA before sharing any project files. The NDA should explicitly cover technical drawings, design concepts, specifications, and client information. Verify that the NDA is enforceable in the jurisdiction of both parties.
IP ownership clause: Your contract should explicitly state that all drawings produced by the outsourcing partner are work-for-hire and that IP ownership transfers to your organization upon delivery and payment. Do not assume this by default.
Data handling and deletion clause: Specify that the outsourcing partner must delete all project files from their systems within a defined period after project completion (typically 30-60 days). Request confirmation of deletion.
Subcontracting restriction: Some outsourcing firms subcontract work to additional third parties without disclosure. Require written approval for any subcontracting, and ensure that subcontractors are bound by the same IP and confidentiality terms.
Technical Protections
Use secure file transfer: Avoid emailing design files as attachments. Use encrypted file sharing platforms (ShareFile, Box with enterprise encryption, or a dedicated engineering file exchange portal).
Watermark preliminary files: For early-stage drawings shared for review or briefing, consider using visible or embedded watermarks that identify the recipient. This does not prevent copying, but it creates a paper trail.
Limit access to what is needed: Share only the files required for the specific task at hand. Do not provide access to your full project file library, BOM data, or client information unless directly necessary.
Consider physical data security requirements: For highly sensitive projects, some firms require outsourced drafters to work in isolated virtual desktop environments where files cannot be downloaded locally. This is common among defense-adjacent commercial work.
12. Transition Tips: Changing Models Without Disruption
Businesses change. An outsourcing arrangement that made sense when you were a 12-person firm may need to evolve when you grow to 50 people. An in-house team built during a period of strong growth may become difficult to justify during a contraction. Here is how to manage transitions well.
Transitioning from Outsourcing to In-House
Capture standards documentation before you hire: Use your outsourcing period to develop and document your drawing standards, approval workflows, and file management processes. This documentation becomes the onboarding foundation for your first in-house hire.
Overlap the transition: Keep your outsourcing relationship active for 90-120 days after your in-house drafter starts. This provides overflow coverage while your new hire comes up to speed and ensures no projects are disrupted.
Transfer institutional knowledge: Request that your outsourcing partner provide organized project file archives in a format your new hire can navigate. A clean handover file structure is worth negotiating as part of the contract wind-down.
Transitioning from In-House to Outsourcing
Document before departure: If an in-house drafter is leaving and you are transitioning to outsourcing, ensure that all drawing standards, template files, project archives, and process documentation are organized and preserved before they leave.
Run a parallel period: Engage your outsourcing partner while your in-house drafter is still available, even if only for a few weeks. This allows the outgoing drafter to review and provide feedback on the outsourced output quality before you are fully dependent on the new arrangement.
Rebuild standards documentation for external use: Standards that live in a drafter’s head need to be externalized. Invest time in creating a clear drawing standards package that can be shared with any outsourcing partner.
FAQ: In-House vs Outsourced CAD Drafting
Is outsourced CAD drafting cheaper than hiring in-house?
In most cases, outsourcing is cheaper on a per-drawing or per-hour basis, particularly when comparing offshore rates to fully-loaded domestic employee costs. However, the total cost comparison is more complex than the hourly rate gap suggests. You need to account for management overhead, revision cycles, onboarding, and QA processes on the outsourcing side, and set this against the true all-in cost (not just salary) of an in-house hire. For businesses with consistent, high-volume drafting needs, in-house may reach cost parity with a well-managed outsourcing arrangement, with the added benefit of institutional knowledge and faster turnaround.
What types of CAD work should never be outsourced?
Defense and aerospace work covered by ITAR, medical device design subject to FDA design control requirements, and drawings containing highly sensitive proprietary technology (novel processes, pending patent designs, core product innovations) are strong candidates for in-house-only handling. Beyond regulatory requirements, any work where the feedback iteration cycle is so rapid and context-dependent that external handoffs would be genuinely disruptive is also better suited for in-house treatment.
How do I maintain drawing quality standards with an outsourcing partner?
Quality management with an outsourcing partner requires three things: a clear, documented drawing standards brief that is shared at the start of every engagement; an internal QC review step built into your project schedule before outsourced drawings enter production; and a consistent, respectful feedback loop that helps the partner improve their understanding of your expectations over time. The firms that struggle with outsourcing quality are usually those that provide inadequate briefing, skip the review step, or change partners too frequently to build institutional knowledge.
Can a small business benefit from outsourcing CAD drafting?
Yes, and small businesses are often the best-suited candidates for CAD outsourcing. A 10-person engineering consultancy rarely has enough consistent drafting work to justify a full-time drafter, but needs high-quality drawings regularly. Outsourcing allows small firms to access professional drafting on a project basis, with no fixed overhead, while keeping their limited capital focused on revenue-generating work. The key is finding a reliable partner and investing in the brief and QC process, which takes effort upfront but pays off repeatedly.
What is the typical turnaround time for outsourced CAD drawings?
Turnaround varies significantly by complexity, drawing type, and provider. For straightforward 2D AutoCAD drawings (floor plans, layouts, simple mechanical details), turnaround from a good offshore provider is typically 24 to 72 hours after briefing. Complex assembly drawings, 3D models, or BIM deliverables may take several days. Offshore time zones can work in your favor for turnaround: a brief sent at 5 PM US Eastern Time may be answered with draft drawings by 8 AM the next morning.
How do I handle a situation where my outsourcing partner’s work is consistently below standard?
First, review whether the quality problem is caused by inadequate briefing on your side or poor execution on theirs. Many quality disputes are actually briefing failures. If the brief is clear and comprehensive and the work is still falling short, have a direct conversation with the firm’s project manager citing specific examples. A good outsourcing firm will take quality feedback seriously and make corrections. If the problem persists across multiple projects and conversations, it is time to find a different partner. Do not continue to invest in a relationship that is not delivering consistent results.
Conclusion: The Right Answer for Your Business
There is no universal correct answer to the in-house versus outsourced CAD drafting question. What there is, is a correct answer for your specific business, your workload pattern, your budget structure, your IP sensitivity, and your growth stage.
If your drafting work is consistent, confidential, fast-turnaround, and central to your competitive value, invest in building a strong in-house team. If your workload is variable, your sensitivity levels are mixed, and your need for specialized skills exceeds what a small team can maintain, a hybrid model will likely serve you better than either pure approach.
The businesses that consistently succeed with outsourcing are not those who went looking for the cheapest option. They are those who treated their outsourcing partner as a professional relationship, invested in clear communication and standards, and built a QC process that caught problems early. The businesses that succeed with in-house teams are those who planned for the full cost of employment, built redundancy against the single-point-of-failure risk, and invested in keeping their team’s skills current.
Use the scorecard in Section 9 as your starting point. Re-evaluate your model every one to two years as your business evolves. And if you are considering a change, the transition guidance in Section 12 will help you make the switch without disrupting the projects that depend on you.
Ready to make the right call for your business?
Explore our related guides on CAD document management, version control for engineering drawings, and PLM system selection to build a complete engineering operations framework for your organization.
60% cost saving reported by engineering firms outsourcing CAD drafting to specialist providers vs maintaining equivalent in-house capacity (C-Design, 2026) 3-4x higher cost of an in-house CAD and BIM team in the US or UK compared to specialist outsourcing, per published 2026 industry benchmarks Go-by set the single most effective tool for reducing rework on outsourced drawings, per leading providers who make it a mandatory first step Free pilot the most credible outsourcing partners offer a no-charge pilot on a representative sample before any volume commitment is made
Introduction:
Outsourcing CAD drawing work is a legitimate and increasingly common strategy for engineering teams in 2026. The cost advantage is real. Access to specialist skills is real. The ability to scale without permanent headcount is real. What is also real is the pattern of what happens when the briefing is done informally.
An engineer sends a sketch, a PDF of an old drawing, and a brief email. The outsourcing partner, skilled and capable, produces drawings based on what they understood from those inputs. The drawings arrive. They are technically competent but in the wrong style, wrong file format, wrong drawing standard, with a title block the client has never seen, and layer names that make no sense in the client’s drawing management system.
None of that is the partner’s fault. They were not told what was required. They applied their defaults. The rework is expensive and entirely avoidable, caused by the absence of a proper CAD drawing specification at the start of the engagement.
This guide explains what a drawing specification must contain, how to use go-by drawings to communicate what a written document cannot, how to structure a pilot project that genuinely tests a partner before you commit production volume, and the mistakes that cause rework even when everyone involved is competent.
Quick answer: A CAD drawing specification for outsourcing is a written document defining the drawing standard, CAD software and version, file delivery formats, layer naming, title block requirements, revision protocol, and quality acceptance criteria. Without it, every assumption your partner makes is a potential source of rework. Provide go-by drawings alongside it to communicate style and quality that words alone cannot capture.
A verbal briefing produces verbal results. A complete specification package produces drawings that match your standards from day one.
Why a Written Specification Is Not Optional
Every gap in the briefing becomes an assumption. Every assumption your partner makes that differs from your expectation becomes rework. The disciplines that benefit most from documented specifications are also the ones where rework is most expensive: mechanical drawing packages for manufacturing, structural drawing sets for construction, and MEP coordination drawings where errors propagate across multiple trades.
What Happens Without a Specification
The partner applies their default drawing standard. If they work to ISO and your manufacturing base works to ASME, the GD&T interpretation is immediately wrong.
The partner uses their own title block template. Your drawing register uses a specific format. Every drawing must be recreated, not just corrected.
The partner uses their preferred layer naming convention. New drawings cannot be integrated with your existing archive without a conversion exercise.
The partner selects the file format they use most. If they deliver DWG 2024 and your CNC software requires DWG 2018, every file must be individually converted.
The revision protocol is improvised. Mark-ups go by email. Three revisions in, neither party has a reliable audit trail.
Each problem is entirely preventable with a written drawing specification document provided before any work begins.
What Your CAD Drawing Specification Must Contain
A complete CAD drawing specification covers three categories: technical standards governing what the drawing contains, format requirements governing how files are delivered, and process requirements governing how work is managed. Missing any category produces avoidable rework.
Specification Item
What to State Precisely
Why It Matters If Missing
Drawing standard
ASME Y14.5-2018, ISO 1101:2017, or DIN EN ISO equivalent
Partner applies wrong GD&T defaults; form controls misinterpreted
Ambiguous tolerances lead to over- or under-constrained parts
Projection method
Third-angle (ASME) or first-angle (ISO)
Views misread as mirrored; wrong features on wrong faces
Units
Millimetres, inches, or mixed (state clearly)
Dimensional errors from unit conversion if mixed unwittingly
Scale convention
1:1 default; NTS where stated; scale bar required
Printed drawings used for measurement; wrong parts made
Revision control system
Revision letter sequence, revision table format, ECN ref
Revision history lost; old revisions used in production
Numbering and drawing register
Part number format, drawing number format, BOM numbering
Mismatched part numbers between drawing and procurement
BOM format and content
Required columns, hierarchy, link to drawing numbers
BOM does not match drawing; procurement builds wrong assembly
Confidentiality level
Proprietary, controlled distribution, or open
Intellectual property risk if unmarked drawings are shared
The Drawing Standard Declaration
This is the single most technically consequential element. State the standard by name and year: ASME Y14.5-2018, ISO 1101:2017, or DIN EN ISO 2768-mK. If your drawings use multiple standards, state each separately with a clear note about which governs which element.
The Scope Document: Structure That Prevents Disputes
Alongside the technical specification, provide a scope document defining the commercial and process boundaries of the engagement.
Document Section
What It Must Contain
Common Gap If Missing
Project overview
What is being designed, industry context, end use
Partner draws without understanding function; misses safety-critical features
Deliverable list
Every drawing type, quantity, and format required
Drawing types or formats missed; argument about scope at invoice
Partner works from memory or assumptions; wrong style or standard
Drawing standard reference
Standard name, year, and which elements it governs
Partner applies default standard; GD&T and projections conflict
Software requirements
Software name, version, required plugins or templates
File compatibility issues at delivery; cannot open without conversion
Timeline and milestones
Submission date per batch, review period, revision deadline
No accountability; delivery slips without contractual reference
Revision protocol
How mark-ups are sent, turnaround time, back-redline req
Revision cycles become unstructured; changes get lost or duplicated
Quality check requirement
What QA the partner must perform before submission
Unchecked errors submitted; review burden falls entirely on client
Communication protocol
Primary contact, escalation path, response time SLA
Communication gaps; decisions made without documentation
IP and confidentiality
NDA status, marking requirements, data security standard
Intellectual property risk; no contractual protection if breach occurs
Acceptance criteria
What constitutes a complete and acceptable deliverable
Disputes about quality at completion; rework without clear definition
Go-by Drawings: The Most Effective Tool in Your Specification Package
A specification document tells a partner what you require. Go-by drawings show them. Leading CAD outsourcing providers ask for go-by drawings before beginning any work because a written description of dimension text height 3.5mm with closed filled arrowheads is not as unambiguous as a drawing where the engineer can see exactly what those requirements produce visually.
Go-by drawing element
What it communicates to your outsourcing partner
Title block layout and field positions
Exactly which field goes where, how your company name and logo appear, what the revision table looks like
Layer naming and colour assignments
The visual hierarchy of the drawing; what is visible in which colour on screen and in print
Line weight hierarchy
Which features print heavy (object lines), medium (hidden), or fine (centre lines, dimension lines)
Text height and font
Annotation style throughout: dimension text, note text, title text, table text
Dimension style and arrow type
Closed filled arrows vs open arrows; leader line style; tolerance annotation format
View layout and spacing
How views are arranged on the sheet; spacing between views; section label placement
General notes format and content
Standard notes your drawings carry: projection symbol note, general tolerance note, surface finish default
BOM table format
Column headers, row spacing, part number format, quantity and unit format
Revision table format
Column headers, revision letter format, description field length, approval field
Section and detail view labelling
How section cuts are labelled (A-A, B-B), how detail enlargements are referenced
Weld symbol and GD&T callout style
How feature control frames are placed; leader line and flag note conventions
How to Select Good Go-by Drawings
The best go-by drawings are: technically complete with no missing information, representative of the complexity of work the partner will produce, free of known errors that crept in under schedule pressure, and recently produced to reflect your current standards. Provide at least two to three go-by drawings covering different drawing types and complexity levels.
Go-by drawing rule: Redact proprietary dimensional information from go-by drawings before sending if they show commercially sensitive products. Replace specific dimensions with representative values while keeping all stylistic and format information intact. The partner needs to see how the drawing is built, not the exact dimensions of the product.
The Pilot Project: Testing a Partner Before Committing Volume
A pilot project is the most reliable way to discover whether a partner can genuinely meet your specification before you commit significant volume. Every credible outsourcing provider offers pilot work, and many offer it at no charge because they understand it is the normal due diligence step before a production relationship begins.
Pilot phase
What to include
What you are testing
Scope selection
One to three drawings of moderate complexity
Real capability, not a showcase best effort on an easy drawing
Full spec provision
Provide your complete specification, templates, and go-by drawings as if for full production
Whether partner can absorb and apply your standards correctly
Defined timeline
Set the same turnaround expectation as production; do not give extra time
Real delivery performance, not a padded demonstration
Structured review
Review against your specification point by point; document every finding
Whether partner quality matches your requirement, not just your impression
Revision round
Issue one complete set of mark-ups; request back-redlined copy with changes highlighted
Revision discipline: how thoroughly and accurately changes are applied
Communication log
Note response times, question quality, escalation handling across the pilot period
Whether working relationship will be productive at scale
Go/no-go decision
Set explicit criteria before the pilot; do not grade on a curve at the end
Whether this partner can safely receive production work
Evaluating the Pilot
The pilot review should answer four questions. Did the partner apply your specification correctly without constant reminders? Are the drawings technically complete and accurate, not just visually correct? How did they handle gaps in the specification that required judgment? And was the revision round productive, with changes applied completely and a back-redlined copy returned? The go/no-go decision should be based on objective criteria defined before the pilot begins, not on a general impression.
Defining Your Revision Protocol
The revision protocol governs how changes are communicated between your team and the outsourcing partner. Without a documented protocol, mark-up cycles become an email chain where changes get applied partially and both parties lose track of the current revision state.
Mark-up format: Annotated PDF, redlined DWG, numbered comment list, or cloud review tool. State the format and provide a template.
Turnaround time: 24 hours, 48 hours, or by a named date. State it explicitly.
Back-redline requirement: After implementing changes, the partner should return a back-redlined copy showing exactly what changed. This confirms the mark-up was understood and applied completely.
Revision letter protocol: What triggers a revision letter increment? State it in advance.
Scope of change vs new drawing: When is a change large enough to become a new drawing? Define the threshold.
The back-redline rule: Always require a back-redlined copy after every revision round. A partner who returns a clean updated drawing without a back-redline cannot prove every mark-up was addressed. This single practice eliminates the majority of revision disputes.
Quality Assurance: What to Require Before Submission
Every drawing your outsourcing partner submits should have passed their own internal quality check before it reaches you. Specifying what that check must cover transfers the first-pass review burden to the partner.
QA check item
What the partner should verify before submission
Drawing standard compliance
GD&T symbols, datum notation, and projection method match the stated standard
Model drawn at 1:1 in model space; viewports set to specified scales; NTS noted where applicable
Spell check and nomenclature
Notes, labels, and BOM descriptions spell-checked; terminology consistent with client standards
A documented revision cycle with back-redline requirement eliminates the most common revision disputes.
Intellectual Property and Data Security
When you outsource CAD drawings, you share information about your products, designs, and clients with a third party. That information needs legal and procedural protection before it is shared, not after a breach has occurred.
The NDA: Sign Before You Brief
A Non-Disclosure Agreement should be signed before any project information is shared, including during scope discussions and before providing go-by drawings. Make it a standing rule: NDA first, then specification, then go-by drawings, then project briefing.
Drawing Confidentiality Markings
Every drawing sheet should carry a confidentiality marking: PROPRIETARY, CONFIDENTIAL, or CONTROLLED DISTRIBUTION. Specify the required markings in your drawing specification and provide a template that includes them in the correct title block position.
Data Security Requirements
File storage: State where project files must be stored. Prohibit storage on personal devices or consumer file-sharing services.
Access control: Who within the partner organisation may access the files?
Subcontracting: Is the partner permitted to pass work to subcontractors? Under what conditions?
File deletion: When and how are your files deleted at project end? Request written confirmation.
Software licensing: Confirm the partner uses fully licensed CAD software.
The most common IP mistake in CAD outsourcing: Providing go-by drawings and project sketches before the NDA is signed because the partner needs to see the scope to quote it. A responsible partner will sign the NDA before receiving any design information. If a prospective partner resists signing before the briefing, that is itself a red flag about their approach to client data.
Managing the Outsourcing Relationship After It Starts
Single Point of Contact
Nominate one internal contact for all communication with the outsourcing partner. When multiple team members brief the partner independently, the partner receives conflicting instructions. The resulting drawings satisfy one internal stakeholder and disappoint another.
Regular Output Review
Do not wait for a large batch to be complete before reviewing quality. Schedule periodic light reviews of recent submissions against your specification. Drift happens gradually: a partner fully compliant at pilot end may begin taking shortcuts on elements rarely checked.
10 CAD Outsourcing Briefing Failures That Produce Rework
These are the patterns that appear most consistently when outsourced drawing quality falls short. Almost all trace back to something not specified at the start rather than any failure of partner capability.
Failure
What happens
How to prevent it
Spec given verbally or by email thread
Partner interprets differently; no audit trail
Always deliver a written specification document, not a call summary. Version control it.
No go-by drawings provided
Partner creates own style; training rework needed
Provide go-by drawings before work starts. Allow no assumptions about style.
Drawing standard not stated
Partner applies their default; GD&T misinterpreted
State the standard explicitly. ASME Y14.5-2018 or ISO 1101:2017.
Software version not specified
File delivered in incompatible format or version
Name the exact software and version. Include required plugins or template files.
No pilot project run
Misalignment discovered after full batch submitted
Always run a scoped pilot before committing full production volume to a new partner.
Revision protocol undefined
Mark-ups lost; changes applied inconsistently
Define revision turnaround, back-redline requirement, and mark-up format before work begins.
NDA not signed before briefing
IP disclosed before legal protection is in place
Execute NDA before any project information is shared, including during scope discussion.
No acceptance criteria defined
Disputes about what correct means at delivery
Define acceptance criteria in the specification before work starts, not during review.
Single point of contact not defined
Multiple people brief partner inconsistently
Nominate one internal contact for all communication. Document this in the spec.
No versioning on specification itself
Spec updated informally; partner works to old version
Version-control your specification document. Treat it like an engineering drawing.
The outsourcing briefing checklist: Before assigning any work: (1) NDA signed. (2) Written specification provided and version-controlled. (3) Go-by drawings provided for all drawing types. (4) CAD template and layer standard files provided. (5) Pilot project scoped, run, and evaluated against objective criteria. (6) Revision protocol agreed. (7) QA checklist provided. (8) Single point of contact confirmed on both sides. (9) File format and software version confirmed compatible. (10) IP and data security requirements stated in writing. Ten items. All preventable rework if addressed before work begins.
AI and Digital Collaboration Tools in CAD Outsourcing in 2026
Cloud-based review platforms like Bluebeam Revu and Autodesk Construction Cloud allow mark-ups in a shared environment with every comment timestamped and tracked. AI-assisted review tools like CoLab AutoReview automate first-pass checks of submitted drawings against company standards. AI tools like Claude can draft a complete CAD drawing specification from a conversational description of requirements, reducing the time from ‘we need a spec’ to ‘the partner has it’ from days to hours.
Conclusion:
The quality of your CAD outsourcing relationship is determined before the first drawing is produced. It is determined by the completeness of the specification you provide, the relevance of the go-by drawings you include, the rigour of the pilot project you run, and the clarity of the protocols you define for revision, QA, and communication.
Outsourcing partners in 2026 are generally capable. What they cannot invest in is your specific drawing standard, your specific title block, your specific revision convention, and your specific layer naming. That knowledge lives in your organisation and must travel to them in writing.
A good specification is the contract between what you need and what you receive. Write it that way.
Frequently Asked Questions
What is a CAD drawing specification for outsourcing?
A CAD drawing specification for outsourcing is a written document defining every technical, format, and process requirement your external CAD partner must meet. It covers the drawing standard, CAD software and version, file delivery formats, layer naming, title block requirements, general tolerance reference, revision control protocol, and quality acceptance criteria. Without it, every assumption your partner makes is a potential source of rework.
What are go-by drawings in CAD outsourcing?
Go-by drawings are representative examples from your existing drawing set provided to a partner as a visual reference for style, standard, and quality expected. They communicate what a written specification cannot: layer structure, line weights, text heights, dimension style, title block layout, and BOM format. A good go-by set covers a range of drawing types representative of the work the partner will produce.
How do you run a pilot project with a new CAD outsourcing partner?
A pilot project involves issuing one to three representative drawings to a new partner before committing full volume. Provide the complete specification, templates, and go-by drawings. Set the same timeline as production. Review output against your specification point by point. Issue one revision round and check whether all changes are applied correctly with a back-redlined copy returned. Define go/no-go criteria before the pilot begins.
What file formats should I specify for CAD drawing outsourcing?
File format for CAD drawing requirements depend on your downstream workflow. For manufacturing: DWG and PDF/A. For BIM coordination: Revit native plus IFC. For machining: STEP alongside 2D DWG. For sheet metal: DXF for flat patterns. Always specify the software version alongside the format because DWG from AutoCAD 2026 may not open correctly in AutoCAD 2019 without conversion.
How do I protect my IP when outsourcing CAD drawings?
IP protection requires three measures. First, a signed NDA before any project information is shared. Second, confidentiality markings on every drawing sheet. Third, data security requirements in the specification covering file storage location, access control, subcontracting restrictions, and file deletion procedures at project end.
What should a CAD drawing outsourcing scope document contain?
A scope document should contain: a project overview, a complete deliverable list, a list of input documents provided, the applicable drawing standard, software and version requirements, a timeline with milestones, the revision protocol, QA requirements the partner must perform before submission, communication protocols, IP and confidentiality requirements, and acceptance criteria defining what constitutes a complete and acceptable deliverable.