HDRI backgrounds in Fusion 360 are the fastest way to transform a CAD model render from a flat, lifeless image into a photorealistic product visualisation that could appear in a professional marketing campaign. High Dynamic Range Images (HDRIs) do two jobs simultaneously: they light the scene using real-world captured illumination data, and they provide a photorealistic background environment that reflects in the model’s surfaces. The combined effect, accurate image-based lighting plus environment reflection, is what produces the convincing realism that product designers and engineers need to communicate design intent to clients, stakeholders, and manufacturing teams.
Yet despite being one of the most impactful settings in the Fusion 360 Render workspace, HDRI setup is poorly documented. Most engineers who use Fusion 360 for design work have never explored the Render workspace beyond the default grey environment, and most of those who have tried rendering have struggled with washed-out backgrounds, incorrect lighting, or environments that do not match the product’s intended context.
This guide covers everything: what HDRIs are and how they work in Fusion 360’s render engine, the complete step-by-step workflow for loading and configuring HDRI environments, how to control the relationship between background visibility and scene lighting, how to source and prepare high-quality free HDRI files, the render settings that determine output quality, and the troubleshooting fixes for every common HDRI rendering problem in Fusion 360. By the end, you will be able to produce renders that are indistinguishable from professional product photography.
| Quick Definition: An HDRI (High Dynamic Range Image) is a 360-degree panoramic image captured across multiple exposure values, storing light intensity data far beyond what a standard photograph records. In Fusion 360’s Render workspace, loading an HDRI file as the scene environment simultaneously sets the background image, provides image-based lighting (IBL) that illuminates the model from all directions with the real-world light captured in the panorama, and provides surface reflection data that appears in reflective or metallic materials on the model. |
What Is an HDRI and Why Does It Matter for Fusion 360 Rendering?
A standard photograph records light in a limited dynamic range the camera clips values above a certain brightness (blowing out highlights) and below a certain level (blocking up shadows). A High Dynamic Range Image captures and stores the full range of light intensities present in a real scene by merging multiple exposures taken at different shutter speeds, then encoding the merged result in a 32-bit floating-point format (typically .hdr or .exr) that preserves the true luminance relationship between the darkest shadow and the brightest light source.
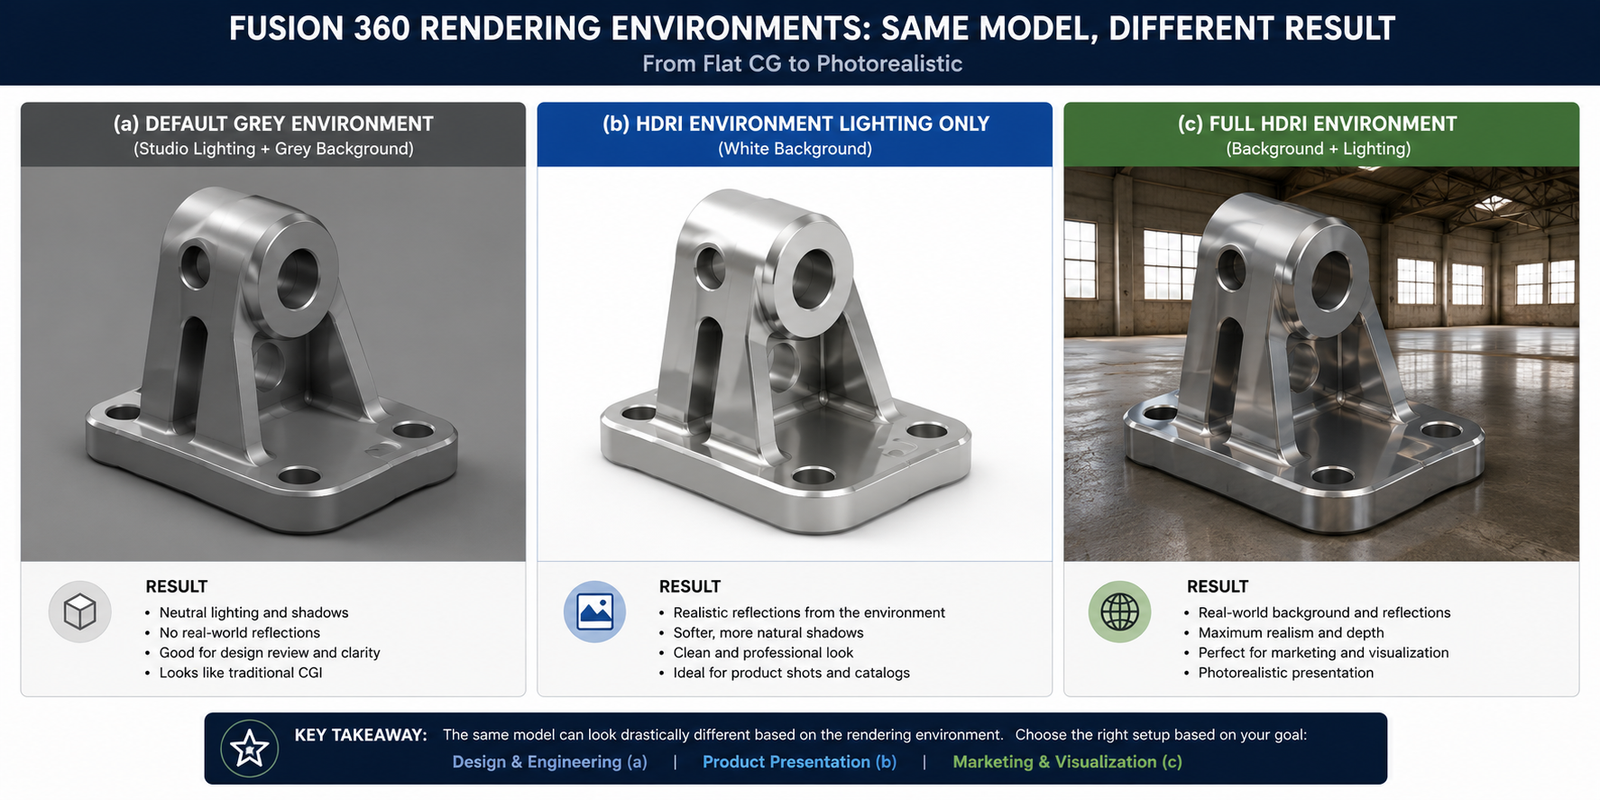
In Fusion 360’s Render workspace, this matters for two fundamental reasons:
- Image-Based Lighting (IBL): The HDRI is projected as a sphere surrounding the 3D scene. Every pixel of the HDRI contributes light to the scene with its actual captured intensity, the bright sky region illuminates the top of the model, the darker ground region contributes fill light from below, and any light sources captured in the panorama (windows, lamps, the sun) create accurate highlights and shadows on the model’s surfaces. This is dramatically more realistic than placing manual point lights or spot lights, because the illumination comes from the same rich, spatially varied light distribution that exists in the real location where the HDRI was captured.
- Surface Reflections: Metallic, glossy, and specular materials in Fusion 360 reflect their environment. When an HDRI is loaded, these reflections show the HDRI panorama rather than the default blank grey, which is the single biggest visual upgrade in product rendering. A brushed aluminium component reflecting a realistic studio environment looks immediately credible; the same component reflecting a blank grey void looks computer-generated at first glance.
| Rendering Method | Light Quality | Reflection Quality | Setup Effort | Realism Level |
| Default environment (grey) | Flat, directionless no shadows | Blank grey reflections no environment detail | None | Low obviously CG |
| Manual lights only (point/spot) | Controllable but artificial, hard shadows | Reflects manual light positions, no environment | High, each light must be placed and adjusted | Medium professional but not photorealistic |
| HDRI environment lighting | Captured real-world illumination, natural shadows and gradients | Full environment reflected in all specular surfaces | Low, load one file and adjust two sliders | High, indistinguishable from product photography |
| HDRI + manual lights combined | HDRI fills the scene; manual lights add key light emphasis | HDRI provides environment; manual lights add specular highlights | Medium, HDRI setup plus light placement | Highest, full professional studio control |
How Fusion 360 Uses HDRI Files: The Render Engine Explained
Fusion 360’s Render workspace uses a physically based rendering (PBR) engine that models how light interacts with materials according to real physics. In this engine, all materials are defined by their physical properties, base colour, roughness, metalness, reflectivity, emission. and the render engine calculates how light from all sources in the scene interacts with those properties to produce the final pixel colours.
The Two Roles of the HDRI in Fusion 360
Fusion 360 separates the HDRI’s two functions into independently controllable parameters:
- Environment Light Intensity: Controls how much light the HDRI contributes to the scene illumination. Increasing this makes the entire scene brighter; reducing it darkens the scene without changing the background appearance.
- Background Visibility: Controls whether the HDRI panorama is visible as the scene background behind the model, or whether the background is replaced by a flat colour or remains transparent for compositing in post-production.
This separation is powerful and frequently misunderstood. It means you can use a bright, high-contrast HDRI to light the scene realistically while showing a clean white or transparent background, a common product photography look used in e-commerce and marketing. Alternatively, you can show the full HDRI panorama as the background to place the product in a visible real-world environment (a studio, an outdoor location, an industrial setting) while the same image simultaneously provides accurate lighting.
Supported HDRI File Formats in Fusion 360
| Format | Extension | Bit Depth | Fusion 360 Support | Notes |
| Radiance HDR | .hdr | 32-bit float | Full support | Most common format for HDRI downloads, recommended for Fusion 360 |
| OpenEXR | .exr | 16-bit or 32-bit float | Full support | Professional VFX format, excellent quality but larger file size |
| JPEG | .jpg | 8-bit integer | Supported (background only) | Not a true HDR format, no IBL capability; use only for flat background images, not lighting |
| PNG | .png | 8-bit or 16-bit integer | Supported (background only) | Not a true HDR format limited to background image use |
| Critical Note: Only true HDR formats (.hdr, .exr) provide image-based lighting in Fusion 360. Loading a standard JPEG as your environment will display it as a background image but will not provide IBL illumination, the scene will still be lit only by the default ambient light. Always use genuine .hdr or .exr files for environment lighting. |
Step-by-Step: Loading an HDRI Environment in Fusion 360
The following workflow applies to Fusion 360 version 2.0.17000 and later. The Render workspace UI has been consistent across recent versions, but menu locations may differ slightly in older builds.
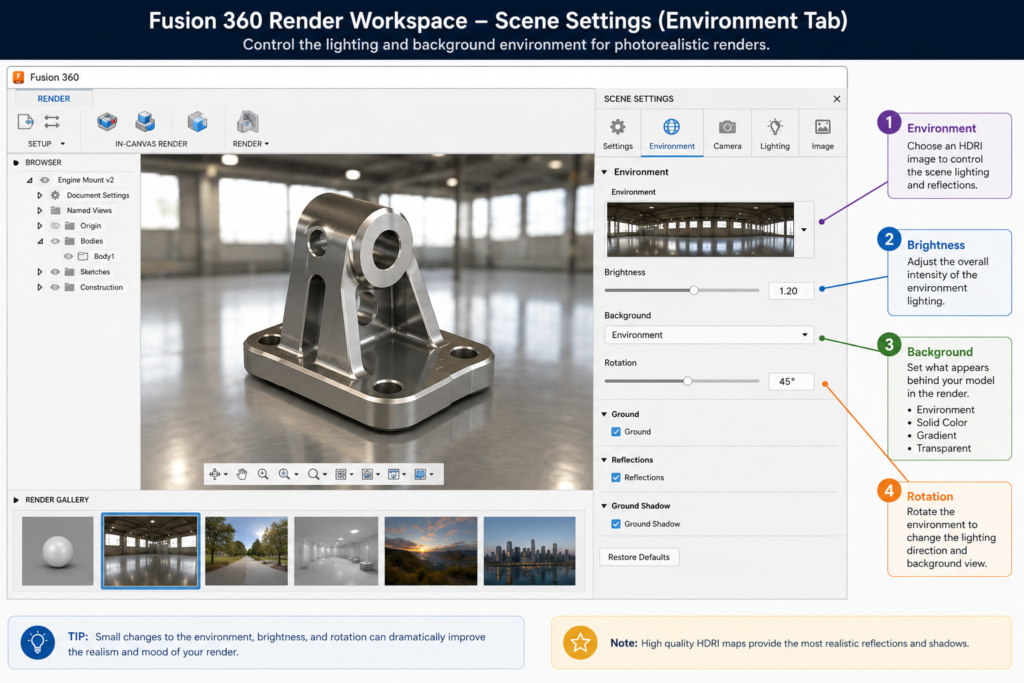
Step 1: Enter the Render Workspace
- Open your Fusion 360 model.
- Click the workspace selector dropdown at the top-left of the toolbar (it will show the current workspace name, e.g., ‘Design’).
- Select Render from the dropdown list. The toolbar will change to show Render-specific tools and the canvas will show the current environment preview.
Step 2: Open the Scene Settings Panel
- In the Render toolbar, click Scene Settings (the sun/environment icon). The Scene Settings panel will open on the right side of the screen.
- The panel contains three tabs: Environment, Camera, and Effects. Ensure you are on the Environment tab.
Step 3: Load Your HDRI File
- In the Environment tab, locate the Environment thumbnail at the top. This shows the currently active environment (default is a grey gradient).
- Click the environment thumbnail. A dropdown appears showing Fusion 360’s built-in environment presets.
- To load your own HDRI file: click the Import Environment option (folder icon) at the bottom of the dropdown.
- Navigate to your .hdr or .exr file and click Open. Fusion 360 will import and process the HDRI, which may take 5-30 seconds depending on file size.
- The viewport will update to show the new environment. Your model is now being illuminated by the HDRI.
| Tip: If your HDRI appears very bright or very dark immediately after loading, do not adjust the model’s materials yet. First set the Environment Light Intensity (see next section) to expose the scene correctly, then evaluate material appearance. Most HDRI issues are exposure problems, not material problems. |
Step 4: Preview the Result
- Click Render Preview in the Render toolbar to generate a quick local render preview. This is faster than a full render and sufficient for evaluating the HDRI and exposure settings.
- Review the preview image. Check: Is the model correctly exposed? Do reflections in metallic or glossy surfaces show the environment? Does the background look correct?
- Adjust Environment settings as needed (see next section) and regenerate the preview until satisfied.
Controlling the HDRI Background vs. Lighting Relationship
The most important concept in Fusion 360 HDRI rendering is the independent control of what the HDRI does visually (background) versus what it does physically (lighting). These are controlled by two separate parameters in the Scene Settings Environment tab.
| Parameter | Location in UI | What It Controls | Typical Range | When to Adjust |
| Environment Light Intensity | Scene Settings > Environment > Brightness slider | The luminance multiplier applied to the HDRI when calculating scene lighting. Does not affect background appearance. | 0.1 (dark, moody) to 3.0 (bright studio) | When model is too dark or too bright regardless of material settings |
| Background Mode | Scene Settings > Environment > Background dropdown | Whether the HDRI panorama, a solid colour, or transparency appears as the scene background behind the model | HDRI / Solid Colour / Transparent | When you want a clean white background but HDRI lighting, or full environment background |
| Background Brightness | Scene Settings > Environment > Background Brightness (visible when Background Mode = HDRI) | Scales the visual brightness of the HDRI background without affecting the lighting contribution | 0.5 to 2.0 | When background appears over- or under-exposed relative to the model |
| Environment Rotation | Scene Settings > Environment > Rotation slider (degrees) | Rotates the HDRI panorama around the vertical axis, changing which part of the HDRI illuminates and reflects in the model | 0 to 360 degrees | To control the primary light direction and the reflections visible in the model’s surfaces |
The Three Most Useful Background Configurations
Clean White Background + HDRI Lighting (Most Common for Product Photography):
- Set Background Mode to Solid Colour
- Set Solid Colour to white (RGB 255, 255, 255)
- Leave Environment Light Intensity at desired level
- Result: Model is lit by the HDRI with accurate reflections, but background is clean white, ideal for e-commerce, datasheets, and presentations
Full HDRI Environment (Context Placement):
- Set Background Mode to HDRI
- Adjust Background Brightness independently from lighting if needed
- Result: Model appears placed in the real environment captured by the HDRI, ideal for lifestyle renders, architectural visualisations, and contextual product shots
Transparent Background (Compositing):
- Set Background Mode to Transparent
- Render in PNG format (supports alpha channel transparency)
- Result: Model is lit by HDRI but background is transparent in the output PNG, ideal for compositing into other images in Photoshop or other post-production tools
Read Related article on How AI Is Changing Engineering Design: Real vs Hype 2026
Adjusting HDRI Environment Settings: Rotation, Brightness, and Scale
Environment Rotation: Controlling Light Direction
Rotating the HDRI environment is the primary way to control the directional quality of the scene lighting without changing the HDRI file. Because the HDRI is a spherical panorama, rotating it around the vertical axis changes which part of the captured environment faces the front of the model, moving the brightest region of the panorama (typically the sky or a studio light source captured in the HDRI) to different positions relative to the model changes the shadow direction, highlight position, and the visible reflections in specular surfaces.
| Rotation Goal | What to Do | Effect on Render |
| Three-quarter lighting (most flattering for product shots) | Rotate until the brightest region is approximately 45 degrees to the left or right of the model’s primary face | Creates a strong key light from one side with fill from the HDRI wrap, producing modelling and depth on the product form |
| Frontal lighting (flat, even, detail emphasis) | Rotate until the brightest region faces the model directly from the front | Reduces shadows, emphasises surface colour and detail, minimises form depth, useful for documentation renders |
| Rim/backlight (dramatic silhouette) | Rotate until the brightest region is behind the model | Creates a bright rim around the model edges and reduces frontal light, produces dramatic effect; combine with a manual key light for visibility |
| Natural outdoor feel | Align the sun or sky region of the outdoor HDRI with the model’s intended ‘top’ | Produces natural top-down sun illumination consistent with how outdoor products are lit in real photography |
Brightness and Exposure Calibration
After loading an HDRI and setting rotation, calibrate exposure using the following workflow:
- Generate a Render Preview at default settings.
- Evaluate the overall brightness of the model surfaces. Is the model correctly exposed, detail visible in both highlights and shadows?
- If the model is too dark: Increase Environment Light Intensity in 0.5 increments until correctly exposed.
- If the model is too bright / blown out: Decrease Environment Light Intensity. Also check if the model has an Emission material accidentally applied.
- If background is too bright or too dark relative to model: Adjust Background Brightness independently (this does not affect lighting).
- Regenerate Render Preview and repeat until satisfied.
| Professional Tip: A common mistake is to set Environment Light Intensity very high to make the model look bright, which then blows out the background and any light-coloured surfaces. Instead, keep Environment Light Intensity in the 1.0-2.0 range and adjust the model’s material properties (reflectivity, base colour value) if specific surfaces need to be lighter or darker. Let the physically-based material system do the work, the HDRI intensity should represent a realistic light level, not compensate for incorrect material setup. |
Adding a Solid or Custom Background Behind Your Model
The Clean White Background with HDRI Lighting combination is the industry standard for professional product renders. Here is the precise workflow:
- In Scene Settings > Environment, set Background to Solid Colour.
- Click the colour swatch that appears and set it to pure white (R:255, G:255, B:255) for a studio look, or any brand colour required by the project.
- Set Environment Light Intensity to your calibrated lighting level (typically 1.0-2.0 for studio HDRIs).
- Render Preview to verify. If the model appears to float with no ground contact, add a ground plane or use the Ground Shadow feature in Scene Settings.
Ground Shadow: Grounding the Model
When using a solid background, the model can appear to float unrealistically. Fusion 360’s Ground Shadow feature in Scene Settings adds a subtle shadow beneath the model that grounds it visually without requiring a physical ground plane geometry. Enable it via Scene Settings > Environment > Ground Shadow toggle. Adjust the ground shadow opacity (0-100%) to control how prominent the shadow is, typically 40-70% for a natural look.
Sourcing Free High-Quality HDRI Files for Product Rendering
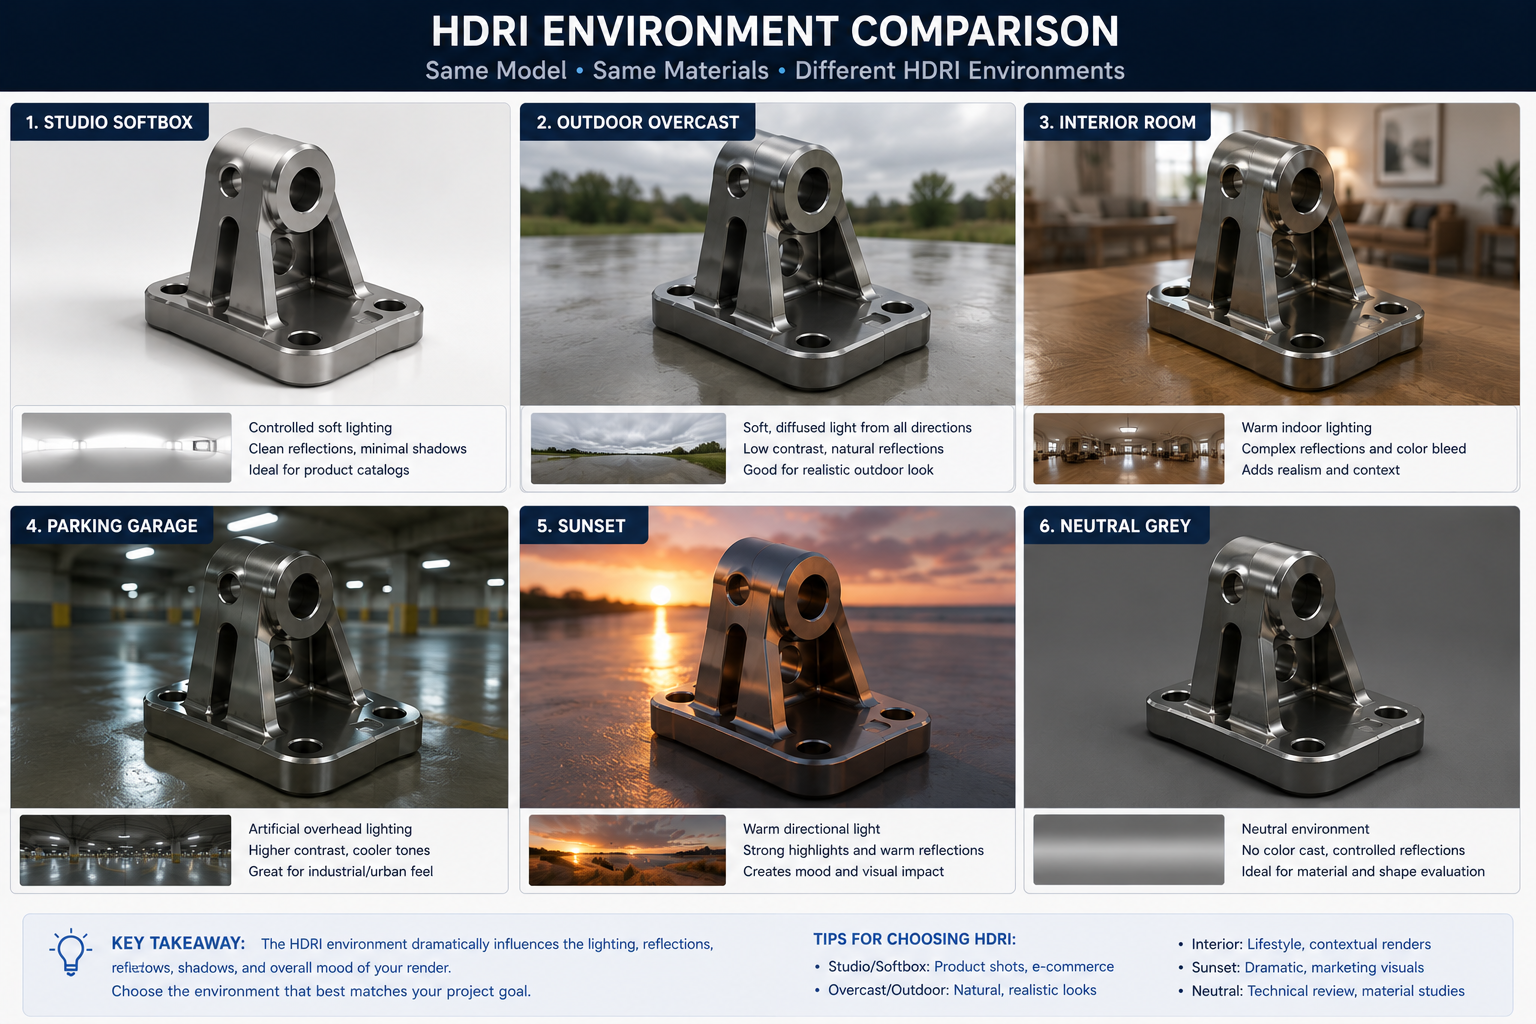
The quality of your render is directly limited by the quality of your HDRI. A poorly captured, low-resolution, or poorly tone-mapped HDRI will produce flat, unconvincing lighting regardless of your other settings. The following sources provide professional-quality HDRIs that are free for commercial use.
| Source | URL | Speciality | Resolution | Licence |
| Poly Haven | polyhaven.com/hdris | Outdoor environments, studios, interior spaces, best overall quality and variety for product rendering | Up to 8K .hdr and .exr | CC0, fully free, commercial use, no attribution required |
| HDRI Haven (now Poly Haven) | polyhaven.com | Original HDRI Haven collection now merged into Poly Haven | Up to 16K | CC0 |
| Pixar RenderMan HDRIs | renderman.pixar.com/resource/rmanAssets | Studio lighting setups optimised for product and character rendering | High resolution | Free for non-commercial; commercial licence available |
| ambientCG | ambientcg.com | Focus on material textures but includes a growing HDRI library | Up to 8K | CC0 |
| Greg Zaal HDRIs | Available via Poly Haven | Outdoor and architectural HDRIs, highly regarded quality | Varies | CC0 |
Choosing the Right HDRI for Your Product Type
| Product Type | Recommended HDRI Category | Why | Example HDRI from Poly Haven |
| Precision mechanical / industrial | Studio HDRIs (softbox setup) | Controlled, even lighting emphasises surface finish and form without distracting reflections from outdoor environments | ‘Studio Small’ or ‘Studio 1’ from Poly Haven |
| Consumer electronics / tech | Interior studio or product photography setup | Clean reflections in black and dark surfaces; controlled highlight shapes on glossy surfaces | ‘Studio Softbox’ or ‘Indoor Office’ HDRIs |
| Outdoor / sporting equipment | Outdoor sky HDRIs (overcast or partly cloudy) | Matches intended use environment; natural light direction appropriate for product context | ‘Kloofendal 48d Partly Cloudy’ from Poly Haven |
| Automotive / transportation | Outdoor or carpark HDRIs | Large horizontal surfaces need horizon-level environment reflection for credible side-panel reflections | ‘Parking Garage’ or ‘Suburban Road’ HDRIs |
| Jewellery / luxury goods | Studio or bright interior HDRIs | Multiple bright reflection sources create the multi-highlight sparkle characteristic of jewellery photography | ‘Studio Small 05’ or bright interior HDRIs |
| Medical / scientific instruments | Neutral studio or clinical interior | Clean, shadowless look consistent with product photography standards in regulated sectors | ‘Studio Neutral’ or ‘Lab’ HDRIs |
Render Settings That Work With Your HDRI
HDRI quality is only realised through sufficient render quality settings. An HDRI rendered at low sample count will show visible noise, particularly in specular highlights and glossy reflections, the exact areas that the HDRI is most responsible for.
| Setting | Location | Recommended Value for HDRI Renders | Effect |
| Render Quality | Render > Render Settings > Quality | Final (not Draft or Preview) | Draft mode significantly under-samples HDRI contribution; Final quality is required for clean HDRI lighting |
| Sample Count / Passes | Render > Render Settings > Passes | Minimum 128 passes; 256+ for complex reflective materials | More passes = less noise in HDRI reflections and caustics; fewer passes = grainy highlights |
| Anti-Aliasing | Render > Render Settings | High | Smooths edges in the background HDRI panorama and on the model silhouette |
| Ray Tracing Reflections | Render > Render Settings > Reflections depth | 2-4 bounces minimum | Controls how many times a ray can bounce between reflective surfaces; HDRI reflections require at least 2 bounces for accuracy |
| Output Resolution | Render > In-Canvas Render > Output Size | Minimum 2000px wide for professional use; 4000px for print | Higher resolution reveals more of the HDRI environment detail in reflections |
| File Format | Render > Render Settings > Output | PNG (for transparency) or JPEG (for white backgrounds) | PNG preserves transparency channel for compositing; JPEG smaller file for white background outputs |
| Render Time Reality Check: High-quality HDRI renders with reflective materials can take 5-30 minutes locally on a mid-range workstation. If render time is a constraint, use Fusion 360 Cloud Rendering (see next section) which offloads computation to Autodesk’s render servers and completes in the background while you continue working. Cloud rendering also applies the same HDRI and settings used in local rendering. |
Cloud Rendering vs. Local Rendering With HDRI in Fusion 360
Fusion 360 offers two rendering paths, both of which fully support HDRI environments:
| Feature | Local (In-Canvas) Render | Cloud Render |
| HDRI support | Full, uses loaded HDRI environment | Full, uploads HDRI with model to cloud servers |
| Render time | 5-60+ minutes depending on hardware and settings | Typically 10-30 minutes; runs in background |
| Hardware requirement | Uses your CPU/GPU, impacts workstation performance during render | No local hardware impact, runs on Autodesk cloud |
| Cost | Free (uses local compute) | Uses Fusion 360 cloud credits (included in subscription) |
| Output resolution | Limited by local memory | Up to 4000 x 4000px standard |
| Best for | Quick previews, iterative testing | Final production renders, high-resolution outputs |
| HDRI file handling | HDRI stays on local disk | HDRI is uploaded to Autodesk cloud with the render job |
| To use Cloud Rendering: in the Render workspace, click Render in the toolbar (not In-Canvas Render). The Render dialog opens. Configure resolution, quality, and output format, then click Render. The job is submitted to Autodesk’s servers. The notification bell icon in Fusion 360 will alert you when the render is complete and available for download in the Fusion 360 render gallery. |
Troubleshooting: Common HDRI Problems in Fusion 360
| Problem | Cause | Fix |
| HDRI loaded but scene appears same grey as before | Loaded a JPEG instead of a true .hdr or .exr file; JPEG provides background only, no IBL | Re-import using a genuine .hdr or .exr file. Verify file extension before importing. |
| Background shows HDRI but model looks plastic / flat | Environment Light Intensity is too low, or model materials lack reflectivity (roughness too high) | Increase Environment Light Intensity to 1.5-2.0. Check material roughness, reduce to 0.2-0.4 for more visible reflections. |
| HDRI background appears blurry in final render | Output resolution too low, or HDRI source file is low resolution (below 2K) | Increase render output resolution to 2000px+. Download a higher resolution HDRI (4K or 8K) from Poly Haven. |
| Model too dark despite high Environment Light Intensity | HDRI is a dark interior/nighttime panorama with insufficient luminance; or model material is very dark (near-black base colour) | Switch to a brighter studio or outdoor HDRI. Alternatively, add a manual directional light as a key light to supplement the HDRI. |
| Noisy / grainy reflections in metal surfaces | Sample count too low for the complexity of the HDRI environment reflections | Increase render passes to 256+. Use Final quality setting, not Draft. |
| HDRI rotation not changing light direction | Model materials may be too rough to show directional lighting changes; or rotation was set in preview mode which does not update live | Reduce material roughness to see rotation effect. Generate a new Render Preview after changing rotation. |
| White background shows grey gradient instead of pure white | Background Brightness slider is set below 1.0, or the HDRI light is causing bloom on the white background | Set Solid Colour background to RGB 255,255,255. Ensure Background Brightness is 1.0. |
| HDRI file fails to import (error message) | File is corrupt, in an unsupported bit depth, or the .exr file uses a compression codec Fusion 360 does not support | Re-download the HDRI from source. Try the .hdr version instead of .exr. Ensure the HDRI is a standard equirectangular panorama, not a cubemap. |
HDRI Best Practices for Different Product Types
Mechanical and Industrial Components
For machined metal components, precision instruments, and industrial products, the goal is to show surface finish quality accurately. Use a studio softbox HDRI with a white solid background. Set material roughness between 0.1 (polished) and 0.4 (brushed) to differentiate surface finishes. Use Environment Rotation to position the main softbox reflection as a long, horizontal highlight across the widest face of the component. This mimics professional engineering product photography used in catalogues and technical datasheets.
Consumer Electronics and Gadgets
Dark, reflective surfaces (black plastic, glass screens, chrome accents) need an HDRI with distinct, well-separated bright regions to create controlled highlight shapes. A studio interior HDRI with window light typically works well. Set the background to a neutral dark grey or gradient for dark products, or white for lighter devices. Use 256+ render passes to avoid grainy reflections in dark surfaces, black materials render much more slowly than light ones because of the contrast between the dark surface and bright highlights.
Architectural Models and Furniture
Large, room-scale models benefit from interior architecture HDRIs that simulate the light distribution inside a real room, combined floor-level windows, ceiling lights, and wall bounce. Use the full HDRI background (not solid colour) to place the furniture or architectural element in a visible environment. Set Environment Rotation to ensure windows in the HDRI appear at realistic positions relative to the model (e.g., windows should not appear below the floor line of the model).
Organic and Sculptural Forms
For organic designs, sculptural products, or any form where the shape itself is the primary subject, use an overcast sky HDRI. Overcast conditions provide extremely even, wrap-around illumination with no hard shadows, which is ideal for communicating complex 3D form because it preserves subtle surface curvature variation that a hard studio light would flatten or burn out.
Frequently Asked Questions (FAQ)
What is an HDRI background in Fusion 360?
An HDRI background in Fusion 360 is a 360-degree High Dynamic Range Image loaded into the Render workspace as the scene environment. It serves two functions simultaneously: providing image-based lighting (IBL) that illuminates the 3D model using real-world captured light data, and providing a photorealistic background environment that appears in the scene and reflects in the model’s surfaces. HDRI files in .hdr or .exr format are loaded through Scene Settings > Environment in the Render workspace.
Can I use my own HDRI file in Fusion 360?
Yes. Fusion 360 supports importing custom HDRI files in .hdr (Radiance) and .exr (OpenEXR) formats. In the Render workspace, open Scene Settings, click the Environment thumbnail, and select Import Environment to browse for your .hdr or .exr file. The HDRI is then available in your current Fusion 360 session and can be saved with the project. Free professional-quality HDRIs suitable for product rendering are available from Poly Haven (polyhaven.com) under a CC0 licence.
How do I make the background white but keep HDRI lighting in Fusion 360?
In Scene Settings > Environment, set the Background option to Solid Colour and choose pure white (RGB 255, 255, 255). Leave the Environment (HDRI) loaded and set Environment Light Intensity to your desired level. This configuration uses the HDRI to illuminate the model with physically accurate IBL lighting while displaying a clean white background, the standard setup for product photography renders. The model will still show HDRI environment reflections in its surfaces.
Why does my Fusion 360 HDRI render look grainy?
Grainy renders in Fusion 360 are caused by insufficient sample count (render passes). HDRI-lit scenes with reflective materials require more samples than flat-lit scenes because the render engine must calculate many light bounces through the HDRI contribution. To fix: in Render Settings, ensure Quality is set to Final (not Draft), and increase the Passes count to 256 or higher. Renders with polished metal or glass materials may need 512+ passes for a clean result.
How do I rotate the HDRI environment in Fusion 360?
In the Render workspace, open Scene Settings > Environment. The Rotation slider controls the horizontal rotation of the HDRI panorama around the vertical axis, expressed in degrees (0-360). Dragging the slider rotates which part of the HDRI faces the model, changing the primary light direction, shadow angle, and the reflections visible in specular surfaces. Generate a Render Preview after each rotation adjustment to see the effect, as the viewport preview may not update fully in real time.
What is the best HDRI for product rendering in Fusion 360?
For most product rendering purposes, a studio softbox HDRI from Poly Haven (polyhaven.com) is the best starting point. Studio HDRIs simulate professional photography lighting equipment and produce clean, controlled highlights without distracting environment reflections. For outdoor or lifestyle products, outdoor sky HDRIs (overcast or partly cloudy) work best. Download 4K or higher resolution files for sharp background quality. The CC0 licence on all Poly Haven HDRIs means they can be used commercially without restriction.
Does Fusion 360 cloud rendering support HDRI environments?
Yes. Fusion 360 cloud rendering fully supports HDRI environments. When a cloud render job is submitted, Fusion 360 automatically uploads the HDRI file along with the model and all scene settings to Autodesk’s render servers. The cloud render uses identical lighting and environment settings to a local render. Cloud rendering is particularly useful for high-resolution HDRI renders because it frees your local workstation from the compute load and completes in the background while you continue working.
Why is my HDRI not lighting the scene in Fusion 360?
The most common cause is loading a standard JPEG or PNG image as the environment instead of a true .hdr or .exr file. JPEG and PNG are 8-bit formats and do not contain high dynamic range data, Fusion 360 will display them as background images but they do not provide image-based lighting. Re-import your environment using a genuine .hdr or .exr file. If you already have an .hdr file loaded and lighting appears absent, check that Environment Light Intensity in Scene Settings is not set to zero or near zero.
Conclusion
HDRI backgrounds in Fusion 360 transform the Render workspace from a basic visualisation tool into a professional product photography system. The core workflow is straightforward: load a quality .hdr or .exr file, set the background mode to match your output goal (full environment, white studio, or transparent), calibrate exposure with the Environment Light Intensity slider, and set Environment Rotation to control the light direction. The technical foundation, image-based lighting, surface reflections, physically based materials, handles the rest.
The single most common mistake engineers and designers make is not using HDRI at all, defaulting to the flat grey environment because the Render workspace feels unfamiliar. The second most common mistake is using a low-resolution or JPEG environment that looks incorrect and is abandoned as ‘not working’. Both problems are solved by downloading a free 4K .hdr file from Poly Haven and following the workflow in this guide.
Fusion 360’s render engine rewards investment in environment quality. A five-minute workflow change, swap the default environment for a proper studio HDRI and set the background to white, produces results that would be genuinely mistaken for product photography by non-technical reviewers. For engineering teams that need to communicate design intent to clients, investors, or manufacturing partners, that visual credibility has real commercial value.