Tag: mechanical engineering

  • What is Parametric CAD Design? Benefits, Examples and Manufacturing Applications

    What is Parametric CAD Design? Benefits, Examples and Manufacturing Applications

    60%  faster design cycles reported by organisations adopting modern parametric CAD workflows (Shalin Designs, 2026)
    70%  of engineering firms with under 50 engineers excluded from enterprise CAD pricing, driving open-source parametric adoption
    2026  AI-assisted parametric generation now available in ANSYS, Fusion 360, CATIA, and Creo as a standard workflow feature

    Introduction:

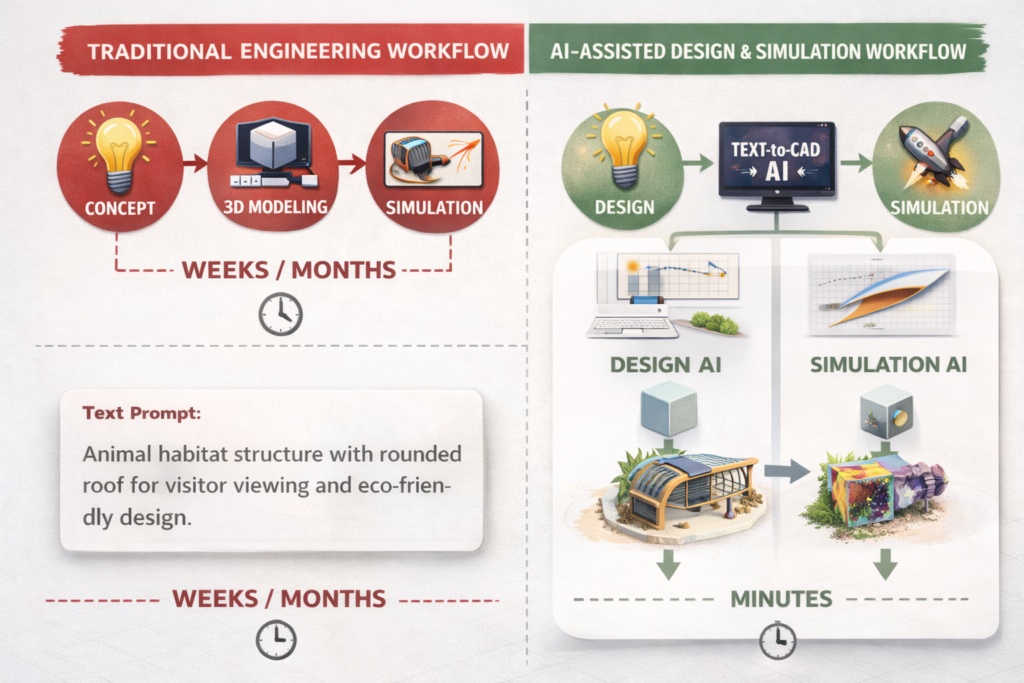
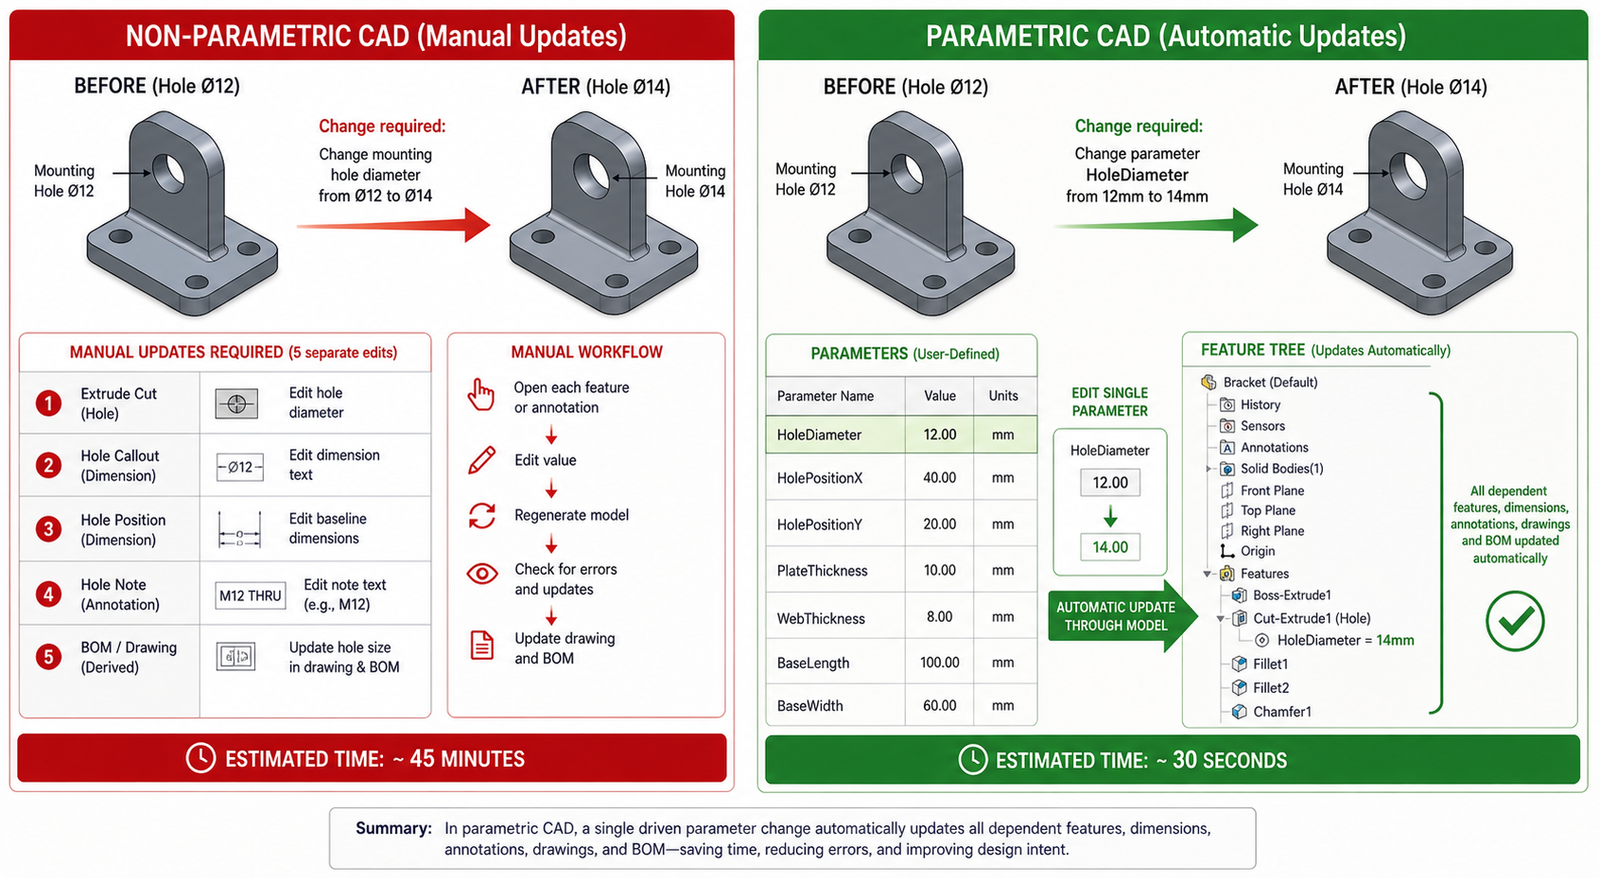
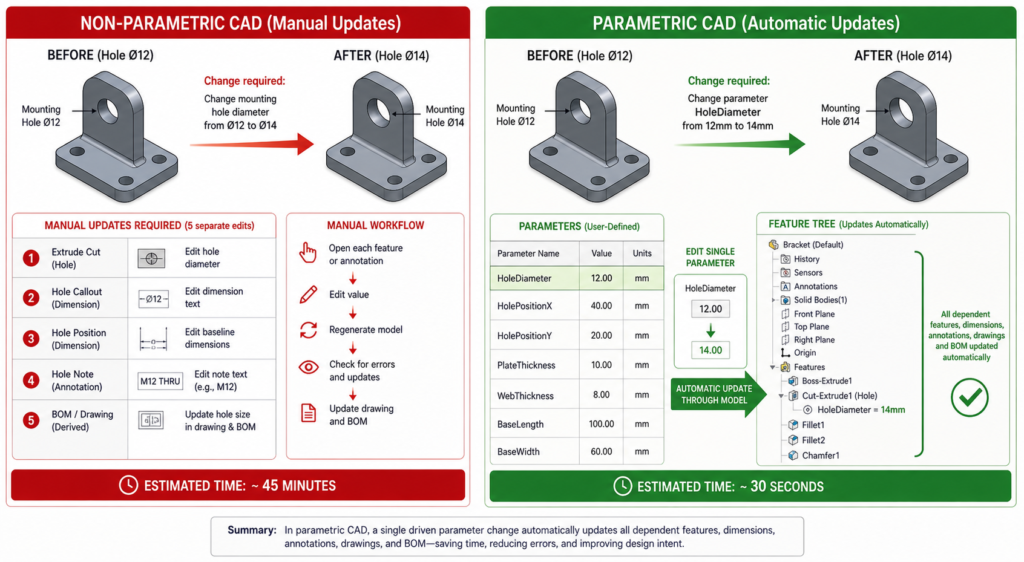
    Picture this. A product engineer needs to increase a shaft diameter by 3mm across an entire product family. In a non-parametric CAD environment, that means opening each file, finding every feature that references that diameter, editing it manually, checking that nothing else broke in the process, regenerating the drawing views, and repeating the whole sequence for every variant in the family.

    In a well-built parametric CAD model, the engineer changes one value in a design table. The entire part family updates. Every drawing view regenerates. The BOM reflects the new dimensions. The process takes two minutes instead of two days.

    That gap, between a design environment that fights your changes and one that anticipates them, is the core reason parametric design in CAD has become the standard approach in manufacturing-focused product development. This guide explains what parametric design actually is, how it works technically, why it matters deeply for manufacturing, and how AI is beginning to extend its capabilities further in 2026.

    Quick answer:  Parametric design in CAD is a modeling method where geometry is controlled by parameters and relationships rather than fixed dimensions. Change a parameter and the entire model, its drawings, and its configurations update automatically. It matters for manufacturing because it encodes design intent and manufacturing constraints directly into the model, making design changes fast, controlled, and consistent.

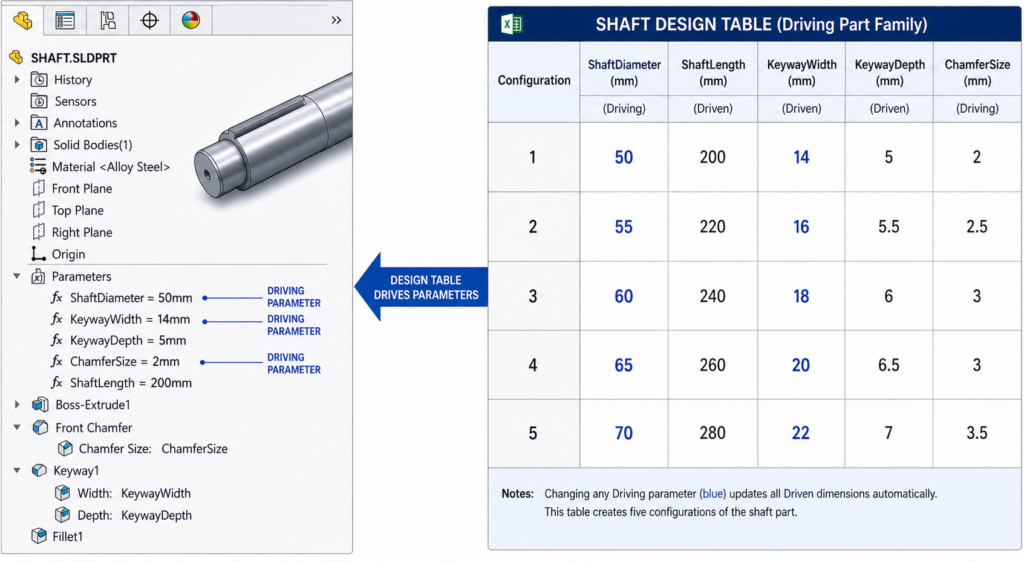
    Image 1: Parametric Feature Tree with Design Table Driving Part Family

    what is parametric design in cad?
    One master model. One design table. Five manufacturing configurations.

    What Is Parametric Design in CAD? The Clear Explanation

    The word parametric comes from parameter, meaning a variable that controls something else. In parametric CAD modeling, those variables are dimensions, angles, radii, counts, and relationships between features. They do not just define the size of the model. They control it.

    The Three Pillars of Parametric Design

    • Parameters: Named variables that drive dimensions. ShaftDiameter = 50mm. BoltPCD = 120mm. WallThickness = 3mm. These can reference each other: FlangeOD = ShaftDiameter x 2.4. Change ShaftDiameter and FlangeOD updates automatically.
    • Constraints: Rules that govern geometric relationships. A hole is always concentric with the boss around it. A fillet is always tangent to the two faces it connects. A pattern always maintains equal spacing. Constraints preserve design intent when dimensions change.
    • Feature history: The model is built from a sequence of features, each depending on what came before it. An extrude references a sketch. A fillet references the edge created by the extrude. A hole references the face created by the fillet. This parent-child chain is the feature tree, and it is what makes the model intelligent.

    When you change a parameter, the solver walks the feature tree from the point of change forward, recalculating every dependent feature in sequence. The result is a model that updates fully and correctly rather than one where you chase broken references through fifty features for the rest of the afternoon.

    Design Intent: The Concept That Separates Parametric from Everything Else

    Design intent is the engineering reasoning behind the geometry. A flange diameter that is always twice the shaft diameter because that ratio satisfies the stress requirement. A mounting hole pattern that is always symmetric about the part centreline because the assembly requires it. A wall thickness that is never less than 2.5mm because the injection moulding process demands it.

    In a traditional 2D drawing or a direct-modeled 3D file, design intent lives in the engineer’s head. When that engineer leaves, the intent goes with them. In a well-built parametric design, the intent is encoded in the model. The relationships and constraints are readable, auditable, and editable by the next engineer who works on the file.

    Why this matters:  A parametric design model is not just a shape. It is a specification. It contains not only what the part looks like but the engineering reasoning that produced it. That is what makes it a reliable manufacturing asset rather than a snapshot that becomes obsolete the moment the design changes.

    Parametric vs Direct Modeling: Which One and When

    One of the most common questions engineers ask when exploring CAD approaches is how parametric modeling compares to direct or explicit modeling. The honest answer is that they serve genuinely different purposes, and knowing when to use each is a judgment call that experienced CAD engineers develop over time.

    FactorParametric CAD ModelingDirect (Explicit) Modeling
    How geometry is definedDriven by parameters and relationshipsPushed and pulled directly by hand
    Design intent storageCaptured in feature tree and constraintsNot stored, only geometry exists
    Handling design changesEdit a parameter, model updates itselfManually redraw affected geometry
    Part familiesOne master model, many configurationsSeparate file for each variant
    Downstream drawing updatesViews regenerate automaticallyViews must be redrawn or manually fixed
    CollaborationParameters are readable and auditableNo history, hard to understand intent
    Best forProducts with design iterationsQuick concept models, scan data
    Learning curveSteeper, requires planning upfrontFaster to start, harder to manage later
    Manufacturing outputConsistent, revision-controlledCan drift without strict file management

    When Direct Modeling Makes More Sense

    Direct modeling is genuinely better in specific situations. When you receive a STEP file from a supplier with no feature history and need to modify geometry quickly, pushing and pulling faces directly is faster than trying to import a feature tree that does not exist. When you are working on a pure concept model that will be thrown away and rebuilt, the time investment in building a parametric model is wasted. When you are working with geometry generated by topology optimisation or a 3D scan, direct tools handle organic shapes better than a feature tree.

    Most professional manufacturing-focused CAD tools now offer both approaches in the same environment. Autodesk Fusion 360 and Siemens NX allow you to switch between parametric design history and direct editing depending on what the task requires. This hybrid approach is one of the CAD design trends gaining the most traction in 2026.

    Image 2: Side-by-Side: Design Change in Parametric vs Non-Parametric CAD

    Design Change in Parametric vs Non-Parametric CAD
    The same design change. The difference is in how the model was built.’

    Why Parametric Design Matters for Manufacturing: The Real Reasons

    Engineers who have only worked in parametric CAD sometimes underestimate how much the modeling approach matters downstream. Parametric modeling for manufacturing is not just about design convenience. It has direct, measurable consequences for what happens at the machine, at the inspection table, and during engineering change management.

    Manufacturing BenefitWhat Parametric Design DoesReal Impact
    Design for ManufacturabilityParameters encode manufacturing constraintsUndercuts, tool access, wall thickness enforced at the model level
    Part family managementOne master model drives all variantsA family of 20 bracket sizes from one parametric file, not 20 separate models
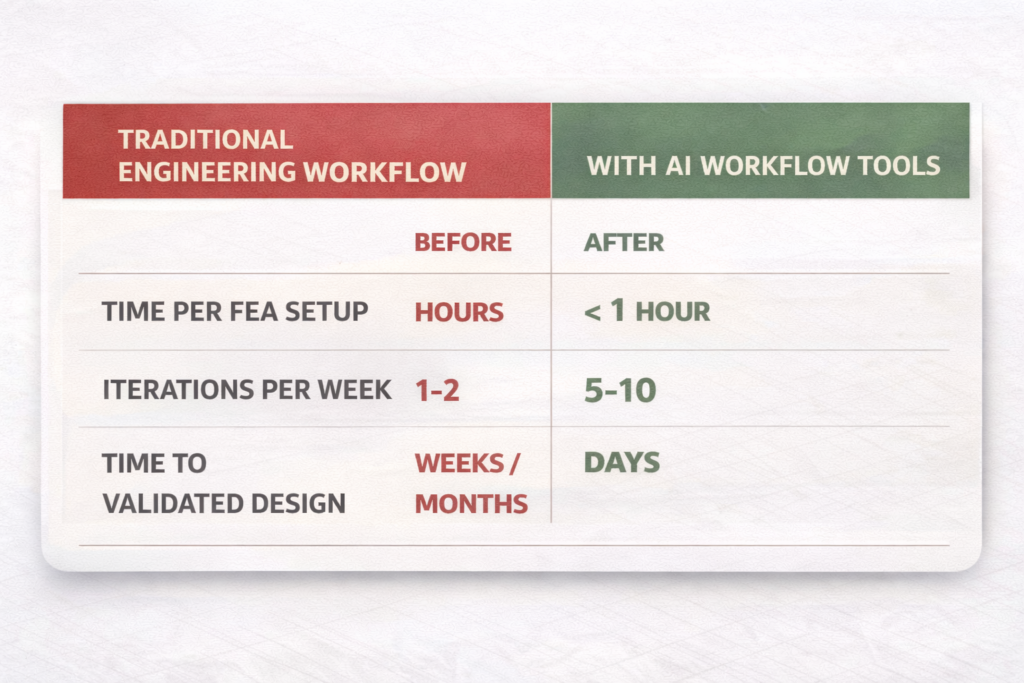
    Rapid design iterationChange a dimension, everything updatesEngineering teams at Autodesk report up to 60% faster design cycles
    Tolerance managementDriven dimensions propagate to drawingsTolerances remain consistent across all drawing views automatically
    CAM toolpath reliabilityGeometry is clean and feature-basedCAM software reads parametric geometry more reliably than direct-modeled meshes
    Supplier collaborationConfigurations exported as separate derived filesSupplier gets the correct variant without access to the full design intent
    Engineering change managementChange is traced through the feature treeAuditors can see exactly what changed and why between revisions
    Revision controlParameters log what drove each design versionFull traceability from concept through production release

    Design for Manufacturability Built Into the Model

    The most powerful manufacturing application of parametric design is encoding Design for Manufacturability rules directly as driven constraints. A minimum wall thickness of 2.5mm for injection moulding is not a note on a drawing that a designer might miss. It is a driven dimension that the model cannot violate. A minimum internal corner radius for a machined pocket is not a guideline in a manufacturing specification document. It is a constraint that prevents the feature from being created without it.

    This approach fundamentally changes when DFM violations are caught. Instead of discovering at tooling review that a pocket cannot be machined with available cutters, the parametric design constraint flags the issue the moment the engineer tries to create a feature that violates it. The cost of catching a DFM issue in the CAD model is essentially zero. The cost of catching it after tool steel has been cut is measured in thousands.

    Managing Part Families Without Chaos

    Most manufactured product lines are not single parts. They are families. A pump impeller in five sizes. A fastener in twelve diameter and length combinations. An enclosure in three form factors. Without parametric design, each variant is a separate file with its own maintenance burden. Change a shared feature and you have changed it in one file out of twelve.

    With a parametric design master model and a design table, all variants live in one file. The design table drives every variant from a single spreadsheet. When a change is needed, it is made once and propagates everywhere. This approach reduces file management overhead, eliminates version drift between variants, and makes engineering change management tractable at scale.

    Reliable CAM Integration

    Computer-Aided Manufacturing software reads geometry to generate toolpaths. The quality of that geometry directly affects toolpath reliability. Parametric design models built on clean feature history produce well-defined, mathematically precise geometry with clear face relationships. Direct-modeled or imported geometry often contains small gaps, overlapping surfaces, or undefined edge conditions that cause CAM software to fail or produce incorrect toolpaths.

    Manufacturers who have moved their design process to parametric CAD consistently report fewer toolpath errors and faster setup time in their CAM workflows. The geometry the machinist receives is trustworthy because it was built with manufacturing intent, not just visual appearance.

    How Parametric CAD Modeling Works: Step by Step

    Understanding the process of building a proper parametric model makes the difference between a model that is a joy to modify and one that explodes the moment someone changes a dimension. Here is the sequence that experienced CAD engineers follow.

    Step 1: Plan the Model Before Opening the Software

    The single highest-leverage habit in parametric CAD is spending time before modeling to understand the design intent. Which dimensions are independent drivers? Which are derived from others? What relationships must always hold true regardless of size? What manufacturing constraints need to be encoded?

    Sketch this out on paper. Define the parent-child relationships between features. Identify which sketch elements will be constrained and which will be driven. Engineers who skip this step build parametric design models that work for the first design configuration and break immediately when the second change request arrives.

    Step 2: Create Fully Constrained Sketches

    Every sketch in a parametric model should be fully defined before extruding. A sketch with open degrees of freedom is a model that can drift unpredictably when a parent feature changes. Fully constrain every sketch with dimensions, geometric constraints (vertical, horizontal, tangent, coincident, equal), and relationships to part geometry or reference planes.

    Named dimensions in sketches become accessible as design parameters. Name them meaningfully from the start: BoltHoleDiameter, FlangeRadius, WebThickness. A model where every dimension is called Dim1@Sketch3 is a model that no engineer other than the original author can work with efficiently.

    Step 3: Build Features in Logical Dependency Order

    The feature tree is a directed dependency graph. Every feature that references geometry from another feature is a child of that feature. If the parent changes, the child recalculates. If the parent is deleted, the child fails.

    Build features in the order that reflects their physical and logical dependency. Base geometry first. Material-adding features next. Material-removing features after that. Finishing features such as fillets and chamfers last. This order means that changes to early features cascade naturally through later ones rather than creating broken reference chains.

    Step 4: Use Global Variables and Equations

    Global variables are parameters that live above the feature tree and can be referenced by any sketch or feature in the model. FlangeOD = ShaftDiameter x 2.4. BoltPCD = FlangeOD – 20mm. WallThickness = MAX(2.5mm, HoleDepth / 10).

    Using equations and global variables rather than entering raw numbers into every dimension is what makes a parametric model genuinely intelligent. Change ShaftDiameter and every dimension that references it, directly or through a chain of equations, updates correctly. Enter 50mm into every dimension separately and you have a brittle model that requires manual attention every time any dimension changes.

    Step 5: Create Configurations and Design Tables

    Once the master model is built and fully parametric, configurations allow you to create named variants without duplicating files. A design table drives configurations from a spreadsheet, specifying the parameter values for each variant. SolidWorks, Creo, and NX all support design tables natively.

    A well-built design table is the manufacturing team’s best friend. It clearly documents every variant, the parameters that define it, and the relationships between them. It is also the input that AI tools are beginning to use for automated variant generation in 2026, where functional performance criteria drive parameter selection rather than the engineer specifying every value manually.

    Parametric Design in Manufacturing: Industry Applications

    The applications of parametric design in CAD vary significantly by industry, but the underlying principle is the same across all of them: encode the engineering intent that drives the geometry, and the model becomes a manufacturing asset rather than a frozen snapshot.

    IndustryHow Parametric Design Is UsedManufacturing Benefit
    AutomotiveBody panels, powertrain components, chassis variantsSingle parameter drives roof height across all trim levels
    AerospaceAirfoil profiles, structural ribs, fastener patternsTolerance chains managed parametrically across hundreds of parts
    Consumer productsEnclosure families, injection-moulded housings, ergonomicsOne master enclosure model generates XS, S, M, L, XL variants
    Medical devicesImplant sizing series, surgical instrument familiesRegulatory compliance parameters locked, size driven by design table
    Industrial machineryConveyor frames, pump housings, gearbox variantsCustomer specification drives model directly, reduces custom quoting time
    Architecture / AECStructural member sizing, parametric design facade panelsEngineering changes propagate to fabrication drawings automatically
    Additive manufacturingLattice structures, topology-optimised geometryAI-generated parametric design lattice adapts density to local stress field

    Real Example: A Pump Impeller Family

    A pump manufacturer designs a centrifugal impeller in one nominal size using fully constrained parametric CAD. The key design drivers are: impeller OD, number of vanes, vane angle, inlet diameter, and outlet width. All other dimensions are derived from these five through equations that capture the hydraulic design rules.

    From this single master model, a design table generates the full product range: eight impeller diameters from 200mm to 500mm, all hydraulically scaled, all with correct vane geometry, all with manufacturing-ready tolerances applied parametrically. The drawing package for all eight sizes is produced automatically from one drawing template referenced to the master model and design table.

    A customer specifies a non-standard impeller diameter for a specialist application. The engineer opens the design table, adds a new row, enters the target diameter, and derives the other parameters from the hydraulic equations. A new compliant geometry is generated in minutes. The same process without parametric CAD would take days of manual drafting and checking.

     AI-Assisted Parametric Generation Workflow Diagram
    I generates the options. Parametric CAD makes them editable and manufacturable.

    Parametric CAD Software for Manufacturing: Honest Comparison

    Choosing the right parametric CAD software for a manufacturing context depends on your industry, team size, budget, and the complexity of the design families you need to manage. Here is a clear breakdown of the main options in 2026.

    SoftwareDeveloperParametric ApproachBest Industry FitAI / Future Features
    SolidWorksDassaultFeature-based, history treeMfg, consumer, medicalAI design suggestions, topology opt
    Creo ParametricPTCFully parametric, relationsAerospace, defenceGenerative design, model-based def
    Fusion 360AutodeskParametric + direct hybridSME, product designAI mesh-to-parametric, cloud collab
    CATIADassaultKnowledge-based parametricsAutomotive, aerospaceAI-driven rules, 3DEXPERIENCE
    InventorAutodeskFeature-based, iLogic rulesIndustrial, machineryInterop with Fusion, cloud PDM
    NX (Siemens)SiemensSynchronous + history-basedAutomotive, heavy industryAI geometry healing, digital twin
    FreeCADOpen sourceConstraint-based parametricSME, indie engineersActive community, Python scripting

    The Open-Source Option: FreeCAD

    FreeCAD has matured significantly and is a genuine option for independent engineers and small manufacturers who cannot justify commercial licensing costs. Its constraint-based parametric design modeling is conceptually identical to commercial packages. The learning curve is real, the community documentation is extensive, and the Python scripting interface is powerful for automation.

    The honest limitation is stability on complex models and the absence of the integrated CAM, simulation, and PDM ecosystems that commercial tools provide. For standalone part design with export to a separate CAM or analysis tool, FreeCAD handles the job. For full integrated product development workflows, commercial options remain significantly more mature.

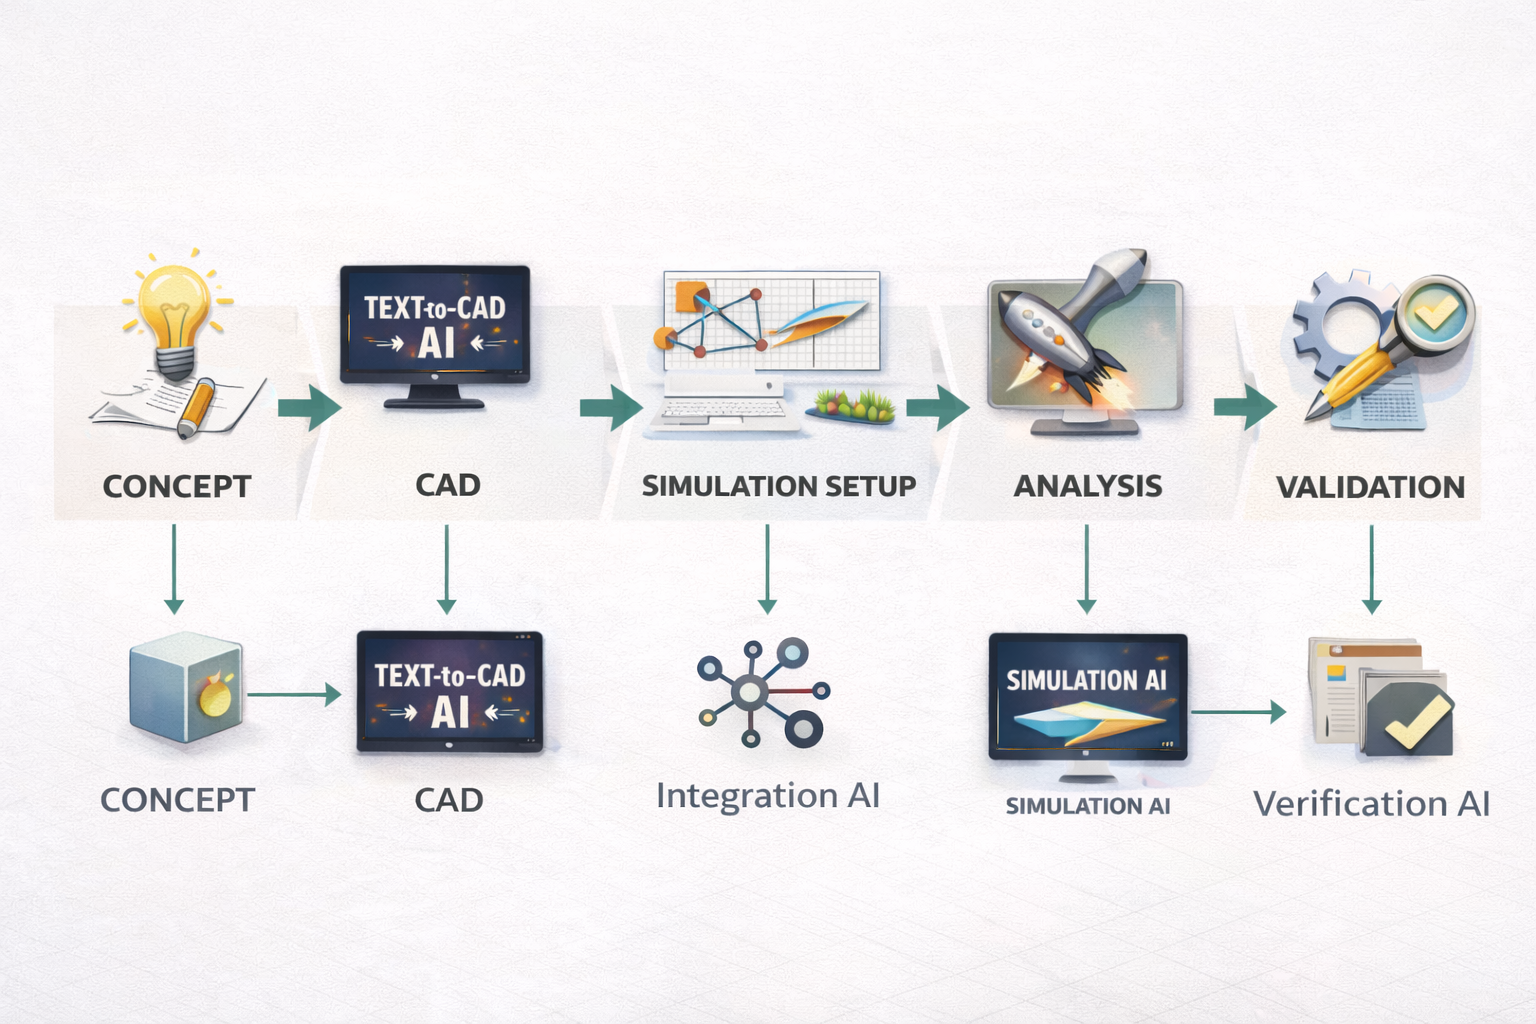
    How AI Is Changing Parametric Design in 2026

    Artificial intelligence is not replacing parametric CAD modeling in 2026. It is extending it. The parametric model is the structure that gives AI-generated geometry meaning, editability, and manufacturing relevance. Without parametric design architecture, AI-generated shapes are meshes: visually interesting but impossible to modify or manufacture reliably.

    AI-Assisted Parametric Generation

    Tools in ANSYS, CATIA, and Fusion 360 now offer assisted parametric generation where engineers define functional criteria: maximum load, target mass, material cost envelope, and manufacturing process. The AI generates multiple parametric design geometry variants, each meeting the constraints, each fully editable in the feature tree.

    Backflip AI, which emerged from stealth in early 2025, converts 3D scan data directly into fully parametric CAD models. A scanned legacy part, previously locked as a mesh with no design intent, becomes a feature-based parametric model that can be modified for manufacturing without rebuilding from scratch. This solves one of the most persistent pain points in reverse engineering workflows.

    Real-Time DFM Analysis Driven by Parametric Data

    Digital manufacturing platforms like Autodesk Fusion and Fictiv now analyse parametric CAD geometry in real time and return DFM feedback before the model is even released for review. Wall thickness violations, unmachineable features, insufficient draft angles for injection moulding, and tolerance combinations that cannot be achieved at the specified process are all flagged at the design stage rather than the production stage.

    This capability works significantly better with parametric models than with imported dumb geometry because the solver can read the design parameters, not just the resulting shape. A parametric wall thickness that reads 2.1mm triggers a DFM alert. A wall that appears 2.1mm thick in an imported mesh without parameter metadata may not.

    Digital Twins Built on Parametric Foundations

    The digital twin concept, where a live computational model mirrors a physical asset and updates as conditions change, relies on parametric architecture. A digital twin of a pump impeller that tracks wear requires a parametric model where wear-related dimensions are driven values that can be updated from sensor data.

    Without the parametric foundation, a digital twin is a static 3D representation that cannot be meaningfully updated as the physical asset changes. With it, the digital model reflects the real asset in real time and supports predictive maintenance, performance modelling, and end-of-life assessment.

    8 Parametric Design CAD Mistakes That Break Models at the Worst Moment

    A parametric model that is built without discipline creates a specific kind of problem: it appears to work perfectly until someone needs to change it, at which point it fails in ways that are difficult to debug and expensive to fix. These are the mistakes that experienced CAD engineers see most consistently in models passed to them from others.

    MistakeWhat Goes WrongHow to Fix It
    No sketch constraints appliedModel drifts when dimensions changeFully constrain every sketch before extruding. Use relations, not just dimensions.
    Feature tree built without order logicChanging an early feature breaks later onesThink through the build sequence before modeling. Parent-child dependencies matter.
    Hard-coded numbers everywhereChanging one value requires editing every featureUse global variables or design tables for all key dimensions from the start.
    No design table for part familiesTwenty variants become twenty separate filesBuild one master model. Drive all variants from a single spreadsheet design table.
    Over-constrained sketchesModel throws errors on minor editsCheck for redundant constraints. One fully defined sketch is better than two conflicting ones.
    Suppressed features not documentedNext engineer unsuppresses wrong featuresAdd descriptions to every suppressed feature explaining why it exists and when to activate.
    Parameters not named logicallyDim1@Sketch3 tells nobody anythingRename every parameter: ShaftDiameter, FlangeThickness, BoltPCD. The model becomes self-documenting.
    Manufacturing constraints not encodedTooling violations discovered at productionBuild minimum wall thickness, draft angle, and tool access as driven dimensions from the start.

    The Rebuild Test

    A reliable parametric model should survive the rebuild test. Make a significant change to a fundamental parameter, one that affects a large portion of the geometry, and verify that the model rebuilds cleanly without errors, that the drawing views regenerate correctly, and that all configurations update to valid geometry. If the model fails this test, the parametric architecture is fragile and will fail in production use when change requests arrive.

    The hidden cost of bad parametric design models:  A parametric model that breaks when modified often gets abandoned in favour of starting again from scratch or, worse, making changes directly in the drawing and bypassing the model entirely. When the model and the drawing diverge, manufacturing gets the wrong information. The cost of a poorly built parametric model is not paid when it is created. It is paid every time someone tries to change it.

    Parametric Design and Design for Manufacturability: The Natural Connection

    The relationship between parametric CAD and Design for Manufacturability is not just compatible. It is synergistic. DFM principles translate directly into parametric constraints, and parametric models are the natural environment for encoding and enforcing those principles automatically.

    Injection Moulding

    Draft angle is mandatory on injection-moulded parts. In a non-parametric environment, the designer applies draft as a finishing step and might miss features. In a parametric model, draft angle is a parameter: DraftAngle = 1.5 degrees. Every extruded feature that requires draft references this parameter. Change the moulding material to one requiring 2 degrees and the model updates every feature simultaneously.

    Minimum wall thickness, gate location constraints, parting line geometry, and undercut avoidance can all be parametric constraints. The result is a model that physically cannot be built in a way that violates the moulding process requirements. DFM compliance moves from a review step to a model property.

    CNC Machining

    Internal corner radii must accommodate the tool radius. Minimum pocket depth-to-width ratios limit tool deflection. Surface finish requirements drive feature sequence and toolpath strategy. These are all parametric constraints that can be encoded as equations: InternalRadius >= CutterRadius + 0.5mm. PocketDepth <= PocketWidth x 4.

    When a machinist receives a parametrically constrained model, the geometry has already been validated against machining feasibility. There are no internal sharp corners that require wire EDM when a milling cutter was specified. There are no pockets that are too deep for available tooling. The shop floor operates on geometry that was designed for how it will be made, not just for how it should look.

    Conclusion:

    Every major manufacturing industry, from aerospace to consumer products, from medical devices to industrial machinery, has converged on parametric CAD modeling as the standard approach for a reason that has nothing to do with software preference. It is the only modeling approach that encodes manufacturing intent in a form that survives design changes.

    A direct-modeled part looks exactly the same as a parametric part when both are sitting on a shelf. The difference appears the moment someone makes a change request. The parametric model handles it in minutes. The non-parametric model creates hours of rework, broken drawings, and the real risk that manufacturing gets inconsistent geometry.

    In 2026, that difference is being amplified by AI tools that use parametric architecture as the input to generative design, real-time DFM analysis, and digital twin applications. Parametric design in CAD is not becoming more important because of AI. It is becoming more important because every AI workflow that adds value to manufacturing requires a parametric model as its foundation.

    Build your models parametrically from the first sketch. Name your parameters clearly. Encode your manufacturing constraints as driven dimensions. Build your part families from design tables. And write your feature trees in an order that any engineer who comes after you can follow.

    The best parametric model is one that an engineer who has never seen it before can change confidently on the first day.

    Frequently Asked Questions

    What is parametric design in CAD?

    Parametric design in CAD is a modeling approach where geometry is controlled by parameters and relationships rather than fixed, hand-drawn dimensions. When you change a parameter, every feature, view, and drawing that depends on it updates automatically. The model stores design intent in a feature tree, making it an intelligent, editable record of how and why the part was built, not just what it looks like.

    Why does parametric CAD modeling matter for manufacturing?

    Parametric CAD modeling matters for manufacturing because it allows you to encode manufacturing constraints directly into the model. Minimum wall thickness, draft angles for injection moulding, tool access clearances, and tolerance relationships can all be driven parameters. When any dimension changes, those constraints still apply automatically. This means fewer DFM violations reaching the shop floor and fewer expensive tooling corrections.

    What is the difference between parametric design and direct modeling?

    Parametric modeling stores design intent in a history tree with driven dimensions and constraints. Changes propagate automatically. Direct modeling allows geometry to be pushed and pulled freely without a history, which is faster for one-off concepts and imported geometry. Parametric is better for products with multiple design iterations and manufacturing variants. Direct is better for quick concept work or modifying geometry from a scan or external source.

    Which CAD software is best for parametric design in manufacturing?

    SolidWorks and Creo Parametric are the most widely used for manufacturing-focused parametric design. SolidWorks leads in general manufacturing, consumer products, and medical devices. Creo leads in aerospace and defence where design intent management and model-based definition are critical. Fusion 360 is the strongest option for smaller teams and startups due to its cloud collaboration and accessible pricing.

    What is a design table in parametric CAD?

    A design table is a spreadsheet embedded in or linked to a parametric CAD model that drives multiple configurations from a single master model. Each row in the spreadsheet defines one configuration by specifying values for the key parameters. A single shaft model can generate 20 size variants from one design table without creating 20 separate files. Design tables are the most efficient tool for managing part families in parametric CAD.

    How does parametric design connect to AI and generative design in 2026?

    Parametric design is the foundation that makes generative design and AI-assisted CAD possible in 2026. AI tools use parametric relationships to explore thousands of geometry variants that all meet the functional constraints. Tools like Backflip AI convert scanned meshes into fully parametric models. Assisted parametric generation, where an AI creates multiple parametric variants based on functional criteria such as load, weight, and cost, is already available in ANSYS, Fusion 360, and CATIA. The parametric model is what gives AI-generated geometry meaning and editability.


    PTC on the principles of parametric modeling in professional CAD’

  • What Is BIM (Building Information Modeling)and How Does It Work with CAD? 2026 Guide

    What Is BIM (Building Information Modeling)and How Does It Work with CAD? 2026 Guide

    Introduction: The Question Every Engineer and Architect Faces

    At some point in your career in construction, architecture, or civil engineering, someone has asked you about BIM. Maybe your firm just mandated it. Maybe a client put it in the project specification. Maybe you have been using AutoCAD for a decade and you are trying to understand what all the noise is about.

    The short version: Building Information Modeling is not just a software upgrade. It is a fundamentally different way of thinking about what a design file is supposed to do. A CAD drawing shows what a building looks like. A BIM model knows what a building is made of, how much it costs, when each piece gets installed, and how it should be maintained for the next 50 years.

    That distinction has enormous practical consequences for how projects are designed, coordinated, built, and operated. This guide walks through exactly how BIM works, where it overlaps with CAD software, where the two serve different purposes, and what this means for engineers and architects working on real projects today.

    Quick definition:  BIM (Building Information Modeling) is a digital process that creates an intelligent, data-rich model of a building or infrastructure project. Unlike CAD which stores geometry, BIM stores information about materials, costs, schedules, and specifications linked directly to every element in the model.
    What Is BIM (Building Information Modeling)and How Does It Work with CAD? 2026 Guide

    What Is BIM? A Clear, No-Jargon Explanation

    BIM stands for Building Information Modeling. Each word matters.

    • Building: It covers not just buildings but infrastructure, bridges, tunnels, roads, utilities, and any constructed asset.
    • Information: Every element in the model carries data. A wall knows its material, fire rating, acoustic performance, cost, and the date it is scheduled for installation.
    • Modeling: The representation is three-dimensional and parametric, meaning changes to the model propagate intelligently across all views and documentation.

    The result is a living, coordinated digital asset that serves the entire project team, from design and engineering through construction and facility management. That is what BIM is in practice.

    BIM Is a Process, Not Just Software

    This is the part most people miss when they first encounter BIM. Buying a Revit license does not mean you are doing BIM. BIM methodology is about how information flows between disciplines, who owns which part of the model, how changes are communicated, and how the model is used after the building is constructed.

    A project team that uses Revit but still coordinates via emailed PDFs and resolves clashes on site is using BIM software without a BIM workflow. The software is only the tool. The process is the point.

    What Information Does a BIM Model Actually Contain?

    This is what separates BIM from geometry-only CAD approaches:

    • Physical properties: dimensions, material, weight, volume
    • Performance data: thermal resistance, fire rating, acoustic value, structural capacity
    • Cost data: unit rates, estimated totals, procurement status
    • Schedule data: installation sequence linked to the construction programme
    • Supplier information: manufacturer, product code, lead time, warranty
    • Maintenance data: service intervals, replacement parts, expected lifespan
    • Regulatory information: compliance with building codes and environmental standards

    When all of this sits inside the model rather than in disconnected spreadsheets and specification documents, the information stays coordinated and current as the design evolves. That is the fundamental value proposition of BIM in construction.

    BIM Dimensions Explained: From 3D to 7D

    You will often see BIM described in terms of dimensions: 3D BIM, 4D BIM, 5D BIM, and so on. Each dimension adds a layer of information to the model. Here is what each one means in practice.

    BIM DimensionWhat It AddsPractical meaning for your project
    3DGeometry and spaceVisual model, clash detection, spatial coordination
    4DTime / scheduleConstruction sequencing linked to model elements
    5DCost / quantitiesQuantities auto-extracted, cost tracking per element
    6DSustainabilityEnergy analysis, carbon footprint, material lifecycle
    7DFacility managementOperations data, maintenance schedules, asset tracking

    Which Dimensions Matter Most on Real Projects?

    3D BIM is now standard on any serious construction project. 4D and 5D BIM are increasingly required on large public sector and infrastructure projects, particularly in the UK, Australia, and Scandinavia where government mandates have pushed adoption. 6D and 7D are growing fastest in the data center, healthcare, and commercial real estate sectors where whole-life cost and facility operations justify the upfront investment in richer data.

    BIM vs CAD: What Is the Actual Difference?

    This is the most commonly searched question in this space and it deserves a direct, honest answer. The difference between BIM and CAD is not about 2D versus 3D. It is about what the file contains.

    AspectTraditional CADBIM
    Core output2D drawings or 3D geometryIntelligent data-rich model
    Information storedLines, arcs, dimensionsMaterials, costs, schedules, specs
    CollaborationFile-sharing, version confusionShared model environment
    Design changesManual redraw across sheetsModel updates propagate everywhere
    Clash detectionManual review, often missedAutomated, real-time detection
    Lifecycle coverageDesign and drafting phase onlyDesign through demolition
    Stakeholder accessEngineers and architects onlyAll disciplines, owners, FM teams
    Data intelligenceNone embedded in geometryEach element carries rich metadata
    Primary toolsAutoCAD, MicroStationRevit, ArchiCAD, OpenBIM tools

    The Wall Analogy

    Here is the clearest way to understand the distinction. Draw a wall in AutoCAD. You have drawn two parallel lines with some hatching between them. The file knows nothing else. It does not know it is a wall. It does not know what it is made of, whether it meets fire rating requirements, or how much it costs.

    Model a wall in Revit. The model element knows it is a wall. It knows its type, its layers, the material of each layer, the thermal properties of each material, the cost per square meter, the fire rating, and the structural load it can carry. Change the wall type and every drawing that includes that wall updates automatically. The wall is not a drawing element. It is an intelligent object.

    That is not a small difference. That is a different category of tool serving a different purpose. Understanding this is the foundation of understanding how BIM and CAD work together rather than treating them as competitors.

    Key point:  BIM does not make CAD obsolete. It changes where CAD fits in the workflow. CAD handles precision detailing and fabrication documentation. BIM handles model coordination, information management, and lifecycle data.

    How BIM Works: The Workflow Step by Step

    Understanding how BIM works in practice requires looking at how a typical project progresses through the BIM process. This is not the theory. This is the actual workflow on a coordinated BIM project.

    How BIM Works step by step workflow

    Step 1: Setting Up the BIM Execution Plan

    Before any modeling begins, the project team establishes a BIM Execution Plan (BEP). This defines the BIM standards for the project: which software will be used, what level of detail is required at each stage, who owns which model, how files will be shared, and what the Common Data Environment (CDE) platform will be.

    Getting this right at the start is critical. Projects that skip the BEP and jump straight into modeling almost always create coordination problems later when different disciplines are using incompatible file formats, naming conventions, and coordinate systems.

    Step 2: Developing Discipline Models

    Each discipline builds its own model. The architect models walls, floors, roofs, doors, and windows in Revit Architecture. The structural engineer models the frame, columns, beams, and foundations in Revit Structure or a structural analysis tool. The MEP engineer models ductwork, pipework, cable trays, and equipment in Revit MEP.

    Each model is developed to the required Level of Development (LOD) for that project stage. LOD 100 is a conceptual massing model. LOD 400 is fabrication-ready with construction-level detail. The LOD framework gives the entire team a shared language for how much information each element should contain at each stage.

    Step 3: Model Coordination and Clash Detection

    The discipline models are federated (combined) in a coordination platform such as Navisworks or BIM Collaborate Pro. The coordination team runs clash detection in BIM to identify where elements from different models intersect or conflict.

    A duct from the mechanical model passing through a structural beam. A drainage pipe conflicting with a foundation element. A lighting fixture too close to a sprinkler head. These are the clashes that cost money to fix on site and pennies to resolve on screen. Clash detection is one of the highest-value outputs of a properly coordinated BIM process.

    Step 4: Drawing Production from the BIM Model

    Here is where CAD and BIM most directly intersect. Floor plans, sections, elevations, and details are generated directly from the BIM model as drawing views. Because the views are driven by the model, they update automatically when the model changes. No more updating the plan and forgetting to update the section.

    Complex fabrication details, specialist trade drawings, and certain annotation-heavy documents are still often completed in AutoCAD or exported to CAD format for specialist contractors. The BIM model produces the coordinated geometry. CAD tools add the fabrication-level detail.

    Step 5: Quantity Takeoffs and Cost Planning

    One of the most immediately valuable BIM benefits for construction is automated quantity extraction. Because every element in the model has material and dimensional properties, the software can generate a complete schedule of quantities directly from the model. Concrete volume, reinforcement weight, number of windows by type, area of external cladding by material: all of it extracted in minutes rather than days.

    Cost planners and quantity surveyors connect these schedules to cost databases to produce early-stage estimates that are directly tied to design decisions. Change the structural system and the cost updates. That feedback loop accelerates decision-making significantly.

    Step 6: Construction and Site Integration

    During construction, the BIM model is used for site coordination, progress tracking, and as-built recording. 4D BIM links model elements to the construction programme so the site team can visualize construction sequencing and identify logistical clashes before they happen on site.

    Mobile BIM viewers allow site engineers and foremen to access the model on tablets directly on site, comparing as-built conditions to the design model and recording issues for resolution.

    Step 7: Handover and Facility Management

    At project completion, the BIM model is handed over to the building owner or facilities management team as an as-built record. The BIM for facilities management use case is arguably the most valuable and the most underutilized. The model contains equipment schedules, maintenance intervals, warranty information, and spare parts data that FM teams need for the entire operational life of the building.

    When BIM handover is done properly, the FM team receives a digital twin of the building they can use to plan maintenance, simulate changes, and manage assets through the building’s entire life.

    How BIM and CAD Work Together on Real Projects

    The framing of BIM vs CAD as a competition misrepresents how most projects actually operate. In practice, the two coexist and complement each other throughout the project lifecycle.

    Where BIM Leads

    • Multidiscipline coordination and clash detection
    • Automated quantity takeoffs and schedule generation
    • Design change management and drawing coordination
    • Energy analysis and building performance simulation
    • Construction sequencing and programme integration
    • Asset data management and FM handover packages

    Where CAD Still Leads

    • Complex fabrication drawings for specialist subcontractors
    • Site engineering and setting-out drawings
    • Detailed civil and infrastructure drawings where BIM tools are less mature
    • 2D annotation-heavy documentation like drainage networks and road layouts
    • Disciplines and regions where BIM adoption has not yet reached standard
    • Export to DWG format for contractors and consultants outside the BIM environment

    The IFC Bridge Between BIM and CAD

    IFC (Industry Foundation Classes) is the open standard that allows different BIM software platforms and CAD tools to share data without being locked to one vendor. An architect working in ArchiCAD can share an IFC model with a structural engineer using Tekla Structures and an MEP consultant using Revit, without any of them needing to own the same software.

    IFC is the file format equivalent of DWG in the CAD world: the common language that makes cross-platform collaboration possible. Understanding OpenBIM and IFC is increasingly important for anyone working in a multidiscipline project environment.

    BIM Software: Key Platforms and What They Do

    The BIM software market is dominated by a few major platforms, each with particular strengths for different disciplines and project types.

    SoftwareTypeBest forBIM standardCAD output
    Autodesk RevitFull BIMArchitecture / MEPIndustry-wideDWG, IFC, NWC
    AutoCADCAD / 2DDrafting, documentationLimitedDWG universal
    ArchiCADFull BIMArchitectureOpenBIM / IFCDWG, IFC, BCF
    NavisworksBIM reviewClash detectionCoordinationNWD, NWF
    Civil 3DBIM + CivilInfrastructureGrowingDWG, LandXML
    Bentley AECOsimFull BIMLarge infrastructureISO standardsDGN, IFC
    OpenBIM / IFCStandardCross-platform shareISO 16739IFC (open)

    Autodesk Revit: The Market Standard

    Autodesk Revit is the most widely adopted BIM software for architects and MEP engineers globally. It handles architectural modeling, structural framing, and building services in a single environment with strong interoperability within the Autodesk ecosystem. Its dominance in the UK, US, Australia, and most of Europe makes Revit proficiency effectively mandatory for BIM practitioners in those markets.

    Navisworks: Coordination and Clash Detection

    Navisworks is not a modeling tool. It is a coordination and review platform that aggregates models from different software packages into a single federated model for clash detection, 4D construction simulation, and project review. Most major BIM projects use Navisworks at the coordination stage regardless of which modeling tools the disciplines use.

    ArchiCAD: The OpenBIM Alternative

    Graphisoft ArchiCAD has a strong following particularly in Europe and Australasia. Its commitment to OpenBIM and IFC export is more mature than Revit’s historically, making it a strong choice for projects involving international teams or public clients requiring vendor-neutral data exchange. The BCF (BIM Collaboration Format) standard for issue tracking also originated in the ArchiCAD ecosystem.

    BIM Dimensions Infographic 3D Through 7D

    BIM Maturity Levels: Where Your Project or Organisation Sits

    BIM adoption does not happen all at once. The BIM maturity levels framework describes the stages of adoption from paper-based working to fully integrated digital delivery.

    BIM Level 0

    No digital collaboration. Paper-based or 2D CAD only with no data sharing. Still found in smaller firms and specialist trades in some markets but increasingly rare on commercial projects.

    BIM Level 1

    CAD use in 2D or 3D but with no shared model environment. Files are shared by email or FTP. Each discipline works in isolation. The drawing set is the primary coordination mechanism. Most construction firms operated at Level 1 through most of the 2000s and 2010s.

    BIM Level 2

    The current UK government mandate and the target standard for major infrastructure and public sector construction globally. Disciplines produce their own BIM models and share them in a Common Data Environment (CDE). Models are federated for coordination. The client receives a data-rich handover package at project completion. BIM Level 2 is where most large commercial and public sector construction projects currently operate.

    BIM Level 3 (OpenBIM / iBIM)

    A single, integrated, cloud-based model shared across all disciplines in real time. Full lifecycle data integration from design through demolition. True digital twin capability where the model reflects the actual state of the built asset continuously. Level 3 is the direction the industry is moving but is not yet standard practice on most projects in 2026.

    AI in BIM Workflows: What Is Actually Changing in 2026

    Artificial intelligence is starting to have a measurable impact on how BIM workflows operate, and it is worth understanding where the real value is showing up rather than the hype.

    Automated Clash Detection and Resolution

    Traditional clash detection flags every geometric conflict and asks the coordination team to resolve them one by one. AI-assisted clash detection is beginning to prioritize clashes by severity and suggest standard resolutions for common conflict types, reducing the time coordination teams spend on routine issues.

    Generative Design in BIM

    Autodesk’s generative design tools within the 3DEXPERIENCE platform and integrated with Revit can explore thousands of design configurations against performance constraints such as structural efficiency, daylighting, energy consumption, and cost. The engineer or architect sets the constraints. The AI generates the options. The human selects and refines the most promising direction. This is a genuine workflow change, not a demonstration feature.

    AI for BIM Documentation

    This is where tools like Claude have a direct and practical application. BIM models produce enormous amounts of structured data: quantity schedules, room data sheets, equipment schedules, material specifications, inspection records. Turning that data into readable technical documents, reports, and handover packages has historically been a significant manual effort.

    Using AI for BIM documentation and AI workflow engineering principles, engineers and BIM managers can now prompt an AI tool with structured BIM data exports and receive formatted technical reports, FM handover documentation, specification clauses, and RFI responses in minutes rather than days. The BIM model supplies the data. AI handles the communication layer.

    Natural Language Queries on BIM Data

    Emerging tools are connecting natural language interfaces directly to BIM databases, allowing project team members to ask questions like ‘show me all the doors in the building that are not fire rated to the required standard’ or ‘what is the total volume of concrete in the ground floor slab’ without needing to build custom schedules or run database queries.

    For engineers and architects who want to understand how AI tools fit into technical workflows more broadly, the  is the authoritative reference for BIM standards including IFC, BCF, and the full OpenBIM specification suite.

    BIM Mandates and Industry Adoption: Where the World Stands in 2026

    Government and institutional mandates have been the most powerful driver of BIM adoption globally. Understanding where mandates exist helps engineers and firms prioritize their investment in BIM capability.

    • United Kingdom: BIM Level 2 has been mandatory on all UK government-funded construction projects since 2016. The UK is now moving toward ISO 19650 compliance as the new standard framework, which builds on Level 2 and provides an internationally aligned methodology.
    • Europe: The EU’s public procurement directive encourages BIM on public projects, and countries including Finland, Norway, the Netherlands, Denmark, and Germany have active BIM mandates or strong government-backed adoption programs.
    • United States: The GSA (General Services Administration) has required BIM on major federal projects since 2007. State-level and sector-specific mandates vary but adoption is high in commercial construction, healthcare, and education.
    • Australia: BIM is required on major federal infrastructure projects and is increasingly standard in state government construction programs. Australian standards largely follow the UK and ISO 19650 framework.
    • Middle East: The UAE, Saudi Arabia, and Qatar have driven significant BIM adoption through major infrastructure programs. Dubai’s BIM mandate for buildings above a certain scale has made Revit proficiency a standard requirement for firms working in the region.

    Common BIM Mistakes and How to Avoid Them

    • Treating BIM as a software purchase rather than a process change. Buying Revit licenses without changing coordination workflows produces expensive, poorly managed models. The process redesign is harder than the software training.
    • Skipping the BIM Execution Plan. Without an agreed BEP, each discipline makes different assumptions about coordinate systems, naming conventions, model ownership, and file sharing. The coordination model becomes unusable.
    • Over-modeling at early stages. Adding LOD 400 detail at a concept stage wastes time and creates a model that is too rigid to accommodate the design changes that inevitably come in early project phases.
    • Ignoring the handover requirement. Many project teams build excellent BIM models during design and construction and then hand over a PDF set at completion. The client receives none of the operational value that BIM makes possible.
    • Not training the full team. BIM coordination only works if all disciplines on a project are producing compatible models. A project where the architect uses Revit but the structural engineer sends DWG files is a coordination project, not a BIM project.

    Who Benefits Most from BIM and Who Still Needs CAD

    BIM Is the Right Tool If You Are:

    • An architect or designer on commercial, healthcare, education, or public sector buildings
    • An MEP engineer coordinating services across multiple disciplines on a large project
    • A structural engineer working on projects where digital coordination with architect and MEP is required
    • A main contractor managing subcontractor coordination and construction programming
    • A facilities manager responsible for a complex building asset over its operational life
    • A client or owner investing in infrastructure who wants digital asset data at handover

    CAD Remains the Right Tool If You Are:

    • A specialist subcontractor producing fabrication shop drawings in a trade-specific tool
    • A civil engineer working on roads, drainage, and utilities where BIM tool maturity is still developing
    • A small design practice on residential or small-scale commercial work where BIM overhead is not justified
    • An engineer in a sector or region where BIM is not yet the coordination standard
    • Producing detailed annotation-heavy drawings for regulatory submission where CAD workflow is faster

    Conclusion: BIM and CAD Are Better Together Than Either Is Alone

    The question ‘what is BIM‘ has a technical answer and a practical answer. Technically: it is a data-rich parametric modeling process where every element carries structured information about what it is, not just what it looks like. Practically: it is the infrastructure that allows complex building projects to be designed, coordinated, built, and operated without the information loss and rework that has characterized the construction industry for decades.

    BIM does not replace CAD. It changes where CAD belongs in the process. CAD tools handle precision detailing, specialist fabrication documentation, and disciplines where BIM tool maturity has not yet reached the same level. BIM handles coordination, information management, lifecycle data, and the intelligent model that the whole project team works from.

    The engineers and architects who understand how to operate effectively in both environments, who know when to use Revit for BIM coordination and when to use AutoCAD for detailed documentation, and who are beginning to incorporate AI tools to handle the documentation and data communication layer, are the ones who will do the most valuable work on the most complex projects in the years ahead.

    Learn the process first. The software follows from understanding the workflow.

    Frequently Asked Questions

    What is BIM in simple terms?

    BIM stands for Building Information Modeling. It is a process of creating and managing a digital representation of a building or infrastructure project that contains not just geometry but also data such as materials, costs, schedules, and specifications. Unlike a CAD drawing that shows what something looks like, a BIM model contains information about what it is and how it behaves throughout its entire lifecycle.

    What is the difference between BIM and CAD?

    CAD produces geometry: lines, arcs, and surfaces that represent a design visually. BIM produces intelligent models where every element carries embedded data. A wall in AutoCAD is a set of lines. The same wall in Revit knows its material, thermal resistance, cost, fire rating, and structural load. BIM enables automatic quantity takeoffs, clash detection, and lifecycle management that CAD cannot support.

    Does BIM replace CAD?

    BIM does not fully replace CAD. CAD tools like AutoCAD remain essential for 2D documentation, detailed fabrication drawings, and disciplines where BIM tools are not yet standard. In practice, most large construction projects use both: BIM platforms for coordination and model management, and CAD tools for detailed drawing production and specialist trade work.

    What software is used for BIM?

    The most widely used BIM software includes Autodesk Revit (dominant in architecture and MEP), Navisworks (clash detection and coordination), ArchiCAD, Bentley AECOsim, and Civil 3D for infrastructure. The IFC open standard allows different BIM tools to share data across platforms without being locked to one vendor.

    What are the levels of BIM?

    BIM maturity is described in levels: Level 0 is paper-based drawing with no collaboration. Level 1 is basic CAD in 2D or 3D without data sharing. Level 2 is collaborative BIM with data-rich models shared between disciplines, currently the UK government mandate standard. Level 3 is fully integrated, cloud-based BIM with a single shared model across the entire project lifecycle, often called OpenBIM or iBIM.

    Can AI be used in BIM workflows?

    Yes. AI tools are being used in BIM workflows for automated clash detection, generative design exploration, energy performance prediction, and natural language documentation. Tools like Claude can assist with BIM documentation, specification writing, quantity takeoff interpretation, and structuring the data outputs from BIM models into readable technical reports, making the information layer of BIM significantly faster to produce and communicate.


    buildingSMART International: BIM standards and OpenBIM specifications’

  • How to Read Engineering Blueprints: A Practical Guide for Non-Engineers

    How to Read Engineering Blueprints: A Practical Guide for Non-Engineers

    A set of engineering blueprint drawings lands on your desk. You need to review them, approve them, or pass them to a fabricator. But the sheets are covered in symbols, numbers, dashed lines, and abbreviations that make no immediate sense. You are not alone, and this is not as complicated as it looks.

    Learning how to read engineering blueprints is a practical skill anyone can develop. You do not need an engineering degree to understand what a drawing is communicating. You need a clear framework for where to look and what each element means. This guide walks you through that framework in plain language, step by step.

    What is Engineering Blueprint?

    An engineering blueprint drawing is a technical document that communicates the exact geometry, dimensions, materials, tolerances and manufacturing requirements of a part or assembly. The name comes from the blue-tinted prints used in the 19th and 20th centuries. Today it refers to any formal technical drawing, whether printed or digital.

    Annotated Engineering Blueprint Drawing with Key Areas Labelled

    Step 1: Always Start with the Title Block

    Before you look at a single line of geometry, go to the title block. It sits in the bottom-right corner of every engineering blueprint drawing, in every industry, on every sheet. It is the drawing’s identity card. Everything else you read on the sheet depends on confirming this information first.

    Title Block FieldWhat It ContainsWhy Check It First
    Drawing TitleThe name of the part, assembly or system being drawnConfirms you have the right drawing for your project
    Drawing NumberA unique identifier in the document control systemUse this in all correspondence and purchase orders
    Revision LevelA letter or number such as Rev A, Rev B, or Rev 3Outdated revisions cause manufacturing errors
    ScaleThe ratio between drawing size and actual part sizeTells you whether dimensions can be read visually
    UnitsMillimetres, inches, or other unit systemMixing metric and imperial is a costly mistake
    DateWhen the drawing was created or last revisedCross-reference with your project timeline
    Drawn By / Approved ByNames and signatures of drafter and approving engineerConfirms the drawing went through a review process
    Company / ClientOrganisation that produced or commissioned the drawingConfirms which standards and formats apply

    Watch out:  The single most common and costly mistake when working with engineering drawings is using an outdated revision. Before reviewing any drawing in detail, confirm the revision level matches your project’s current issued document register. A drawing that looks fine might be three revisions behind the current design.

    Also in the Title Block: The Projection Symbol

    Look for a small symbol near the title block that shows a truncated cone viewed from two angles. This tells you which projection standard the mechanical engineering blueprint uses.

    • Third-angle projection (circle on the left, cone tip pointing right): Used in the United States, Canada, and Australia. Each view is placed on the same side as the direction you are looking from.
    • First-angle projection (circle on the right, cone tip pointing left): Used in Europe, Asia, and most of the rest of the world. Each view is placed on the opposite side to the direction you are looking from.

    Important:  If you read a first-angle drawing as if it were third-angle (or vice versa), the views appear mirrored. This leads to parts being built with holes, features, and interfaces in the wrong positions. Always check the projection symbol before reading the views.

    Step 2: Understand How the Views Work

    Engineering drawings show a 3D object as a series of flat 2D views, like photographs of the part from different directions. The standard set is a front view, a top view, and a side view. Together, these three views define the complete shape of the part.

    Think of it this way. If you placed a part inside a glass box and drew what you could see through each face, then unfolded the box flat onto paper, you would have an orthographic drawing. Each face of the box becomes one view on the sheet.

    View NameWhat It ShowsPosition on Sheet
    Front ViewThe most descriptive face of the part, chosen to show the most geometryCentre-left of the drawing sheet
    Top ViewLooking directly down onto the partDirectly above the front view
    Right Side ViewLooking at the right side of the partTo the right of the front view (third-angle)
    Section ViewA cut-open view showing internal geometry that would be hiddenAnywhere on sheet, labelled e.g. Section A-A
    Detail ViewAn enlarged view of a small or complex area at a larger scaleAnywhere on sheet, labelled e.g. Detail B
    Isometric ViewA 3D-like pictorial view showing length, width and depth, for referenceUsually top-right corner, marked NOT TO SCALE

    Tip:  When you first open a drawing sheet, identify all the views before you read any dimensions. Trace how each view relates to the others. The front view drives the layout and the other views align to it. Understanding this spatial relationship is the foundation for reading the rest of the drawing correctly.

    Step 3: Decode the Lines and Dimensions

    Not all lines on a mechanical engineering blueprint are the same. Each line type has a specific meaning, and misreading them is one of the most common errors for people new to technical drawings.

    Line TypeAppearanceWhat It Means
    Visible (object) lineSolid, thick continuous lineA real edge visible in this view. The actual boundary of the part.
    Hidden lineMedium-weight dashed lineA real edge that exists but is hidden behind another feature in this view.
    Centre lineThin alternating long-short dashThe axis or centre of a circular feature such as a hole or bore. Not a physical edge.
    Dimension lineThin line with arrowheads at each endIndicates the distance being measured. The value sits above or within the line.
    Extension lineThin line from part edgeConnects the part geometry to the dimension line and shows what is being measured.
    Section/cutting planeThick dash-dot line with arrowsShows where an imaginary cut is made for a section view. Arrows show viewing direction.
    Phantom lineThin long-short-short dashShows adjacent parts, alternate positions or motion paths. Not part of the actual component.
    Break lineThin wavy or zigzag lineIndicates a portion of the part has been omitted from the drawing to save space.

    Reading Dimensions

    Dimensions tell the manufacturer the exact size of every feature. Here are the main types you will encounter on any engineering blueprint drawing:

    • Linear dimensions: Straight-line measurements between two points, shown with a dimension line and a value. The most common type.
    • Angular dimensions: Measurements of angles between two surfaces or lines, shown in degrees.
    • Diameter dimensions: Shown with the diameter symbol (a circle with a diagonal line through it) before the number. Always applies to circular features.
    • Radius dimensions: Shown with R before the number. Applies to arcs, fillets and rounded corners. Measured from centre to edge.
    • Depth dimensions: Shown with a downward arrow symbol. Common on hole callouts to specify how deep the hole goes.

    Tolerances on Dimensions

    Dimensions carry tolerances, which are the allowable variation from the stated value. You will see these in three main forms:

    • Plus/minus values: For example, 25.00 plus or minus 0.10 means the finished dimension can be anywhere from 24.90 to 25.10.
    • Limit dimensions: The upper and lower limits are stated directly, such as 25.10 / 24.90.
    • GD&T controls: Feature control frames that define geometric variation in addition to or instead of size tolerances.

    Important:  Never measure directly off a printed engineering blueprint drawing to determine dimensions. Drawings are not printed at a guaranteed 1:1 scale and even minor printing variation makes direct measurement unreliable. Always read the dimension value written on the drawing.

    Step 4: Read the Engineering Blueprint Symbols, Notes, and Callouts

    Beyond dimensions and views, engineering blueprint symbols communicate requirements that would take several lines of text to describe in words. Knowing the most common ones means you can scan a drawing and understand what is being asked of the manufacturer without needing to ask an engineer to translate every callout.

    Symbol / NotationLooks LikeWhat It Means
    Surface finishTick mark with a number (Ra value)How smooth a surface must be. Ra 1.6 is smoother than Ra 6.3. Applies to mating and sealing surfaces.
    DiameterCircle with diagonal line before numberThe feature is circular. This is the full width through the centre, not the radius.
    RadiusR before a numberHalf the diameter. Used for arcs, rounded corners and fillets.
    CounterboreStepped circle symbolA larger flat-bottomed hole above the main hole. Used to recess bolt heads flush with the surface.
    CountersinkAngled V symbolA conical recess at the top of a hole for a flush countersunk screw head.
    Thread calloute.g. M12 x 1.75 or 1/2-13 UNCSpecifies the thread size, pitch and type for holes or external threads such as bolts and studs.
    TYP (Typical)Written after a dimension valueThis dimension applies to all identical features unless otherwise noted, not just the one it points to.
    REF (Reference)Written in brackets: (50) or 50 REFFor reference information only. Not to be used for inspection or manufacturing.
    NTS (Not to Scale)Written below a dimension or viewThis view or dimension is not drawn proportionally. Read the written number, do not measure visually.

    The General Notes Section

    Look for a notes section on the drawing, usually in the upper-left corner or near the title block. General notes apply to the entire drawing and cover things that cannot be expressed graphically: default tolerances for features without individual dimensions, surface treatment requirements, material standards, heat treatment specs, inspection requirements, and applicable regulatory or industry standards.

    A critical rule:  When a general note conflicts with a specific dimension or symbol shown on the drawing, the specific instruction takes precedence. The general note applies only where nothing more specific has been stated.
    Common Engineering Blueprint Symbols Reference Sheet

    Engineering Blueprint Examples: What You Actually See and What It Means

    Reading engineering blueprints is much easier when you have seen real examples of common callouts and know exactly what action to take. The table below covers the situations you are most likely to encounter when reviewing a mechanical engineering blueprint as a non-engineer.

    Think of this as a translation guide. Left column is what the drawing shows. Middle column is what it actually means. Right column is what you should do as the reviewer.

    What You See on the DrawingWhat It MeansWhat You Should Do
    50 +0.0 / -0.2 next to a circleA hole with diameter 50mm, but it can be 49.8mm minimum. The plus side has zero tolerance.This is a precision hole. Flag to the engineer if the tolerance seems tighter than usual for the application.
    M8 x 1.25 inside a circle with arrowAn M8 metric threaded hole with 1.25mm thread pitchConfirm the correct bolt or stud is specified in the BOM. Thread size must match the fastener.
    Dashed rectangle inside a solid outlineA hidden internal pocket or cavity not visible in this viewDo not assume the part is solid. Check the section view to understand the internal geometry.
    Section A-A with a line and arrowsA cut has been made along this line. Section view A-A shows what is inside.Find the section view labelled A-A on the sheet or on the referenced sheet.
    Ra 1.6 on a surface edgeThat surface must be machined smooth to 1.6 microns average roughnessSmoother surfaces cost more to machine. Verify this is genuinely required for the application.
    (75) in brackets near a dimensionThis is a reference dimension only. Not used for inspection.Do not use this number for manufacturing or checking. It is informational only.
    REV C in the title blockThis is the third revision of the drawingCheck your document register. Confirm Rev C is the currently issued version before proceeding.

    Real-World Example: Reviewing a Structural Steel Fabrication Package

    You are a project manager reviewing a structural steel fabrication drawing package before issuing it to a fabricator for pricing. You are not a structural engineer, but you need to confirm the package is complete and ready to issue.

    Here is exactly what you do:

    1. Confirm every sheet carries the same revision level. A mixed-revision package is a fabrication risk. If sheet 1 says Rev C and sheet 3 says Rev B, stop. Do not issue until the engineer confirms which sheets are current.
    2. Confirm the title block on each sheet references the correct project number and part descriptions. Mislabelled sheets cause real problems at a fabrication shop.
    3. Scan for revision clouds. These are the cloud-shaped borders around changed areas. If a revision cloud exists, check the revision table to confirm the change has been documented and signed off.
    4. Check for any RFI notations or open queries. An RFI marker means a question has been raised that has not been answered. Do not issue to fabrication with open RFIs.
    5. Confirm units are consistent across all sheets. If the drawing set uses millimetres throughout, every sheet should say mm. A single sheet using inches in a metric package causes manufacturing errors.

    You do not need to verify every dimension or tolerance callout. That is the engineer’s role. Your job is to confirm the package is administratively complete, internally consistent, and shows no outstanding issues before it leaves your hands.

    The Non-Engineer Blueprint Review Checklist

    Use this checklist every time a drawing set arrives for review, approval, or issue to a supplier. You do not need engineering expertise to complete it. These ten checks catch the administrative and structural problems that cause the most expensive mistakes downstream.

    Engineering Blueprint Reading Checklist Visual
    What to CheckWhy It Matters
    ☐  Confirm the revision level matches your project document registerOutdated drawings cause manufactured parts that do not match current design intent
    ☐  Verify the drawing number and title match the expected part or assemblyMislabelled drawings get issued to the wrong supplier or used for the wrong job
    ☐  Check that units are stated and consistent across all sheetsMetric/imperial confusion is one of the most costly errors in manufacturing
    ☐  Identify the projection method (first-angle or third-angle)Misreading the projection direction produces mirrored or inverted parts
    ☐  Confirm all views are present and labelled with section references matchingMissing or misreferenced views leave geometry undefined or ambiguous
    ☐  Scan for revision clouds. Have all flagged changes been resolved?Unresolved revision clouds indicate the design is not yet finalised
    ☐  Check for any RFI notations or open queries on the drawingOpen RFIs mean unresolved questions. Do not issue to fabrication.
    ☐  Confirm the general notes section is present and legibleMissing notes leave default tolerances, surface treatments and material specs undefined
    ☐  Verify the drawing has been signed or approved in the title blockUnapproved drawings have not been through a design review. Issuing them is a risk.
    ☐  Check the scale is stated and marked NTS where applicableUnstated or incorrect scale creates confusion about whether dimensions can be read visually

    External Resource:  For the international standard that governs engineering drawing practice, see ISO 128 (Technical Drawings: General Principles of Presentation) published by the International Organization for Standardization at iso.org. This is the foundational standard that defines line types, projection methods, and drawing conventions referenced in this guide.

    The Bottom Line

    Reading engineering blueprints does not require an engineering degree. It requires knowing where to look, what each element means, and what questions to ask when something is missing or unclear.

    The title block tells you what you are looking at and whether it is current. The projection symbol tells you how to read the views. The line types tell you what is real geometry and what is reference information. The engineering blueprint symbols and dimension callouts tell the manufacturer exactly what to build. The general notes fill in the requirements that cannot be shown graphically.

    Together, these elements give you enough information to review a mechanical engineering blueprint confidently, catch the issues that matter, and communicate clearly with the engineers and fabricators involved. The checklist in this guide covers the ten checks that catch the majority of drawing-related problems before they reach the shop floor. Use it every time a drawing set crosses your desk.

    Know where to look. Read what it says. Ask when something is missing.

    Working With Engineering Drawings and Need Support?
    Whether you need a new drawing set produced, an existing one reviewed and updated, or a legacy drawing converted to current CAD standards, SimuTecra’s team handles the full range of engineering drafting work. Every drawing we produce is structured to be read correctly the first time.
    Send us your project details and we will come back with a clear scope and timeline.
    Reach out to us today, Simutecra

    Frequently Asked Questions

    What is an engineering blueprint?

    An engineering blueprint is a technical drawing that communicates the exact dimensions, materials, tolerances and features of a part or assembly to a manufacturer. Today the term covers both traditional blue-line prints and modern CAD-produced engineering drawing blueprints. The purpose is the same: give the maker everything needed to build the part correctly the first time.

    What is the difference between first-angle and third-angle projection?

    Both methods show the same three views of a part but arrange them differently on the sheet. In third-angle projection (used in the US, Canada and Australia), each view is placed on the side you are looking from. In first-angle projection (used in Europe and Asia), each view is placed on the opposite side. A small projection symbol in the title block tells you which method is used. Reading one as the other produces mirrored parts.

    What does NTS mean on an engineering drawing?

    NTS stands for Not to Scale. It means the feature or view is not drawn at a reliable proportion. When you see NTS, always use the written dimension value and never try to measure the feature visually off the sheet.

    How do I know which dimension takes priority if values conflict?

    Specific dimensions shown directly on the drawing geometry always override general notes. If two dimensions appear to conflict with each other, that is a drawing error. Raise it as an RFI (Request for Information) and do not send the drawing to fabrication until the discrepancy is resolved in writing.

    What is a revision cloud on an engineering drawing?

    A revision cloud is a curved, cloud-shaped border drawn around an area that changed from the previous revision. It is a visual flag so reviewers can quickly spot what is new. The change is also recorded in the revision table with the revision letter, a brief description and the date.

    Do I need to understand GD&T symbols to review an engineering blueprint drawing?

    For an administrative review covering revision level, completeness and approval status, no. For a more thorough technical review, a basic understanding of GD&T helps you confirm that critical tolerances are properly specified. Our separate guide on GD&T covers the symbols in detail if you need to go further.

  • AI Agents in Mechanical Engineering: Beyond Prompt Engineering

    AI Agents in Mechanical Engineering: Beyond Prompt Engineering

    The Tool You Are Using Right Now Might Already Be Obsolete

    Most engineering teams using AI today follow the same basic pattern. An engineer types a question. The AI responds. The engineer reads the answer, copies what is useful, and manually applies it. Then they type the next question.

    This is useful. It is also the first generation of AI agents engineering thinking, and in 2026 it is being rapidly surpassed by something more capable.

    AI agents in mechanical engineering do not wait for the next prompt. They execute multi-step workflows autonomously: read CAD geometry, check against your standards, run the review, flag the issues, and deliver a structured report. The engineer reviews findings and makes the decisions. The agent handles everything between.

    This article explains what agentic AI engineering is today, what it looks like in real engineering deployments, which tools lead the space, and how your team can start building agent workflows without overhauling what already works.

    Industry Data: AI Agents Engineering 2026 Survey
    DataCoLab survey of 250 engineering leaders (2025): 95% view AI adoption as essential over the next two years, with nearly half calling it a matter of survival. Only 3% report achieving transformational impact so far.
    SimScale State of Engineering AI 2025: 93% expect AI to deliver substantial productivity gains. The 10:1 expectation gap exists because most teams are deploying AI tools on top of outdated workflows rather than integrating agents deeply.
    Gartner 2026:
    50% of cross-functional supply chain management solutions will use intelligent agents to autonomously execute decisions by 2030. Engineering is among the fastest-moving sectors.
    McKinsey:
    AI-centric organisations are achieving 20-40% reductions in operating costs through automation, faster cycle times, and more efficient talent allocation.

    What Is an AI Agent and How Is It Different From a Chatbot

    The distinction matters enormously for engineering teams choosing tools. Here is how do AI agents work in engineering explained clearly.

    Definition: What Is an AI Agent in Mechanical Engineering
    what is an AI agent in engineering: An AI agent in mechanical engineering is a software system that uses an LLM as its reasoning engine, has direct access to engineering data (CAD models, drawings, standards, simulation outputs), and executes multi-step workflows autonomously. Unlike a chatbot that responds to one prompt at a time, an agent understands the goal, plans the steps, takes actions using real engineering data, checks results, and iterates until the task is complete.

    AI Agent vs Chatbot Engineering: The Difference at a Glance

    What MattersChatbot / LLM Prompt ToolAI Agent
    How it worksOne prompt, one response, waitagentic AI: plans and runs a full workflow
    What triggers itYou type a promptAn event: file upload, design request, review submission
    Data accessOnly what you paste inReads native CAD, drawings, PLM data, standards library
    ActionsGenerates text onlyTakes real actions: runs checks, flags issues, updates outputs
    OutputText you apply manuallyStructured report integrated into your engineering workflow
    MemorySession onlyPersistent across tasks, learns from your engineering context
    90%faster design reviewsEngineering teams using bananaz AI agents report completing design reviews up to 90% faster than their previous manual process (bananaz AI, 2026).
    3%achieving transformational resultsOnly 3% of hardware engineering companies report significant AI gains despite 95% viewing it as essential. The gap: most teams use AI as a chatbot, not as an agent. (CoLab survey, 250 engineering leaders, 2025)

    Five Types of AI Agents Already in Production in Engineering

    Not all AI agents in mechanical engineering do the same thing. Each agent type targets a specific workflow stage. Here are the five categories in production use in 2026, with the real tools behind each one.

    01CAD Copilot Agents: In-Software Automation
    What it does: Operate directly inside the CAD environment. Automate repetitive sequences (bulk exports, drawing templates, fillet updates across assemblies), suggest design improvements from assembly context, check standards compliance in real time, and execute multi-step operations that previously took dozens of manual clicks.
    Real tools: MecAgent (SolidWorks, Inventor, Fusion 360, Creo). Onshape AI Advisor (PTC). SolidWorks AURA (Dassault).
    CAD AI agent  x  MecAgent CAD copilot
    02Design Review Agents: Automated Drawing and CAD Checks
    What it does: Read native CAD geometry and 2D drawings. Check against your organisational standards and custom checklists. Flag DFM issues, identify cross-sheet inconsistencies, check title blocks and BOM consistency. Generate structured markup reports. Run the same checks identically every time, eliminating the variability of rotating human reviewers.
    Real tools: CoLab AutoReview (native CAD, DFM analysis, standards checklists). bananaz AI (model comparison, change tracking, 90% faster reviews).
    AI agent design review  x  CoLab AutoReview agent  x  autonomous CAD review
    03Simulation Setup Agents: Geometry to Ready-to-Run
    What it does: Interpret CAD geometry and simulation objectives. Recommend boundary conditions, configure mesh settings, set up load cases. Reduce FEA and CFD setup time from hours to minutes. Accessible to engineers without specialist simulation expertise.
    Real tools: SimScale AI (guided setup, automated meshing, cloud simulation). Ansys Discovery AI (real-time structural feedback during modelling). MecAgent (FEA prep from inside CAD).
    AI agents for FEA automation  x  AI agent simulation setup  x  SimScale agentic AI 2026
    04Generative Design Agents: Constraints to Geometry
    What it does: Accept engineering requirements (load paths, material grades, weight targets, manufacturing method) and autonomously generate and rank geometry candidates. Run the generative optimisation loop without requiring manual iteration.
    Real tools: Autodesk Fusion Generative Design. PTC Creo GDX (results returned as editable B-Rep). Siemens NX Generative Engineering. nTop (complex lattice and gyroid geometries for aerospace and medical).
    agentic AI for mechanical design  x  autonomous engineering AI
    05Workflow Orchestration Agents: Connecting the Full Pipeline
    What it does: Coordinate multiple specialist agents across the complete design-to-manufacturing workflow. Read requirements, trigger CAD generation, run simulation, check results, iterate the design, produce documentation. One goal triggers a coordinated multi-agent sequence across all engineering tools.
    Real tools: Synera (orchestrates across 76+ CAx and PLM tools. Deployed at NASA, automotive OEMs, Fortune 500 manufacturers. RFQ responses completed autonomously overnight).
    multi-agent engineering workflow  x  Synera AI engineering  x  AI agent RFQ automation
    AI agents in mechanical engineering five types CAD copilot design review simulation setup generative orchestration 2026

    What a Real Multi-Agent Workflow Looks Like: Synera at NASA

    Abstract descriptions of AI agents in mechanical engineering are useful up to a point. The Synera NASA deployment makes the capability concrete.

    Real Deployment: Synera AI Agents at NASA
    NASA deployed multiple Synera AI engineering agents to transform engineering requirements into validated part designs. A supervisor agent interprets goals and requirements. Specialist agents handle optical design, mechanical layout, structural validation, harnessing, and reporting. These agents coordinate like a virtual engineering team.
    Result:
    Hundreds of design iterations completed in an hour, meeting strict performance and safety requirements.
    The same platform handles commercial AI agent RFQ automation: when an urgent request arrives, Synera agents simulate performance, verify requirements, calculate cost, and compile a qualified response before the engineering team meets on Monday. A proposal workflow that previously took days runs autonomously overnight.

    Autonomous engineering AI at this level is not coming in 2030. It is working today at automotive OEMs, tier one suppliers, and aerospace manufacturers. The question is not whether this capability exists. It is whether your team is adopting it.

    What AI Agents Mean for Mechanical Engineers Day to Day

    The natural question is whether AI agents in mechanical engineering replace engineers. Every credible source, including CoLab, SimScale, McKinsey, and Gartner, gives the same answer: no.

    Agentic AI engineering automates high-volume, consistency-dependent, data-intensive work. Engineers focus on creative, judgmental, and safety-critical decisions. The ratio of interesting work to tedious work shifts dramatically in the engineer’s favour.

    Where Engineers Spend Less Time With Agents

    • Design reviews: The AI agent design review runs the full drawing and CAD check in minutes and delivers a structured markup report. The engineer reviews findings and decides on exceptions. From 2-3 hours to 15-20 minutes.
    • FEA setup: AI agents for FEA automation interpret geometry and configure simulation studies. The engineer validates the setup and interprets results.
    • CAD operations: MecAgent CAD copilot automates sequences that previously took dozens of clicks. Exporting 50 DXFs in 2 minutes instead of 2 hours, per verified user reports.
    • Documentation: Agents generate specifications, reports, and change notices from structured data. Engineers verify accuracy and approve.

    Where Engineers Remain Irreplaceable

    Engineering judgment on safety-critical design decisions. Customer and supplier relationships. Creative problem framing. Cross-discipline trade-off reasoning. Strategic product direction. These remain human responsibilities in every realistic agentic AI engineering deployment in 2026.

    AI agents mechanical engineering workflow before and after manual versus agentic automated design pipeline 2026

    Engineering AI Agent Tools 2026: Reference Table

    A concise reference for the most significant engineering AI agent tools 2026 available today:

    Agent / ToolStageAgent CapabilityBest Fit
    MecAgent CAD copilotCAD modellingIn-software task automation, standards compliance, sequencesSolidWorks, Inventor, Creo, Fusion 360
    CoLab AutoReview agentDesign reviewAI agent design review: DFM, drawing checks, checklistsHigh-volume drawing review teams
    bananaz AI mechanicalReview + changeModel comparison, 90% faster reviews, change trackingHardware product development
    SimScale agentic AI 2026FEA and CFDAI agent simulation setup: guided config, auto-meshTeams without CAE specialists
    Ansys Discovery AIReal-time FEALive structural feedback as geometry changesDesign engineers needing instant analysis
    Synera AI engineeringFull pipelinemulti-agent engineering workflow: req to outputEnterprise OEMs, aerospace, automotive

    How Engineering Teams Should Start With AI Agents

    The 3% of engineering teams achieving transformational AI impact share one characteristic: they deploy one agent against one bottleneck and measure the result before expanding.

    1. Identify the bottleneck. Where does work pile up most consistently? Design reviews, FEA setup, drawing exports, and BOM management are the most common answers for mechanical engineering teams.
    2. Choose workflow-specific agents. A CAD AI agent that reads native CAD geometry outperforms a general LLM prompted to help with CAD. Engineering agents built for engineering data produce engineering-grade outputs.
    3. Build the context layer first. Agents without your standards, materials, and checklist library produce generic outputs. AI agents in mechanical engineering work best when they have rich organisational engineering context loaded before they start.
    4. Define human checkpoints deliberately. Every autonomous engineering AI deployment needs explicit engineer review points. The agent executes. The engineer reviews flags and decides on exceptions.
    5. Measure before and after. Time the workflow before deployment. Time it after. The data builds internal buy-in and justifies expanding to the next workflow stage.

    Pro Tips for Engineering Teams Deploying AI Agents

    • Start with review agents. Design review and drawing check agents have the clearest ROI, the most mature tooling, and the lowest safety risk. They are the best entry point into AI agents engineering for most teams.
    • Integrate into existing tools. Agents that plug into your current CAD, PDM, and PLM systems get adopted. Agents requiring workflow changes get resisted. MecAgent CAD copilot and CoLab AutoReview agent both operate inside existing environments.
    • Capture organisational knowledge now. Your design standards, lessons learned, and supplier constraints are the training fuel for autonomous CAD review and simulation agents. Start structuring this knowledge before deployment.
    • Fix the workflow first. SimScale’s research found that the execution gap exists because teams bolt AI onto outdated workflows. Agents work best on clean, documented, consistent processes.
    • Plan for machine users in your software licensing. Gartner recommends negotiating pricing terms for machine users ahead of vendors standardising terms. agentic AI engineering creates a new software user category your existing licences may not cover.

    Where AI Agents in Engineering Are Going

    The AI agents in mechanical engineering landscape is accelerating fast. Here is the near-term trajectory based on tools and research already in development.

    Physics AI: Simulation Built Into the Design Environment

    Physics AI engineering tools embed physical reasoning directly into design tools. Autodesk’s 2025 foundation models reason about forces, materials, and motion as geometry changes. CMU’s TAG U-NET predicts stress fields in seconds. These become the prediction engines that make AI agents for FEA automation deliver near-real-time structural feedback during modelling, not just after it.

    Multi-Agent Pipelines Becoming Standard Practice

    The multi-agent engineering workflow that Synera pioneered at NASA and Fortune 500 manufacturers is becoming the template for full product development pipelines. Requirements agent, CAD generation agent, simulation agent, DFM review agent, documentation agent. A supervisor coordinates the sequence. This architecture is in production now. The question is when your team joins it.

    Context Engineering and Agent Capability Converging

    Context engineering (Blog 11) and agentic AI for mechanical design are two sides of the same system. Agents need structured engineering context to perform reliably and consistently. Teams that have built strong context systems will find agent deployment far more effective. Both skills are worth developing simultaneously.

    Conclusion:

    AI agents in mechanical engineering are in production today. CoLab AutoReview checks CAD drawings autonomously. MecAgent runs task sequences inside SolidWorks. Synera orchestrates full RFQ workflows overnight. bananaz delivers 90% faster design reviews.

    The gap between 3% with transformational results and 97% using AI as a chatbot is not a technology gap. It is a deployment gap. Workflow-specific agents, a rich context layer, and clear human checkpoints are what make the difference.

    That is the path from AI agents engineering as a concept to agentic AI engineering as a daily reality. One bottleneck. One agent. Measure the result. Build from there.

    Start Your AI Agent Journey in Engineering
    At Simutecra Engineering Services, we help engineering teams move from passive AI chat tools to active AI agent workflows. We design the agent architecture, build the context systems, and implement the pipelines that deliver real productivity gains.95% of engineering leaders say AI is essential. We help you be in the 3% that actually sees the results.
    Reach out to us today, Simutecra

    Frequently Asked Questions

    What is an AI agent in mechanical engineering?

    AI agents in mechanical engineering are systems that use an LLM as a reasoning engine, have access to engineering data (CAD, drawings, standards), and execute complete multi-step workflows autonomously. Unlike chatbots that respond to one prompt, agents plan, act, check results, and iterate without repeated prompting.

    How are AI agents different from chatbots for engineers?

    A chatbot responds to one prompt and waits. An AI agent CAD workflow tool executes a full workflow: reads your geometry, applies your standards, checks the drawing, flags issues, and delivers a report. No repeated prompting needed. The engineer reviews findings and makes decisions.

    What do AI agents actually do in CAD and engineering workflows?

    Agentic AI engineering tools automate design review checks, drawing validation, DFM analysis, simulation setup, bulk CAD operations, and documentation generation. CoLab AutoReview checks drawings autonomously. MecAgent automates CAD task sequences. SimScale AI configures simulations from geometry.

    Can AI agents replace FEA engineers?

    No. AI agents for FEA automation handle setup, meshing, and boundary conditions. Engineers validate the setup, interpret results, and own safety-critical decisions. Agents remove the expertise barrier to running simulations. They do not remove the need for engineering judgment.

    What is a multi-agent engineering workflow?

    A multi-agent engineering workflow coordinates specialist agents across a full pipeline: one for requirements, one for CAD, one for simulation, one for review, one for documentation. Synera AI engineering orchestrates this across 76+ CAx and PLM tools and has been deployed at NASA and major automotive OEMs.

    Which AI agent tools are best for mechanical engineers in 2026?

    The best engineering AI agent tools 2026 by use case: MecAgent CAD copilot for in-software automation. CoLab AutoReview agent for design review. SimScale agentic AI 2026 for FEA and CFD setup. bananaz AI mechanical for model comparison and change tracking. Synera AI engineering for enterprise multi-agent pipelines.

    How should an engineering team start deploying AI agents?

    Start with one high-volume, consistent workflow. Design review is the safest entry point. Choose a CAD AI agent that integrates with your existing tools. Build the context layer first (standards, checklists, materials). Define human review checkpoints. Measure before and after. Expand from the result.


    For production-grade research on AI agents in mechanical engineering including real workflow examples and how to evaluate agent maturity:

    AI Agents for Engineering Design: Real Examples, Capabilities, and How to Evaluate Them, CoLab Software (January 2026)  (Authoritative engineering-specific AI agent research, January 2026)

  • AI Workflow in Mechanical Engineering: From Design to Simulation

    AI Workflow in Mechanical Engineering: From Design to Simulation

    Introduction: Why the Old Engineering Workflow Is No Longer Enough

    For decades, the mechanical engineering workflow looked the same: sketch an idea, build a CAD model, hand it to a simulation specialist, wait days for results, fix errors, and repeat. It worked, but it was slow, expensive, and often caught mistakes far too late.

    In 2026, something fundamental has changed. AI workflow in mechanical engineering is replacing that slow, linear process with something faster, smarter, and more connected, from the first concept sketch all the way through simulation and validation.

    Engineers at companies like BMW, Hyundai, and Airbus are already using AI-driven design simulation to cut prototype cycles by 40–60%. Teams that once needed specialist CAE analysts to run FEA studies are now letting AI FEA automation handle the setup, meshing, and post-processing, while their engineers focus on the decisions that actually matter.

    Whether you’re a mechanical engineer, a product designer, or a team lead looking to modernise your processes, this guide will show you exactly how AI workflow in mechanical engineering works, from the first design stage to final simulation validation, and which tools and techniques will deliver real results.

    Quick Answer, What Is AI Workflow in Mechanical Engineering?
    AI workflow in mechanical engineering refers to the use of artificial intelligence tools, including generative design AI, AI FEA automation, and AI-driven design simulation, to automate, accelerate, and optimise each stage of the engineering process, from concept design through CAD modelling, structural analysis, CFD, and digital validation. It replaces slow, manual sequences with AI-assisted design and simulation workflow pipelines that give engineers faster feedback, fewer errors, and more design options.
    40-60%Reduction in design cycle time reported by companies using generative design AI and AI-driven simulation (Autodesk, PTC 20251)
    $17.97BGlobal simulation software market size in 2025, growing at 12.1% CAGR, AI is the primary driver (CAE Assistant, 2025)
    10–100×Speed increase for 3D physics performance predictions using Ansys SimAI vs traditional FEA solvers

    What Does an AI Workflow in Mechanical Engineering Actually Look Like?

    Before diving into the tools and techniques, it helps to understand how an AI workflow in mechanical engineering is structured, and how it differs from a traditional process.

    In a traditional workflow, each stage is isolated: a designer creates the CAD model, passes it to a simulation analyst, who sets up the study, runs it overnight, and reports back. Then the designer revises, and the cycle repeats. It’s slow, siloed, and often means simulations only happen at the end, when changes are most expensive.

    An AI CAD workflow 2025 breaks down those silos. AI mechanical design tools provide real-time feedback during modelling. AI-driven design simulation runs alongside the design, not after it. AI engineering tools automate the repetitive parts, meshing, post-processing, documentation, so engineers spend their time on judgement and innovation.

    The 5 Stages of an AI-Powered Engineering Workflow

    • Stage 1 Conceptual Design: AI generates and evaluates multiple design concepts based on requirements. Generative design AI tools like Autodesk Fusion propose geometry optimised for weight, strength, and manufacturability.
    • Stage 2 CAD Modelling: AI mechanical design assistants (including Claude AI for engineering) accelerate modelling, write scripts, generate parameters, and check design logic in real time.
    • Stage 3 Simulation Setup: AI FEA automation handles meshing, boundary conditions, material assignment, and solver configuration, tasks that once took specialist hours.
    • Stage 4 Analysis & Optimisation: AI-powered CAE tools run parametric studies, predict failure modes, and recommend design changes, with surrogate model engineering delivering results in seconds.
    • Stage 5 Validation & Documentation: Digital twin AI enables real-time comparison between simulation and physical test data. AI generates technical reports and documentation automatically.

    Stage 1–2: AI in the Design Phase, From Concept to CAD

    The design phase is where AI workflow in mechanical engineering delivers its most immediate, visible impact. Let’s walk through what’s possible today.

    Generative Design AI, More Options, Less Manual Work

    Generative design AI doesn’t just help you draw a part, it proposes the part. You define the constraints: applied loads, fixed mounting points, material choices, and weight targets. The AI generates dozens of optimised geometry variations, each meeting your requirements in a different way.

    Tools like Autodesk Fusion generative design and PTC Creo AI have made this mainstream. Engineers report 40–60% reductions in design cycle time and lighter, stronger components that human designers rarely arrive at intuitively.

    This is AI design optimisation working at its most powerful, the AI explores a design space that would take months to map manually, and does it in hours.

    AI-Assisted CAD Modelling, Smarter, Faster, Error-Free

    Beyond generative design, AI-assisted design and simulation workflow tools are changing how individual engineers model parts day to day. Claude AI for engineering, used alongside CAD platforms, can write AutoLISP scripts, generate parametric feature lists, check design logic, and produce technical documentation in minutes.

    SolidWorks AURA, Onshape AI Advisor, and MecAgent all operate directly inside CAD environments, offering real-time suggestions, automating constraints, and flagging potential issues before they become simulation failures. This is AI CAD workflow 2025 in daily practice, not a future concept, but a working reality.

    Example AI Prompt for Engineering Design Brief (Use with Claude):
    “You are a senior mechanical engineer. I am designing an aluminium bracket that must support 2kN downward load with a 3× safety factor, mounted to a steel frame with 4 × M8 bolts. Wall thickness must be 4–6mm. Suggest key design features, critical dimensions, and potential failure modes I should simulate. Format as a structured engineering brief.”

    Result: Claude returns a complete design brief with dimensions, failure mode analysis, and simulation priority list, ready to use as your CAD and FEA starting point.

    How to Use AI for Mechanical Engineering Simulation | Stage 3 to 4

    Simulation has historically been the biggest bottleneck in product development. Complex AI tools for FEA and CFD studies can take hours or days to set up and run. AI simulation changes this dramatically.

    AI FEA Automation, End the Setup Bottleneck

    AI FEA automation tackles the two biggest problems in structural analysis: setup time and solve time. On the setup side, AI tools handle meshing, contact definitions, boundary conditions, and material assignment automatically, tasks that once required a specialist engineer and several hours. On the solve side, surrogate model engineering, where a machine learning model is trained on previous simulation data, delivers near-instant predictions instead of waiting for the full solver to run.

    Carnegie Mellon University’s TAG U-NET (2025) demonstrated that AI can predict stress and deformation fields directly from CAD geometry, replacing costly FEA iterations in early design stages with real-time feedback. This is AI simulation engineering 2025 at the research frontier, and it’s reaching commercial tools rapidly.

    AI CFD Optimisation, Faster Fluid Dynamics

    Computational Fluid Dynamics (CFD) has always been the most computationally expensive simulation type, fine meshes, long solve times, massive compute bills. AI-powered CAE tools like SimScale and Ansys SimAI are changing that equation by using machine learning to predict flow behaviour based on geometry patterns learned from thousands of previous simulations.

    The result: AI tools for FEA and CFD can now run parametric CFD sweeps, varying inlet velocity, geometry, or boundary conditions, in a fraction of the traditional time. Convion’s team at HD Hyundai used this approach to solve a complex hydrogen ejector pump optimisation problem that would have taken months with traditional CFD, completing it in weeks.

    Surrogate Models and Physics-Informed Neural Networks

    The cutting edge of AI-driven design simulation involves physics-informed neural networks (PINNs) and surrogate models. A surrogate model engineering approach trains a lightweight AI on high-fidelity simulation data, then uses that trained model to predict results for new design variants in milliseconds, without running the full solver.

    Platforms like Ansys SimAI, Altair HyperWorks AI, and Siemens NX are all integrating this capability. The practical result: engineers can explore 50–100 design variants per session instead of 3–5. That’s the AI design optimisation multiplier effect.

    Digital Twin AI: Closing the Loop Between Virtual and Physical

    Digital twin AI takes simulation one step further. A digital twin is a live, continuously updated simulation model of a physical product or system. AI processes real-world sensor data from the physical asset and updates the simulation model in real time, enabling predictive maintenance, performance monitoring, and design validation against actual operating conditions.

    For mechanical engineering teams, digital twin AI means your simulation doesn’t end when the product ships. It becomes an ongoing engineering resource that gets smarter with every operating hour, a critical capability in industries like aerospace, energy, and industrial machinery.

    AI workflow in mechanical engineering 5-stage design to simulation pipeline 2026 by simutecra

    Best AI Tools for Mechanical Engineers 2026 Complete Comparison

    Here is a clear breakdown of the best AI tools for mechanical engineers 2026 across the full workflow, from design to simulation.

    AI ToolWorkflow StageKey AI CapabilityBest For
    Autodesk Fusion generative designDesignGenerative design, topology optimisation, cloud CAMFull product development teams
    PTC Creo AIDesign + SimAI generative design, real-time simulation, thermal physicsComplex mechanical systems
    Claude AI for engineeringDesign + DocsPrompt engineering, scripts, design briefs, FEA setup notesAll engineers, any CAD platform
    Ansys SimAISimulationAI-powered CAE, 3D physics predictions 10–100× fasterFEA/CFD speed optimisation
    SimScale AISimulationCloud-native AI CFD and FEA, guided simulation setupTeams without specialist CAE
    Altair HyperWorksSimulationAI surrogate models, topology optimisation AI, auto-meshingOptimisation-heavy workflows
    Siemens NX / TeamcenterPLM + SimDigital twin AI, AI knowledge management, PLM automationLarge engineering organisations
    SOLIDWORKS AURACADContextual AI suggestions, automated constraints, feature recognitionSolidWorks daily users

    Step-by-Step: Building Your AI-Assisted Design and Simulation Workflow

    Here is a practical framework for implementing AI workflow in mechanical engineering, whether you’re starting from scratch or upgrading an existing process. This is the AI-assisted design and simulation workflow used by leading engineering teams today.

    1. Define your design requirements clearly. Write a structured requirements document. Use Claude AI for engineering to help: describe your part’s function, loads, materials, manufacturing method, and applicable standards. A clear requirements document is the foundation of any successful AI-driven design simulation workflow.
    2. Generate design concepts with AI. Feed your requirements into a generative design AI tool. Let Autodesk Fusion generative design or PTC Creo AI propose geometry options. Review 5–10 variants against your requirements before committing to one direction.
    3. Build and refine your CAD model. Use your chosen CAD platform with AI assistance. Write scripts, check parameters, and generate documentation with Claude AI for engineering. This is your AI CAD workflow 2025 in action.
    4. Set up simulation with AI automation. Import your model into SimScale AI or Ansys. Let AI FEA automation handle meshing, contact definitions, and boundary conditions. Validate the setup with a quick sanity check before running. Explore more on this: Prompt Engineering in Mechanical Engineering
    5. Run parametric studies, not single runs. Use AI tools for FEA and CFD to run sweeps of key parameters, wall thickness, fillet radius, load magnitude, in parallel. Surrogate model engineering makes this practical even on modest hardware.
    6. Interpret results with AI assistance. Ask Claude AI for engineering to help interpret your simulation output. Describe the results and ask: ‘What does this stress concentration indicate? What design changes should I prioritise?’ This turns AI simulation results into actionable engineering decisions.
    7. Connect to your digital twin. For products that will be monitored in service, connect your validated simulation model to your digital twin AI platform. This closes the loop between virtual AI-driven design simulation and real-world performance.
    AI-assisted design and simulation workflow vs traditional mechanical engineering process comparison by Simutecra

    Common Mistakes Teams Make When Adopting AI Engineering Workflows

    Adopting AI engineering tools isn’t just a technology decision, it’s a process change. These are the mistakes that slow teams down, and how to avoid them.

    Mistake 1: Starting Too Big
    Trying to overhaul the entire AI workflow in mechanical engineering overnight creates chaos. Start with one bottleneck, like AI FEA automation for a single part family, prove the value, then expand.
    Mistake 2: Poor Data Quality Going In
    Surrogate model engineering and AI simulation tools are only as good as the data they’re trained on. Messy, inconsistent, or incomplete simulation data produces unreliable AI predictions. Clean your data first.
    Mistake 3: Treating AI as a Replacement, Not an Augmentation
    AI doesn’t replace engineering judgement, it amplifies it. AI-powered CAE tools accelerate simulation but still require an engineer to validate results, interpret failure modes, and make design decisions. Engineers who expect AI to ‘just solve it’ are consistently disappointed.
    Mistake 4: Skipping Prompt Engineering for AI Tools
    Whether you’re using Claude AI for engineering or writing prompts for a generative design AI tool, vague inputs give vague outputs. Learning to write precise, structured prompts is the single biggest lever on the quality of your AI-assisted design and simulation workflow output.
    Mistake 5: Ignoring the Digital Twin Layer
    Teams that stop at simulation miss the compounding value of digital twin AI. Connecting your validated models to real-world operational data turns a one-off project into a continuously improving engineering asset.

    Pro Tips: Getting Expert Results from AI Engineering Workflows

    Expert Tips for AI Workflow in Mechanical Engineering

    • Build a simulation-first culture: Use AI FEA automation to make simulation fast enough that it happens at every design stage, not just at the end. This is the hallmark of teams with mature AI workflow in mechanical engineering practices.
    • Layer Claude with specialist tools: Claude AI for engineering is your briefing, documentation, and prompt refinement layer. Specialist tools like Ansys or SimScale handle the physics. Using both together creates a complete AI-assisted design and simulation workflow.
    • Use surrogate models for DOE: Design of Experiments (DOE) with surrogate model engineering is 10–100× faster than running full simulations at every point. Build the surrogate, sweep the parameter space, then validate only the top candidates with high-fidelity AI simulation.
    • Mandate prompt engineering training: Every engineer using AI engineering tools should understand how to write effective prompts. Even a half-day training session on structured prompt writing for AI-driven design simulation delivers immediate, measurable productivity gains.
    • Set AI simulation guardrails: Establish validation checklists for AI-powered CAE outputs. Even when AI FEA automation handles the setup, a 5-point engineer review checklist catches the errors AI tools miss, material assignments, unit inconsistencies, boundary condition oversights.
    • Track your AI ROI: Measure the time saved per simulation cycle before and after introducing AI tools for FEA and CFD. Concrete data builds internal buy-in and justifies investment in more capable platforms.
    AI workflow mechanical engineering before and after KPI comparison FEA simulation time savings 2026

    Conclusion: The Engineers Who Adopt This Now Will Lead Their Industries

    AI workflow in mechanical engineering is not coming, it’s here. The engineers and teams who are building AI-assisted design and simulation workflow practices today are already seeing 40–60% faster design cycles, more design options explored, fewer late-stage surprises, and better-performing products.

    The full stack, generative design AI for concept, AI CAD workflow 2025 for modelling, AI FEA automation and AI tools for FEA and CFD for analysis, and digital twin AI for validation, is available, proven, and accessible right now.

    The only question is where you start. Our recommendation: pick one bottleneck in your current workflow, introduce one AI engineering tools solution, measure the result, and build from there. The teams who start small and iterate fast are the ones who build the most effective AI-driven design simulation pipelines.

    Frequently Asked Questions

    Q1. What is AI workflow in mechanical engineering?

    AI workflow in mechanical engineering refers to using artificial intelligence tools throughout the entire engineering process, from generative design AI in the concept phase, through AI FEA automation and AI tools for FEA and CFD in simulation, to digital twin AI for post-deployment validation. It replaces slow, manual, siloed processes with connected, intelligent pipelines that give engineers faster feedback, more design options, and fewer late-stage errors. In 2025, this is the defining capability separating high-performing engineering teams from the rest.

    Q2. How does AI automation improve FEA simulations?

    AI FEA automation improves structural simulations in two key ways. First, it automates the most time-consuming setup tasks: meshing, boundary condition application, contact surface definition, and material assignment, reducing specialist setup time from hours to minutes. Second, surrogate model engineering trains a machine learning model on existing simulation data to deliver near-instant predictions for new design variants, cutting solve time from hours to seconds. Tools like Ansys SimAI can predict 3D physics performance 10–100× faster than traditional solvers.

    Q3. What are the best AI tools for mechanical engineers in 2025?

    The best AI tools for mechanical engineers 2025 cover every workflow stage. For design: Autodesk Fusion generative design and PTC Creo AI. For simulation: Ansys SimAI and SimScale AI for AI tools for FEA and CFD. For documentation, scripting, and AI engineering briefs: Claude AI for engineering. For optimisation loops: Altair HyperWorks with topology optimisation AI. The right combination depends on your workflow bottleneck.

    Q4. What is a surrogate model in engineering simulation?

    A surrogate model engineering approach involves training a lightweight machine learning model on high-fidelity simulation data (FEA or CFD results). Once trained, the surrogate can predict simulation outcomes for new design variants in milliseconds, rather than requiring the full physics solver to run. This makes it practical to explore 50–100 design variants per session. Physics-informed neural networks (PINNs) take this further by embedding physical laws directly into the model for higher accuracy across a wider parameter range.

    Q5. How is a digital twin different from a simulation model?

    A traditional simulation model is a static, one-time analysis. A digital twin AI is a live, continuously updated simulation that receives real-time data from the physical asset and updates its predictions accordingly. While simulation gives you a validated design, digital twin AI gives you ongoing operational insight, enabling predictive maintenance, performance monitoring, and in-service design improvements. It’s the final stage of a mature AI workflow in mechanical engineering pipeline.

    Q6. Can AI replace FEA engineers?

    No, and this is important. AI FEA automation handles the repetitive, time-consuming parts of simulation setup and processing. But engineering judgement, interpreting results, identifying failure modes, making design trade-offs, and validating AI outputs, still requires an experienced engineer. The correct framing is that AI engineering tools amplify what engineers can do, not replace them. Teams using AI-powered CAE tools are producing better work faster, with the same or smaller headcount.

    Q7. How do I start implementing an AI workflow in my engineering team?

    Start small and focused. Identify your single biggest workflow bottleneck, likely either FEA setup time or design iteration speed, and introduce one AI-assisted design and simulation workflow tool to address it. Measure before and after. Use Claude AI for engineering to accelerate documentation and prompt refinement from day one (it’s free to start). Once you’ve proven ROI on one stage, expand to the next. Full AI workflow in mechanical engineering adoption happens stage by stage, not all at once.

    1. Autodesk ↩︎
    This article cites verified 2025–2026 industry data from Ansys, SimScale, PTC, Autodesk, and peer-reviewed sources. All tool claims are sourced from official product pages and independent engineering publications. It is written for , and reviewed by, practising mechanical engineers.